Wow I'm behind! I meant to post this as soon as I got back, but it's over a week later and I've been too busy to do anything! XD
So once again, I have no pictures of the beginning of this project! D: Although in this case, it's because this is not my work! This is about 0.3% my work! Hahaha! No, I was involved in the sewing of the outfit, but for the head, I was merely a helping hand for tools that were out of reach and a second opinion! And I would take pictures. So here they are!
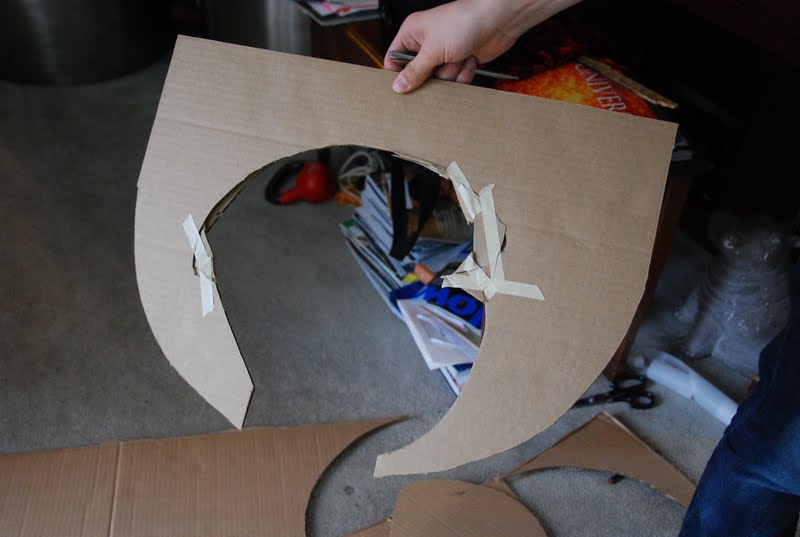
Like me, she started with a bike helmet, only she built the base frame out of cardboard. She figured out the curve she wanted for the bowl, and cut 2 pieces of cardboard in this shape. Then she measured the shape of the helmet and cut that out of the pieces. And cut a slit into each so they would interlock to make a cross shape. And she also cut a circle to make the flat top.
The fallout, the wire measuring the shape of the helmet and the failed piece.
She then glued the whole base frame to the helmet. She added a shelf and made braces to make it more stable, and also to support the layer of foam. (Which is added later)

Then she added in ribs along the bottom, and connected them together with a wire.
She extended the bowl to be taller.
She cut out large rectangles of foam and put slits up the bottom so it would curve easily.
Cutting out the excess and gluing the bottom in place.
Looking good~! :D Just a bit of a squeeze getting her head in and out, and not with her glasses on. Next I (yeah, something I actually did!) drew an estimate guideline of the size and placement of the face.
So smooth over the joins, she covered the entire thing with cotton batting. then measured and cut the hole for the eyehole.
She constructed the rectangle for the face, using bias tape on the edge to save herself some trouble. She had to find a fabric that she could see out of.
She spraypainted the inside of the bowl, and cut chunks of upholstery foam to be the tofu. Gessoed and then painted white.
We got the antenna parts of of a friend in the katamari group who had bought a whole bunch so the antennas on all the characters would be identical. So many people dropped out of the group that we were able to obtain some extra parts, for my costume later.
She filled the cardboard bowl she made with more foam, as we realized that that much resin would be too expensive! DX Painted brown to save her the trouble of tinting it.
Mum was enlisted to help her make the cover, as I was busy working on my beak (and crying....). They made a ring and then sewed a rectangle to it.

A fair amount of photos missing here, but mum tacked the excess together and basted the seams together so it would be easier to machine stitch when she took it off than if she pinned it.
Pouring the resin on the front lawn. It smelt dreadful! DX
The white was put there so the see-through-ish face wouldn't look pink! XD
Finally cutting the hole in the cover and securing it inside with hot glue. Newspaper was used to protect the face. It looks like they are performing dental surgery.
OM NOM NOM. Delicious.
Face was hand stitched into place.
We waited for the resin to cure properly with our fingers crossed... and presto! Fini! :D


 Then she added in ribs along the bottom, and connected them together with a wire.


 A fair amount of photos missing here, but mum tacked the excess together and basted the seams together so it would be easier to machine stitch when she took it off than if she pinned it.


I look so comfy with the bowl on my lap! ha ha! Pretty involved project!
ReplyDeleteYeah, but not really involving me! XD I really only helped take pictures of this one. I was debating whether or not I should post the head at all seeing how it's not my work...
ReplyDeleteHello, first of all, sorry if my english isn't perfect.
ReplyDeleteI'm from France, and with friends we wanted to do a Katamari cosplay group, and i wanted to make Miso. Well, all I can say is thanks a lot, because without your website I couldn't do it. The least I can do is show you a few pictures. :)
http://www.noelshack.com/2013-21-1369285235-980355-545578035480317-1175837209-o.jpg
http://www.noelshack.com/2013-21-1369285244-966349-10151631858472220-536050105-o.jpg
We also won first prize, thanks to our crazy Cosmos King !
Well, I wish you the best and thank you again, keep on rollin' !
It looks fantastic, you did an amazing job! I can see that you all must have put a lot of hard work into your costumes, so congratulations on your win! :)
ReplyDeleteI am glad my tutorial helped! :D It is always exciting for me to know that my website can help people around the world with their own costumes, and it is really nice to see finished pictures too. This makes me really happy, and definitely made my day.
Keep on rolling! ;D
Wonderful work! I noticed it's very hard to find any sort of tutorials to make Miso cosplay but thanks to you there's all I need to know and adapt to my own costume. I used soft and thin travelling matress/tenting matress for the head, it's very light but I needed to figure out the insides how the heck it's was going to stay on my head and so on. This have given me good ideas how to do it :)
ReplyDeleteI'm glad I was able to help! :) Rigging costumes to stay on properly can be tricky, even if the construction of the item itself is straightforward. Miso is a cousin that people don't cosplay as often because the head is more difficult to make than the tube-shaped ones, which is a shame because it is such a fun character!
DeleteGood luck on the costume!