To preface this: some of my fellow Canadian cosplayers were recently discussing fame in cosplay/what it means to cosplay. I thought I would take a moment to do something a little different than my usual content and write an article on my thoughts on this.
In recent years, I have noticed a huge generational gap in the mindset of cosplayers--people like myself: who have been cosplaying for 10+ years, versus the younger generation who only started cosplaying in the last 5 years.
Those who started out 10+ years ago remember a time before the hobby was considered "mainstream" or "cool". A time before wigs of any colour were available for purchase. When Facebook fan pages hadn't been invented yet. In a time where you had to use your ingenuity to make cardboard and thrift store clothes into a costume, using hot glue, duct tape and spit to hold it together. (Although some of us still do that!) The idea that anyone could turn this crazy hobby into a job was laughable.
In contrast, the new cosplayers see the "idols" who have rocketed to internet fame, and they think that's the essence of what it means to be a cosplayer. The idea is that being a cosplayer = being popular online. So many young cosplayers become discouraged from the hobby because of a lack of facebook fans, or because they are not one of the "pretty cosplayers"/"sexy cosplayers". It saddens me, because they are great cosplayers, but their confidence is shattered because they hang their hopes on being a shining star. Only to realize that there are a bajillion stars in outer space and it's impossible to outshine them all.
My generation didn't have this pressure to "succeed".
Really, the notion of becoming a "Professional Cosplayer" is absurd. The reality is that there are tens of thousands of people who cosplay and only a handful of people who could possibly make a living off of it. And even those who one would consider to be a "Pro" most often have day jobs so that they can support themselves. Being a cosplayer will typically not earn you a living wage. For 99.9% of cosplayers this is a hobby. A very extravagant and expensive hobby, but a hobby nonetheless.
Let me take a moment to say to those lucky few who have made this into a working lifestyle, by no means do I think they are untalented people/undeserving of fame--quite the opposite! The handful of pros have a combination of some really great costumes and extraordinary good luck.
Obviously we cosplayers wear our costumes to events to share our creations with other like-minded individuals; people who appreciate the character, series or even simply the craftsmanship of the costume itself. This is why I enjoy the Masquerade events so much. Because it is a showcase of the effort and hard work that people put into their costumes, celebrating their fandoms and throwing together a great show to boot. But even more than the show itself, I love to be backstage, so I can ask my fellow cosplayers the secret to how they made their own wicked costumes!
That is why I continue to write my process blog, describing in detail how I make things--I want to share the things I learned making each costume with those who care to read--whether there are 5 people or 200 who are interested. The reason I made a facebook page was not so that I could count my fans, but so I could post more process pics of my cosplay projects without feeling guilty for spamming all my friends who would rather not have a billion pictures of mine clogging up their newsfeed.
For me cosplay holds a very dear place in my heart. In the past, I was very shy and socially awkward, with lots of self-confidence issues. Dressing up as someone else for the day--a character that I idolized or admired--made a huge difference for teenage me. It was a chance to be someone else. Because in real life (elementary school/high school) I was not popular or cool. I have never considered myself one of the "pretty"/"sexy" cosplayers. Heck, I didn't even start wearing makeup until I was 17! (Nobody got time for that!)
My original reason to cosplay was to celebrate the fandoms/characters I loved. It was a fun thing I did with my sister. We would go to cons and show off our costumes. Having your picture taken was flattering! People who loved and recognized the character you were wanted your picture, because they were excited about the character/series as you were! (I remember bringing my very first digital camera with me to cons!) The Toronto cosplay community was so supportive and I loved the atmosphere of conventions. It was great to hang out with people who liked the same things I did. My experience with cosplay and conventions as a teen was very positive, and ultimately helped to boost my confidence as a person.
Time went on and I became less interested in anime, though still an active gamer and lover of the sci-fi and fantasy genres. I no longer cosplay from the current mainstream anime series. Instead of cosplaying because I love anime, I cosplay because I developed a love for the craft itself. Now I cosplay because I enjoy the exciting process of building and creating costumes with my own hands. I love bringing the characters to life and relish the challenge of making something complex. This is why I decided to pursue costuming for theatre/film as a career, because I realized that is what I love to do more than anything.
I wish sometimes that I could convey this passion to the younger generation. That cosplay is not about becoming famous, it is about your showing your passion for something that you love. You should always love what you do! Cosplay is meant to be fun. If you are not getting enjoyment out of cosplay then what is your reason to cosplay?
I hardly think we should discourage the younger generation from cosplaying--quite the opposite!--but I think we all need a reminder on what cosplaying should be about: A celebration of fandom! Whether you buy or build your costumes, no matter your skin colour, race or religion, no matter your size, if you love the fandom, or simply love the design; your reason to cosplay should ultimately be because you enjoy it!
Ultimately, no one can tell you what your reason is to cosplay. Your reason to cosplay may evolve over time like mine did! There is no single "correct" reason to cosplay--simply, if your only reason to cosplay is to be famous, you may end up disappointed.

Thursday, January 28, 2016
Tuesday, January 26, 2016
Vaporeon Gijinka - Wrap Skirt "Tail" - Pokémon


Thanks to Elemental Photography for the great photoshoot! Credit for the original costume design goes to Cowslip!
One thing I loved about this design was the way that the tail was incorporated into this wrap skirt.
The "tail" was made from the same blue silk as the bolero jacket. It has a really nice shine to it--without being overly shiny. The fabric itself actually has a salmon-y pinkish colour woven in, which you can see in the shine. It helps to break up a bit of the blue overload.

The tail itself ended up being over 5ft long. It was a bit cumbersome, so I pinned it up to walk about the con.
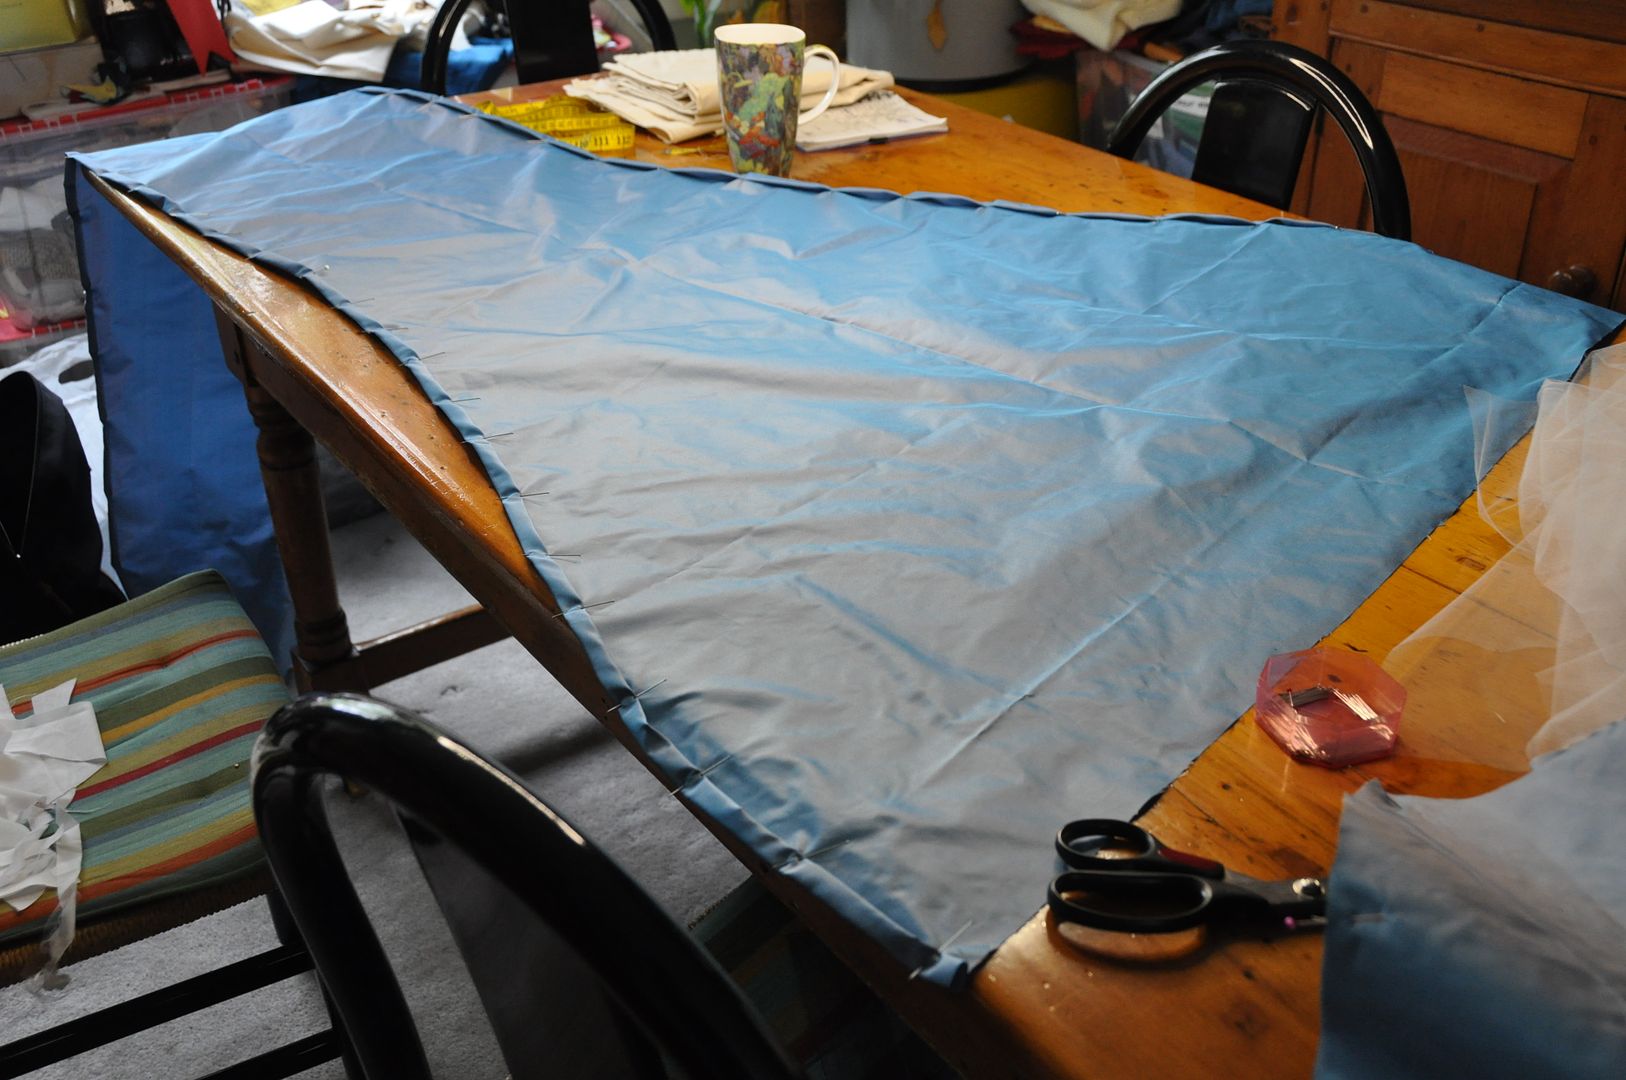
The next step was to finish off the edges. I neatly rolled them over and top stitched it. I wanted to make sure it looked neat from both sides, as the inside would be quite visible. Also, this fabric frayed like nobody's business. I wanted to make sure the edges wouldn't get destroyed.

The tail fin pieces and decorative waistband ruffle were sewn right sides together, clipped, turned right way out and then top stitched to finished them off.
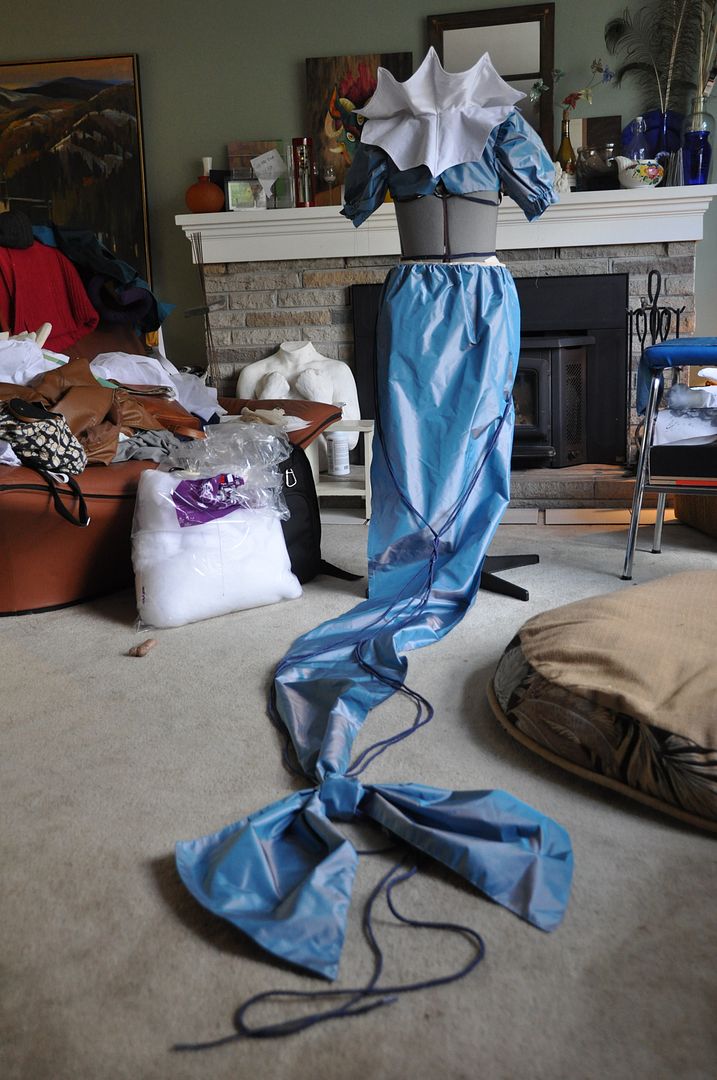
I pinned the tail fin to the end of the tail, arranging the ruffled look how I wanted it and then tacked it on with my most invisible hand-stitching. It's basically like a giant bow.
It was around this point that I realized I would not be meeting my original deadline (AN 2014) and gracefully admitted defeat. I took a year-long break from this costume.
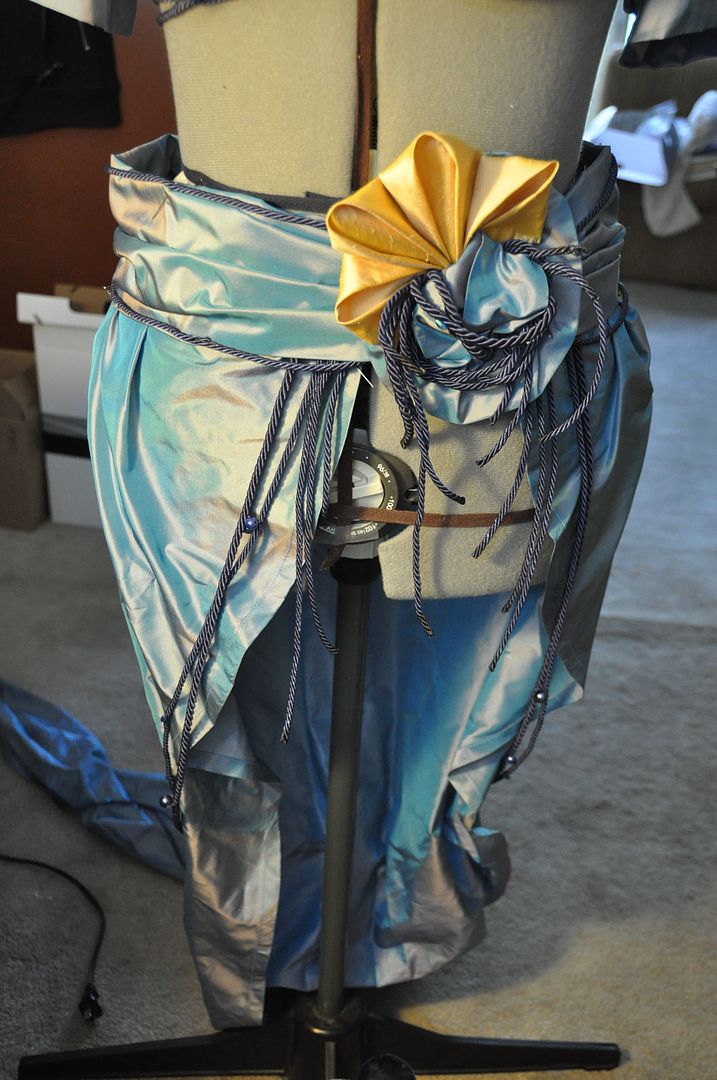 The next step was to attach the decorative waistband ruffle. I arranged it and pinned it in place until I was satisfied with the look then tacked it on with hand stitching.
Then I went about creating the brooch that attaches to the waistband, covering the clasp. It was all made of scrap materials--leftover cording, fabric, beads, etc. I used some of the yellow silk from the hairpiece flowers to create a matching kanzashi style detail for the petals (I will go into more detail on my wig and hairpiece post for this costume.). The entire thing was sewn to a felt backing that was glued to a brooch pin.
Extra cording was used to decorate the waistband and create more dangling bits near the opening at the front.
Then I had my friend Harriet (the official Bead-Dazzler) sew on tons of beads. Props to her for her hours of hard work (in exchange for food)--I certainly have the skills to sew beads myself, but I definitely lacked the time.
The detailing is what really makes the design. There is such richness and embellishments, and I had a lot of fun realizing those little details.
Next I had to create the leaf detail that sticks up from the waistband of the skirt. The problem was, it need to be rigid, but also sheer. The fabric I had was nice and sheer, but super flimsy.
On the Splatoon project I was introduced to this magical stuff called "heat n bond". I essentially used it to fuse my fabrics together around a central support structure made of leftover corset bones. I have to say--I had no idea if my crazy idea would work, but it did, so YAY!
First I traced out the shape I wanted on the paper side of the heat n bond. I cut this out and then ironed it to my first layer of silk. Then I used fray check and applied it all around the outline of the leaf shape and let it dry before cutting it out--this way, when I cut it out it would not fray.

Then I laid the leaf shape heat n bond side down on the second layer of silk. I carefully lined up my corset bones where I wanted them and pinned them in place. I carefully sewed around them using the machine's zipper foot. The bones were now sandwiched between the two layers of silk.
Then I ironed the whole thing, fusing my layers together.

The next step was to apply more fray check, around the edge of layer two, allow that to dry and then cut it out.


The finished leaf feels completely different than the fabric I started with.
To create the veins on the leaf I used a similar process.
First I traced out the desired shape in heat n bond. I then cut that out and used an iron to apply it to the first layer.
Then I fused it to the second side. I fray checked the outline, allowed it to dry and then cut it out.

This was then tacked on the leaf by hand in a few key spots.
The leaf was simply tucked into the waistband when I wore the costume.
Tuesday, January 19, 2016
Website Launch
Hey all! Today I finally launched my portfolio website: SierraBoake.com ! This is what I have been working on for the past 2.5 weeks instead of making costumes.

Look at that screenshot of the homepage. So majestic, much shininess.
This new website is not replacing this blog Among Bobbins and Thread, but merely an easier way for potential employers to view my portfolio. As you may already know, I aim to continue my career path in costume/paints for theatre & film. An organized website with galleries is much easier to flip through than trudging through hundreds of blog posts.
This website archives my most noteworthy/interesting costumes and samples of my fabric painting, as well as my design work for costume and set (from the dark depths of my sketchbook, which has pretty much never seen the light of day.)
Special thanks to my most wonderful-est boyfriend Blayke for helping me set this up--it was the best Christmas present a person could ask for. Particularly someone as un-tech savvy as myself. I have no skills in the area of graphic design/web layout, so this took me ages longer than it should have.
I may go back and rework some of the galleries, and I of course will be adding new projects as they are completed, but for now I declare my website finished! :D
Tuesday, January 12, 2016
Vaporeon Gijinka - Under Layers - Pokémon

Let's talk about under layers! This includes the front drape--with its built-in bra--and the navy booty shorts I constructed. If you want to see how I made the Bolero Jacket, go here!
Once again many thanks to Elemental Photography for the great photoshoot! I love this reflection shot. :) Credit for the original costume design goes to Cowslip!
Since the design only shows how the front looked I had to design a suitable back for the costume. I decided to make a second drape at the back, since it seemed logical and would cover more skin. Also, the design itself was originally designated as one of her "male" designs. I made a slight alteration to the design of the drape at the front for the purposes of female modesty--I changed the proportion of how the drape sat across the chest so it came further back towards my armpits at the top and would therefore properly cover my bust. This is one of the few minor changes I made to make the design work for me.
I started by using twill tape to outline on Molly where I wanted the gaps at the sides to be. I used some cheap broadcloth to drape the pieces.
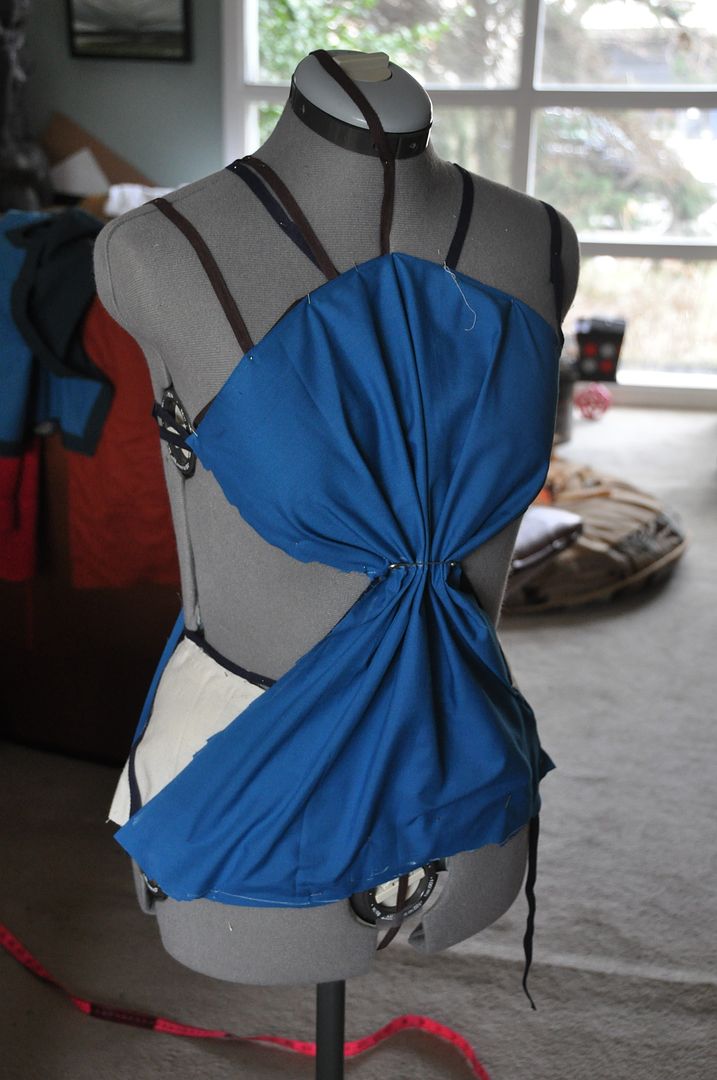


 The fabric I bought was pretty see through, so I double layered both sides. Each piece was sewn rights sides together along the side edges and turned right way out. Then I top stitched those edges to keep them from shifting about. This fabric was fairly uncooperative...
The bottom edge of the drape was finished with a band of beige cotton. On both sides where it overlaps it has velcro to adjust the size around the hips and allow me easy on/off.

Using beige cotton fabric and elastic I made the bra layer to fit comfortably. It opens at the back of the band with hook and eyes. I tacked the bra into the draped piece at the front so it would shift and be revealed. The band at the side peeks out a bit when I lift my arms, but it is not the end of the world.
The bra itself provides moderate support--I am not super busty, so I don't need that much support. Mostly it needed to be something that I could a) sew into the costume, and b) choose the placement of the straps so they wouldn't stick out too much and look weird. Had I used a regular bra bought in a store, the band would be clearly visible at the sides. This one I made comes up higher in the sides and back than a typical store bought bra--which is why it doesn't give maximum support. Also I didn't give it an underwire. Because I didn't think it would be super necessary.
The last detail was the cording. I bought tons and tons of navy blue cording for this costume. It wrapped around the gather at the center front and looped to the back. It's tacked in place so it doesn't move. The ends of the cord were dipped in clear nail polish so they wouldn't fray.
 The other under-layer for this costume was a pair of booty shorts. Somehow I didn't clue in until the very last minute that the wrap-skirt did not actually cover all at the front and I didn't have anything suitable to wear underneath. Hence, I decided to make a very simple but unobtrusive pair of matching shorts.
They were made of some navy blue jersey I picked up at the last minute. I patterned them based off some leggings I own. I pieced them together at a friend's house so I could use a serger.
The hem was done with a zig-zag stitch on my own machine. The waistband had a roll-over where I inserted an elastic band.
I think this is one thing that convinced me I needed to get a serger of my own... I have been avoiding stretch fabrics for so long because I lacked the equipment to work with them.
Sunday, January 10, 2016
January Update
It's 2016 suddenly--and that means new projects for the new year!
...I realize I've been disappearing a lot lately. I am having trouble sticking to a regular posting schedule. I could apologize, but I won't. Blogging is a hobby, and as much as I love it, sometimes real life comes first. My plan for the new year is to post once every other week. I think that will be more manageable for me. Upcoming content includes Vaporeon, Vaporeon and more Vaporeon. With a few DIY projects I did this winter.
My first project I've started is to build myself a website for my portfolio. It will be nice to have a professional-looking site to house my costume and design work. It's taking longer than I thought though, because technology is my worst enemy. And also because I misplaced a lot of files when I transferred everything to my new computer this fall. I've spent the better part of this week reorganizing my hard drive. Uuuuuugh.
Without further ado, I present this year's cosplay projects!
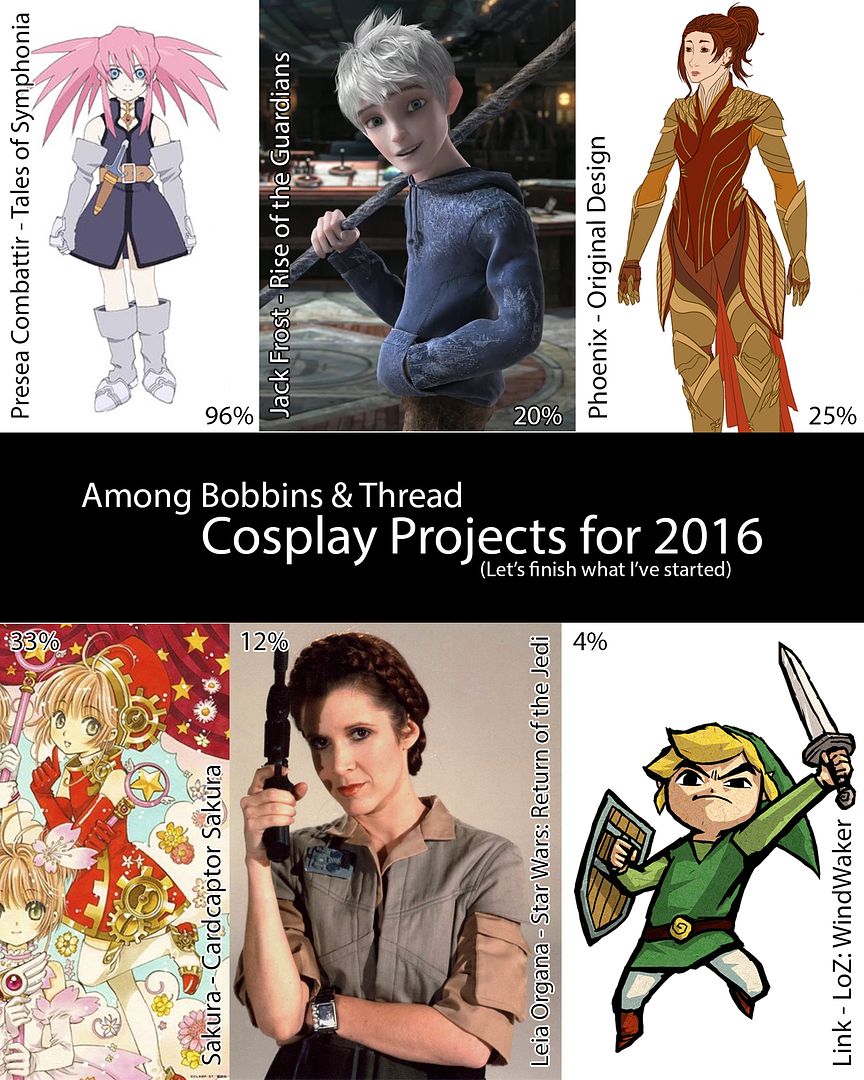 6 costumes that are in varying states of completion (represented by the arbitrary percentages I have labelled them with). I make no promises on any of these, but the general goal here is to finish what I've already started before undertaking any more hugely complicated projects.
Presea: Costume started in ...2012/2013??? I wore it to Otakon the same year I did Kero & Suppi, but I have zero finished pictures. Unfortunately, the giant battle axe sustained serious paint-chipping damage in transit. I just need to sand down and re-paint the axe and this costume is finished. I would really love to do a photoshoot of this in the spring.
Jack Frost: I started this costume the same winter the film was released (2012), but I grew disinterested because it quickly became a costume that was SO overdone that con season. The costume pieces are built but need detailing. I think this will provide an interesting fabric painting challenge for me. I would love to have this done for a winter photoshoot, if I can.
Phoenix: An original design I did for my final project in university. My focus there was building the armour, but since I learned so much during the process, I want to go back and re-work some things. I don't expect to finish this costume this year, but I would like to build the tailored vest. The goal deadline is CostumeCon in 2017--which I think is a realistic deadline.
Sakura: Started this past September. It feels like I am trying to build every single Sakura costume in existence. I assure you, this is not the case. Just this one. And the other 2 I've made. And maybe some more after that.
Leia: Started this past October. Building the uniform pictured above as well as the poncho and helmet from the scenes on Endor. By far one of my favourite Leia costumes--except for perhaps her bounty hunter disguise from the same film.
Link: My excuse to bring out King of the Red Lions again. He's been sitting in our basement collecting dust. It makes me sad. The best part about making a Link costume is deciding which props to build. I think I want to make the mirror shield... But not sure what else...
Anyhoo, those are what I plan to work on this year. I may add another project to the list later on--as is always bound to happen when inspiration strikes.
In other news: I am taking a millinery course in night school starting later this month. Hat-making ahoy! Pretty stoked for that. But this may lead to some previously unplanned Downton Abbey costume. I love the heck out of that show and miss it already.
Hats off to a new year! Lets make it a good one! ;D
...I realize I've been disappearing a lot lately. I am having trouble sticking to a regular posting schedule. I could apologize, but I won't. Blogging is a hobby, and as much as I love it, sometimes real life comes first. My plan for the new year is to post once every other week. I think that will be more manageable for me. Upcoming content includes Vaporeon, Vaporeon and more Vaporeon. With a few DIY projects I did this winter.
My first project I've started is to build myself a website for my portfolio. It will be nice to have a professional-looking site to house my costume and design work. It's taking longer than I thought though, because technology is my worst enemy. And also because I misplaced a lot of files when I transferred everything to my new computer this fall. I've spent the better part of this week reorganizing my hard drive. Uuuuuugh.
Without further ado, I present this year's cosplay projects!
Presea: Costume started in ...2012/2013??? I wore it to Otakon the same year I did Kero & Suppi, but I have zero finished pictures. Unfortunately, the giant battle axe sustained serious paint-chipping damage in transit. I just need to sand down and re-paint the axe and this costume is finished. I would really love to do a photoshoot of this in the spring.
Jack Frost: I started this costume the same winter the film was released (2012), but I grew disinterested because it quickly became a costume that was SO overdone that con season. The costume pieces are built but need detailing. I think this will provide an interesting fabric painting challenge for me. I would love to have this done for a winter photoshoot, if I can.
Phoenix: An original design I did for my final project in university. My focus there was building the armour, but since I learned so much during the process, I want to go back and re-work some things. I don't expect to finish this costume this year, but I would like to build the tailored vest. The goal deadline is CostumeCon in 2017--which I think is a realistic deadline.
Sakura: Started this past September. It feels like I am trying to build every single Sakura costume in existence. I assure you, this is not the case. Just this one. And the other 2 I've made. And maybe some more after that.
Leia: Started this past October. Building the uniform pictured above as well as the poncho and helmet from the scenes on Endor. By far one of my favourite Leia costumes--except for perhaps her bounty hunter disguise from the same film.
Link: My excuse to bring out King of the Red Lions again. He's been sitting in our basement collecting dust. It makes me sad. The best part about making a Link costume is deciding which props to build. I think I want to make the mirror shield... But not sure what else...
Anyhoo, those are what I plan to work on this year. I may add another project to the list later on--as is always bound to happen when inspiration strikes.
In other news: I am taking a millinery course in night school starting later this month. Hat-making ahoy! Pretty stoked for that. But this may lead to some previously unplanned Downton Abbey costume. I love the heck out of that show and miss it already.
Hats off to a new year! Lets make it a good one! ;D
Subscribe to:
Posts (Atom)