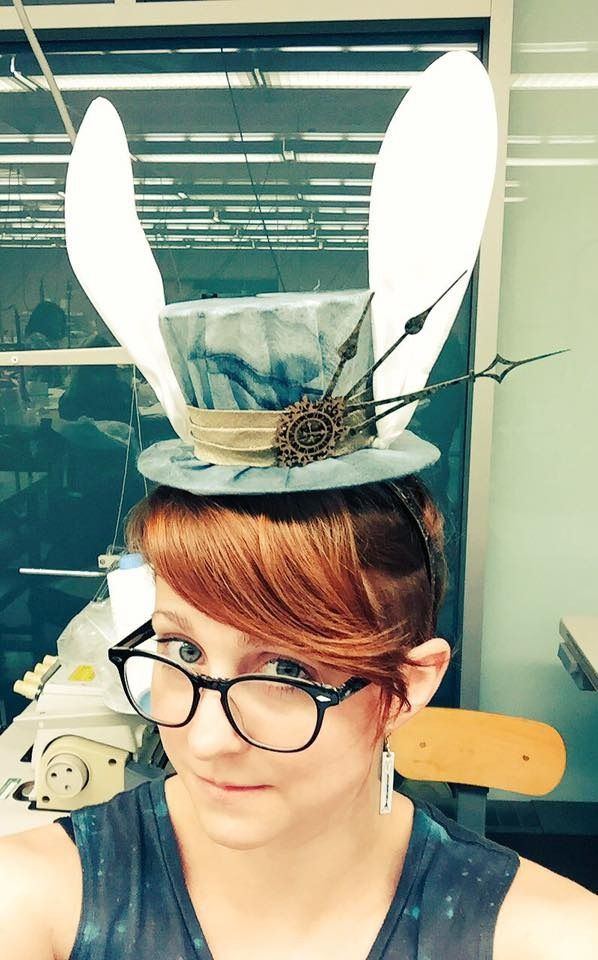
The second project from my millinery class--my White Rabbit top hat!
So the project outline was really open-ended: you had to make a wire frame hat, cover it with sheer fabric and decorate it to represent a theme/character. We were given the option of doing a mini top hat or boater that she had patterns for, or we could design our own hat shape. I picked the mini top hat because I didn't have time to pattern a new shape.
After going fabric shopping to get ideas, I found this really cool sheer blue-grey fabric. It had almost a paper-like quality to it. I thought it might make an interesting take on the White Rabbit. Since I have learned from theatre--stage lights wash out fabrics and make them look whiter, perhaps I could design a white rabbit while hardly using any white?
Here's a picture of the finished hat frame on top of the fabric. It shifts from blue to grey depending on lighting and instagram filters. Haha
I won't go into too much detail on how the frame was constructed. All the pieces of wire were carefully cut to length and bent into shape. I used quilting thread to tightly wrap the joints and then strengthened the bond with a mixture of white glue and water.
The brim and crown were not attached until after I covered it. It makes covering the pieces way easier.
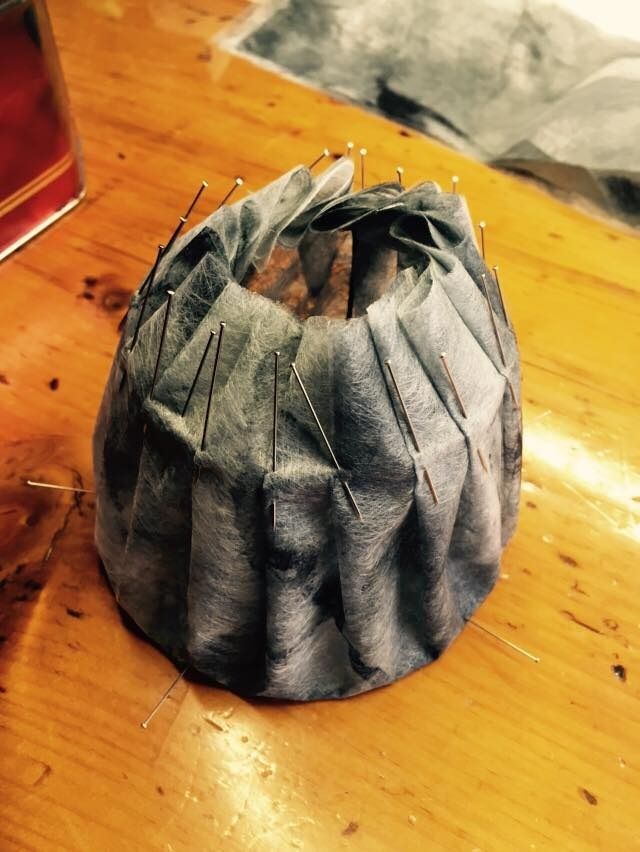
I covered the crown and brim using 2 layers of my fabric. It was fairly sheer with just a single layer and I was worried it would rip. I like that with the double layer you get a ghost of the leaf pattern coming through.
For the crown I cut 2 circles overlayed, I draped these over the top holding them in place with pins. Then I pleated the fabric along the bottom edge to conform it to the shape of the crown. I basted this in place, attaching it to the frame. I cut off some of the excess fabric, but the rest would be tucked into the inside.
The brim was done in a similar way. I cut 2 long rectangles that measured the same as the outer circumference of the brim. These were each sewn into a long loop and folded in half over the edge. Then I pleated and basted them to the frame.
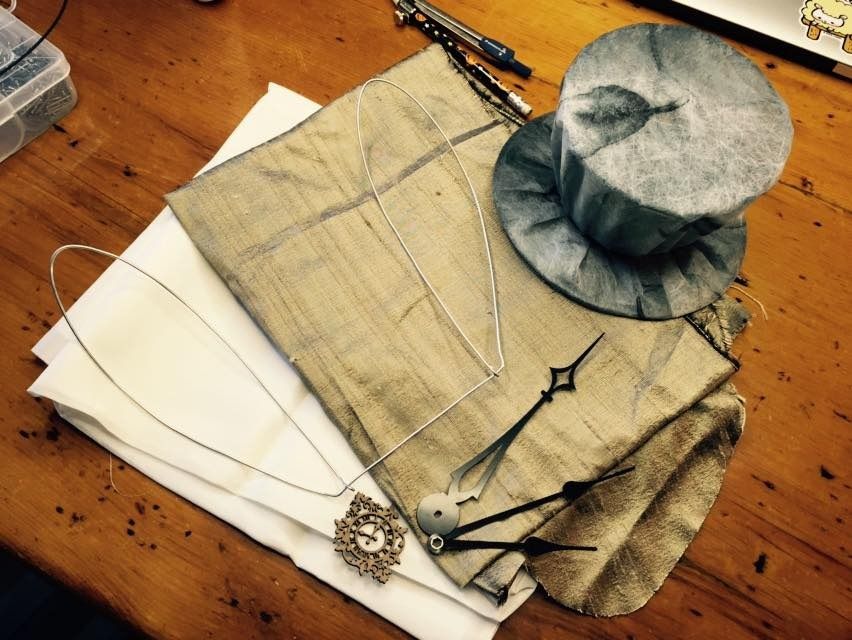
Next I created my ear shape. As you can see here, both ears are made out of one piece of wire. It would sit between the crown and brim and make them much stronger overall. I covered them with a white silk leftover from the painting and dye class I took last summer.
All of my cool accent pieces--laser cut clock, clock hands--were picked up from Michael's art store. It has a great selection of weird crafting bits. I got the clock hands in the DIY clock section, for example.
The gold fabric I used to make a hat band was leftover from my Steampunk Corset (I really did buy way too much fabric for that).
I sewed the ears to the brim base, then sewed my brim to the crown. Then I carefully tacked the side of the ears to the top of the top hat--I sewed the wire frame to the wire frame, not just the fabrics.
Next was the hat band and decoration. I sewed the hat band on, the sewed the decorations on. Before attaching the clock hands I sponged on some gold acrylic paint and sprayed them with a gloss finish sealer. This was to help them match the costume better.
Lastly, I sewed a felt circle to the bottom to cover the hole and seal it shut. Then I sewed a headband to it (which I also painted gold). I think later I will swap out the headband for alligator clips, but for now (and for handing it it) it was fine.
I'm really happy with how the hat turned out and I am in the process of completing a full design for the costume. I'm thinking I would really like to complete the outfit in the future...
Showing posts with label alice in wonderland. Show all posts
Wednesday, May 18, 2016
White Rabbit - Wire Frame Mini Tophat
Labels:
acrylic paint,
alice in wonderland,
blue,
bronze,
cosplay,
ears,
felt,
gold,
grey,
hat,
headband,
millinery,
mini,
rabbit,
sewing,
sheer,
spraypaint,
tophat,
white,
wire
Tuesday, June 10, 2014
3D Printing Collaboration with Crowtrees Studio
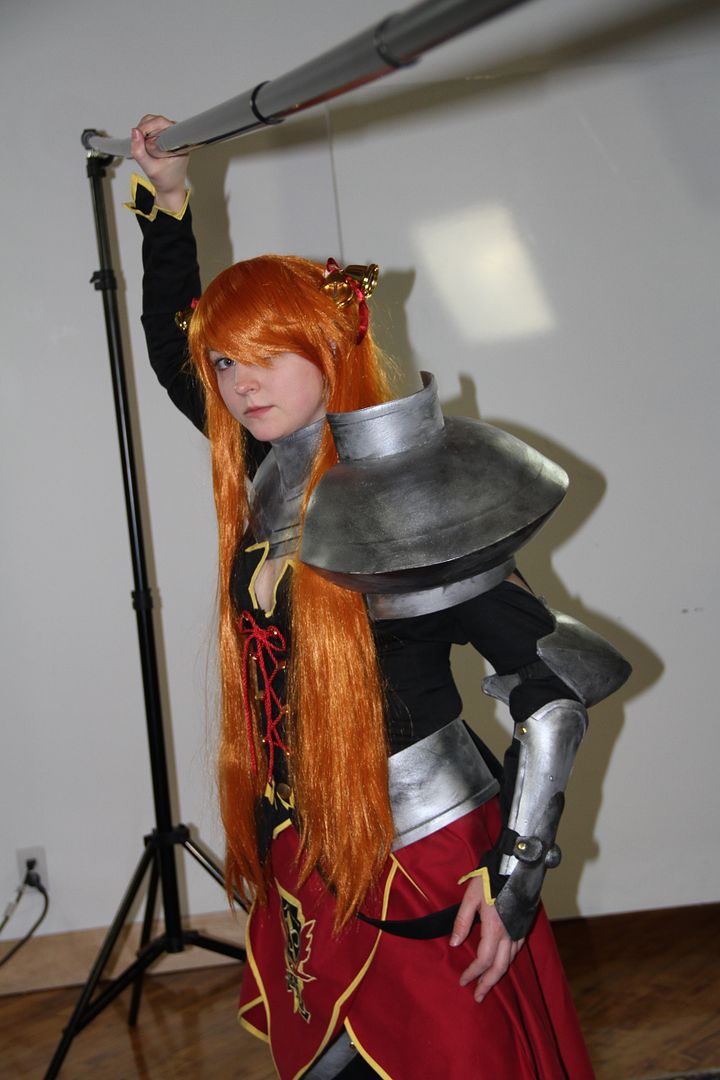
I say "collaboration" in the loosest sense of the word because all I really had to do was get in costume hold a pose for about 10 minutes! Hahaha :D Special thanks to James and Rui for making this happen! And another thanks goes to my friend Harriet for coming with me and acting as my squire for the day!This project has been a long time in the running; I was actually contacted before Christmas about potentially being a cosplay model for 3D scanning. We set up a date in March to do the scans. I took 3 costumes with me that weekend: Asuna, Alice, and Kero. We did 5 scans that day (2 Asuna, 2 Alice, 1 Kero), but Asuna is the one they went ahead with to create the final 3D model.
Though they are now starting into doing cosplay figures, Crowtrees actually started out doing wedding cake toppers!
The thing about cosplay is that you encounter a whole lot of crazy challenges in the scanning process because of all the different complicated bits. For example, on Asuna the golden bells on her hair didn't get picked up by the scanners at all because they are highly reflective! Those had to be added in in post. Similarly when we scanned Kero's candy the cellophane wrapping totally messed with the scan. Another issue on Asuna was getting the back of the legs to scan, so we had to do a second pass with the scanner of just the legs while the skirt was held out of the way.
In terms of pose, I had jokingly mentioned that my one issue with this costume was that the sword was too heavy to wield and was very limiting on my posing capabilities. When they told me they could scan the sword separately and add it in later I was thrilled! Finally I would get to hold the sword in the air! Hahaha So they rigged a pole to be stationary above my head that I could hold onto at the right angle so they could scan my body with my arm raised. (Because if I just held my arm in the air it would move around a lot during the scan!) Long story short, I finally got my wish to hold the sword above my head like the character does in the manga. :P
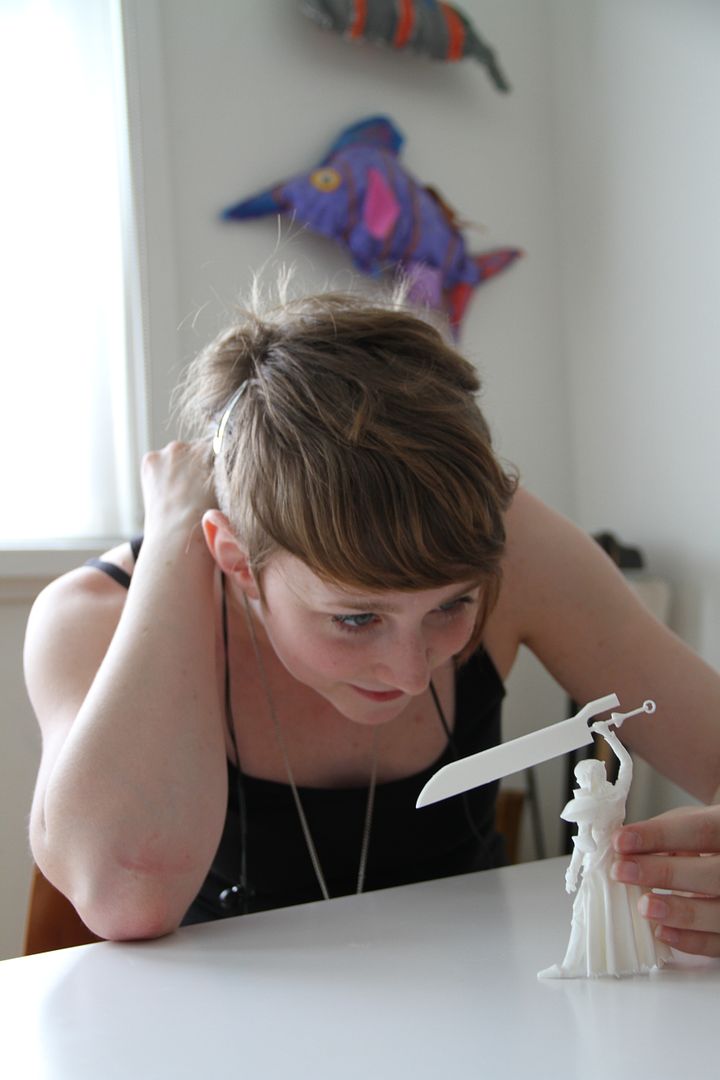
I went to pick up my mini me last week! What a surreal experience! It is one thing to see a figurine of the same character as you, it is another thing to see a miniature version of your costume!
I am always really impressed with technology, so suffice to say that 3D scanning blew my mind! You could see the image forming in real time as the sensors picked up the figure with a surprising level of detail. The scans also picked up colour data as well! I especially love the way it picked up the drape of the fabric. :D
They printed it in 2 pieces, so the sword hand is detachable. Mini sword is much lighter and easier to deal with than the 6' version! Hahaha
Excited to see what these guys do in the future as the technology gets even better! :D
Saturday, September 22, 2012
September Update
Hey guys!
The con season is officially over for me this year, and I am back to school again, now in second year university. Which is bound to be very busy, so I have been madly prepping my next posts in advance.
So in case you haven't noticed the pattern, I have started a weekly post schedule. Among Bobbins and Thread will have a new post every Tuesday, and Photo Escapes will have a new post every Sunday. This is to spread out my content over the coming months. It probably won't last me all the way through first term, but you are guaranteed less of an absence than last year... where I dropped off the map for 3 months...
My Alice in Wonderland posts are all up, if you missed them you can view them here, here and here. Next upcoming is some miscellaneous older stuff, before we move on to Cosmo--which I know you are all psyched for!
That's it for now! Mischief Managed! ;D
The con season is officially over for me this year, and I am back to school again, now in second year university. Which is bound to be very busy, so I have been madly prepping my next posts in advance.
So in case you haven't noticed the pattern, I have started a weekly post schedule. Among Bobbins and Thread will have a new post every Tuesday, and Photo Escapes will have a new post every Sunday. This is to spread out my content over the coming months. It probably won't last me all the way through first term, but you are guaranteed less of an absence than last year... where I dropped off the map for 3 months...
My Alice in Wonderland posts are all up, if you missed them you can view them here, here and here. Next upcoming is some miscellaneous older stuff, before we move on to Cosmo--which I know you are all psyched for!
That's it for now! Mischief Managed! ;D
Tuesday, September 18, 2012
Alice in Wonderland - Apron & Accessories
Here's the last post on my Alice in Wonderland costume! ;D...Which I thought was a perfectly recognizable character, but one or two people asked me if I was some character from an obscure anime's alternate outfit from another dimension... No. I really wish I knew what character and anime they were referring to that I so uncannily resemble. Really.
But making Alice was a good learning experience, and a joy to wear!
If you want to know how I made the dress go here. If you want to see how I made the petticoats go here.
Once again, you can see the whole photoshoot here!
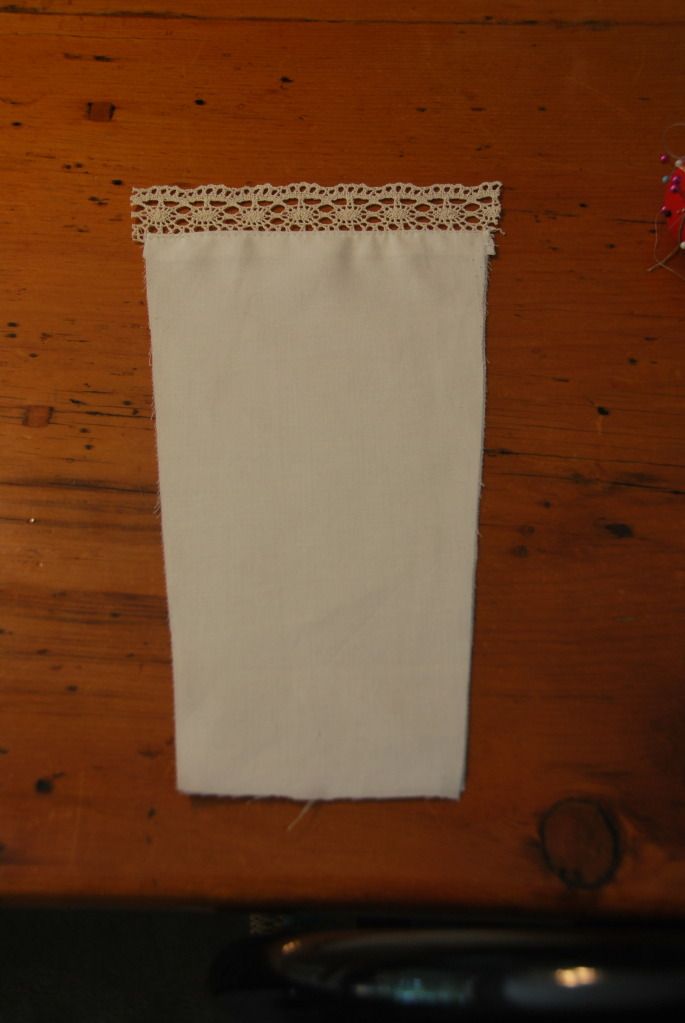
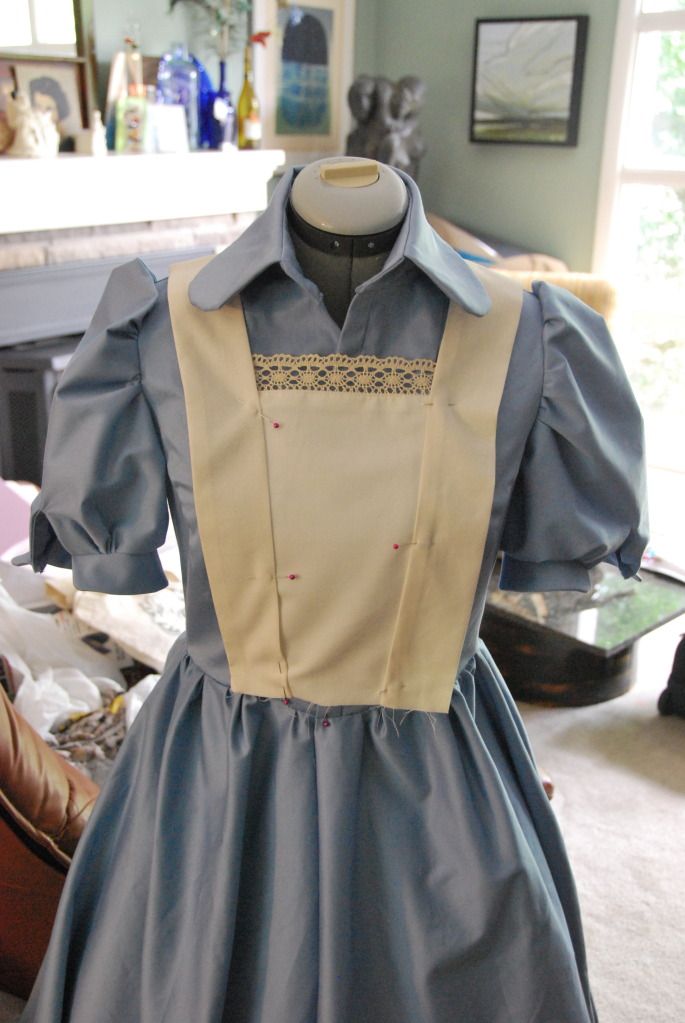
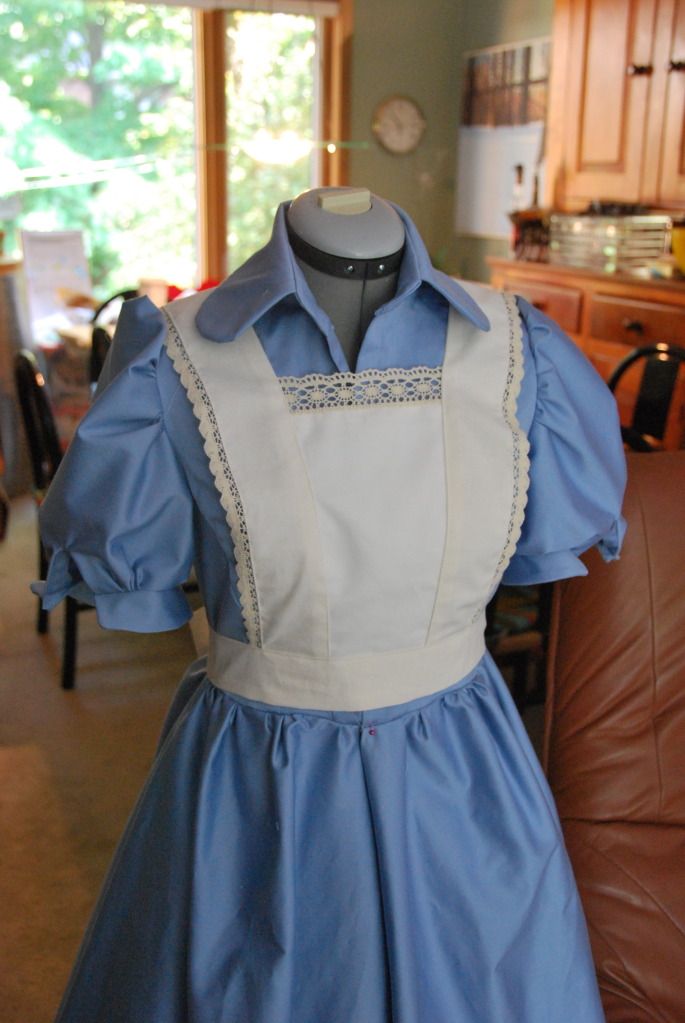
The apron was by far the easiest piece to construct for this whole costume.I started with the front panel: a piece of fabric that I double layered--because it was a tad see-through. I attached the the 2 pieces at the top and folded it over to get a nice finished edge. I attached a piece of lace trim to the top edge. I used a zig-zag stitch to finish off the remaining edges.
Then I made 2 straps that would go over the shoulders on a slight angle. These were tubes that were then turned right way out and pressed flat. I had to make sure they would be long enough to go all the way from the waistband at the front to attach to the waistband at the back.
I sewed the straps to the front panel, and then attached a lace trim to the straps.
I made another really long tube and flattened it. This was the waistband that would tie at the back. I wanted the bow to be nice and long.
This was attached to the front panel first, then I measured and made sure the straps were even before attaching them at the back.
Then I finished off the ends of the bow.
Once the top part was done I set about making the bottom. The bottom piece is 2 rectangles sewed together and turned inside out to finish the edge, to which I attached more lace trim. The top edge of the rectangle was left open to do this. I gathered the top with a basting stitch to create a ruffle effect and sewed it to the waistband.
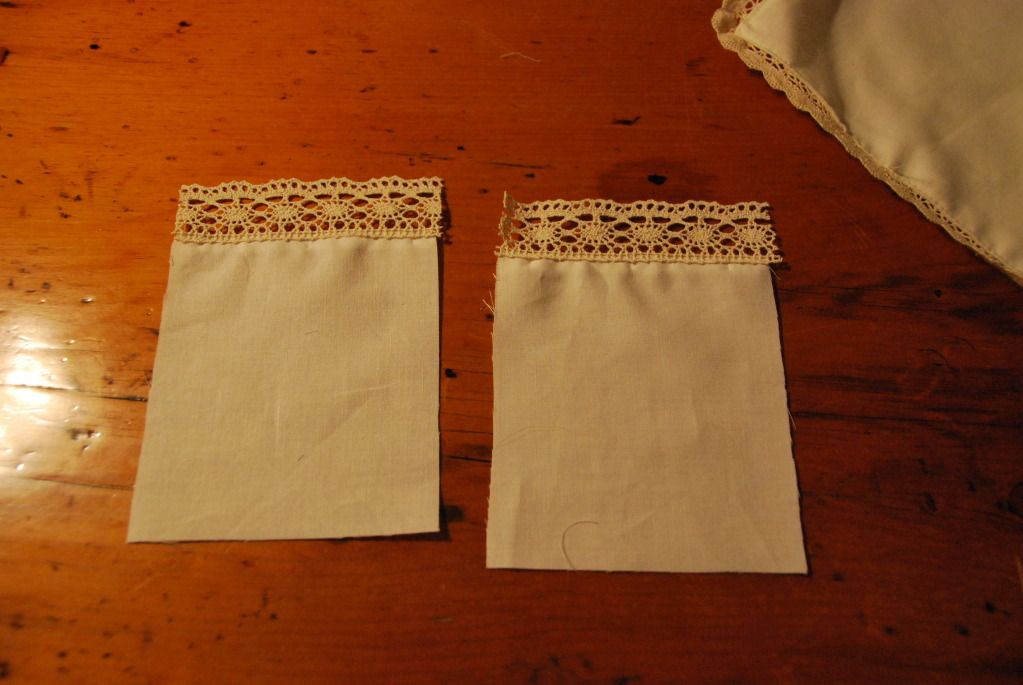
Pockets were added last. They were just rectangles with the edges finished and turned over that were superficially attached to the bottom of the apron. And of course: more lace trim. ;D
Now let's talk accessories! These are of course the last thing on the priority list when making a costume, but help to really complete the overall effect. As you may know, I have an unhealthy obsession with pocket watches, so naturally I equipped my Alice with one from my collection. I picked up the 'drink me' bottle at Otakon. So cute! :D
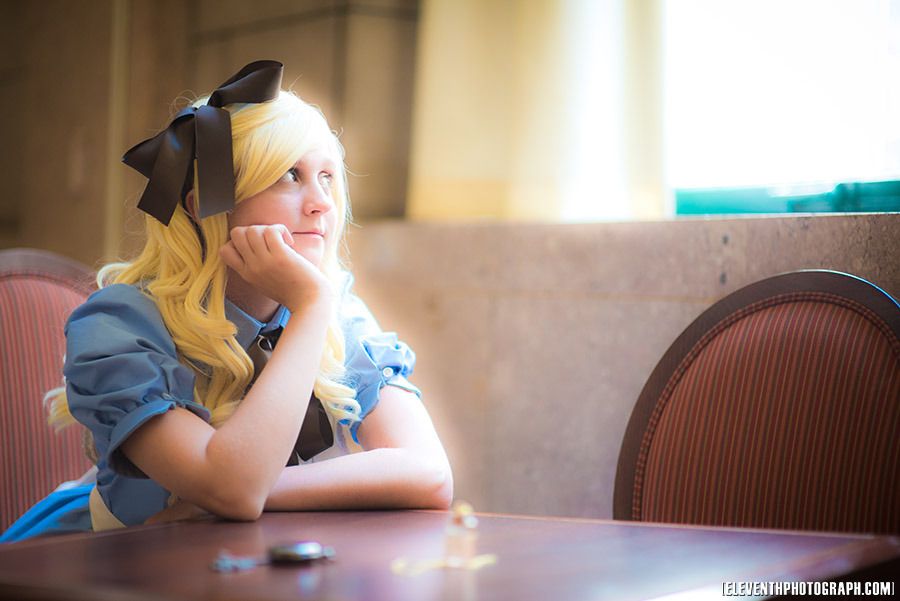
For the ribbons, worn in the hair and at the collar, I chose to go with a dark brown as opposed to black, because I thought it gave a softer, more natural look than a harsh black. I picked those up at Sussman's Bridal Accessories on Queen, which is my favourite place to buy lace trim, ribbon and feathers because they have such a good selection.
The shoes were a last minute purchase. Shoes are always the most difficult part of cosplay. Decent shoes can be pricey, and the perfect shoes can be near impossible to find. I decided to pick up a pair of plain black flats at Ardene. Are they comfortable? No. Are they good quality? Hell no. But do they do their job? Yes.
Ardene has a really good selection of cheap women's shoes (flats, lace-ups, etc.), and if you are looking for something for cosplay that you are either going to destroy, modify or only wear for the weekend it makes sense to your wallet to buy something cheap. If you want something that will last a long time, these probably won't be the best for the job. (Unless you buy multiple back-ups on a two-fer deal). The best location I know of in Toronto is the one on Queen as it has the largest selection of their shoes I've seen, in pretty much every colour.
The tights were also pick up for cheap downtown. But I really need to invest in some better quality ones as I totally put a hole in them on the first wear... :/
The last touch is the wig. After much deliberation I picked this colour of blonde, although it was not my first choice (which was sold out). I also decided on curly as opposed to straight hair because I decided it would look best.
This wig is actually exactly the same as the one I wore for my Steampunk Lolita, the only difference is the colour.
The reason they look different is the styling. I brushed the bangs to the opposite side, and took sections of the hair from the front and pinned them back before tying the ribbon. This made it look like there were more curls higher up at the sides.
Thanks for reading my Alice posts! Overall this costume was fun to make and fun to wear. It was refreshing to do my own take on Alice. I received many compliments. I would say this costume was best received at Otakuthon. ;D Much obliged Quebec! Thanks again to Mike for the awesome photoshoot, you guys should definitely check out his cosplay gallery, the pictures--and of course the costumes--are awesome!
Alice will probably make a few more con appearances next season. ;D
Tuesday, September 11, 2012
Alice in Wonderland - Petticoats
My second part of my Alice in Wonderland costume.
Click here to see how I made the dress.
Go here for the photoshoot. ;D
I knew when I started the project that this dress would require a petticoat in order to achieve the volume I desired for the skirt.
So I looked online for a tutorial on how to make a petticoat. This is the one I found and it was super helpful. :D
Building a petticoat is like making a layer cake... lots of fluff. :D
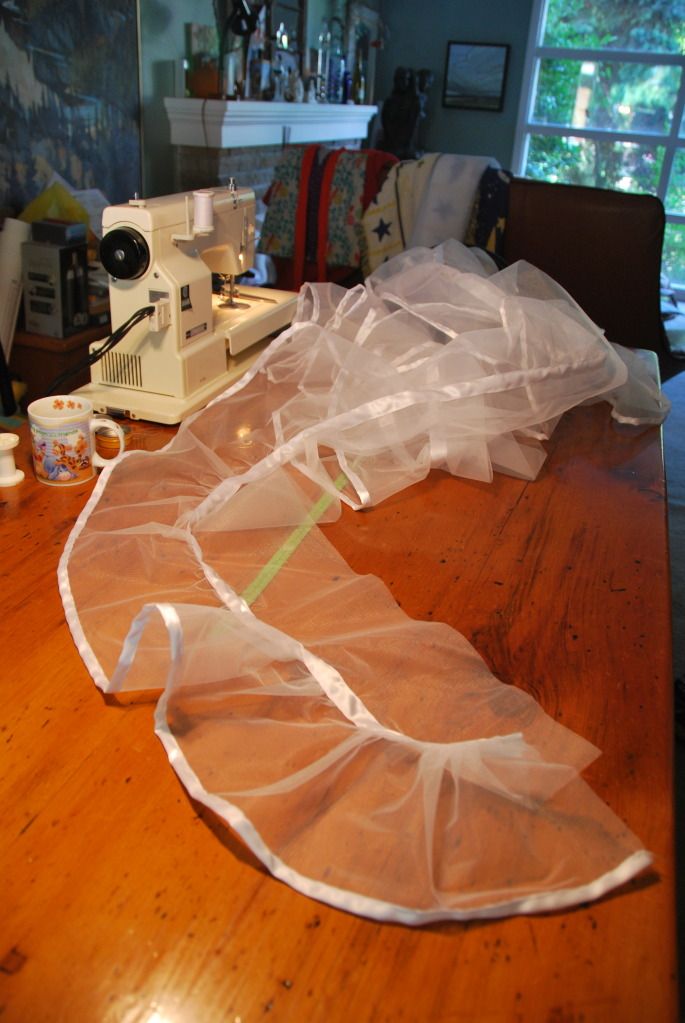
I went to the closing sale of my nearest fabricland and bought their last 8 meters of crinoline. Obviously, I didn't need that much for this particular project, but it was in deep discounts at that point and I do plan on making more costumes with various petticoats in the future. Also, it comes in handy to have that length of fabric when making petticoats as you need to cut several super long strips of fabric.
The other thing you need for this is ribbon. It makes finishing off all the seams way easier. Seriously.
The first thing you need to do is decide how many tiers you want your
petticoat to have. I decided on 4. Then you need to decide how long you
want it to be. I made mine 23" long so it would fall an inch short of
the dress's hem line.
I added 1/2" seam allowance in to attach each tier to one another. Which is a total of 3". In the long run, since the petticoat isn't visible it doesn't really matter if the layers aren't exactly even. The easiest way of adding in the seam allowance so you can just cut all the layers to the same size is to add your seam allowances to the total length and then divide by the number of layers.
For example: For my 23" petticoat I added the 3" of seam allowance to the total making 26" then divided that by 4 tiers. This means that the strips would be cut to be 6 1/2" wide.
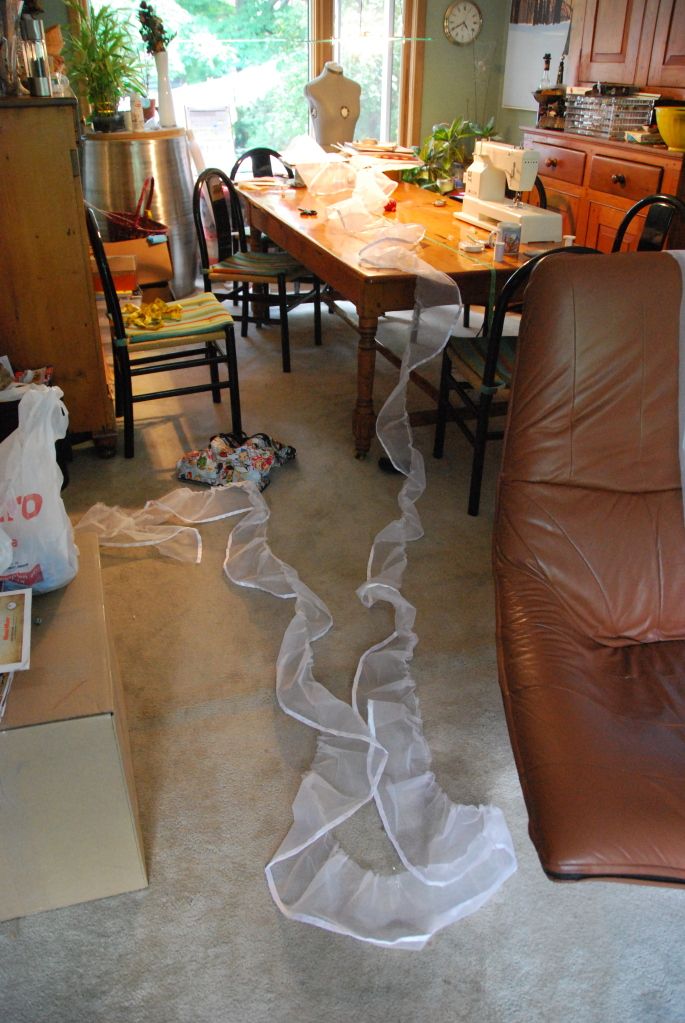
I don't know if there is a scientific way to calculate pouffiness... So I just improvised. From the bottom up the circumference of the tiers were as follows: 12 ft, 9 ft, 6.5 ft and 3 ft. Note: Make sure you separate each set of strips and label them because having to recheck the measurement on a piece that is 12ft long is not exactly preferable.
First finish off the bottom of the petticoat by stitching a folded piece of ribbon over the bottom edge.
Then I used a basting stitch to gather up the tiers so I could sew them to the next layer. You take the tier and evenly gather it to the measurement of the tier you want to sew it to. The unfinished edge of the seam should go on the outside.
I found it easiest to gather it evenly by dividing my fabric strips into equal sections and gathering them all to the same measurement. And also taping a measuring tape to the table.
After that, finish off the seam by sewing a piece of ribbon over the unfinished edge. The ribbon will be on the outside of the petticoat.
It's easiest to finish each seam as you go, as you are less likely to get wrinkles. Once you gather a tier it is more difficult to go back and sew the ribbon on.
Then I sewed the skirt together. I left the top tier open and finished the edge with ribbon.
I made a fold over waistband and sewed it to the top tier, leaving an overlap so I could sew on some velcro.
The dress wasn't as pouffy as I wanted it to be. So I decided to make another, less intense, petticoat to be worn over the first one.
This second one had 2 tiers, and the bottom was made of a quilting cotton finished off with lace trim. It was made long enough so that the lace trim could be seen below the hem of the dress.
Click here to see how I made the dress.
Go here for the photoshoot. ;D
I knew when I started the project that this dress would require a petticoat in order to achieve the volume I desired for the skirt.
So I looked online for a tutorial on how to make a petticoat. This is the one I found and it was super helpful. :D
Building a petticoat is like making a layer cake... lots of fluff. :D
I went to the closing sale of my nearest fabricland and bought their last 8 meters of crinoline. Obviously, I didn't need that much for this particular project, but it was in deep discounts at that point and I do plan on making more costumes with various petticoats in the future. Also, it comes in handy to have that length of fabric when making petticoats as you need to cut several super long strips of fabric.
The other thing you need for this is ribbon. It makes finishing off all the seams way easier. Seriously.
The first thing you need to do is decide how many tiers you want your
petticoat to have. I decided on 4. Then you need to decide how long you
want it to be. I made mine 23" long so it would fall an inch short of
the dress's hem line.I added 1/2" seam allowance in to attach each tier to one another. Which is a total of 3". In the long run, since the petticoat isn't visible it doesn't really matter if the layers aren't exactly even. The easiest way of adding in the seam allowance so you can just cut all the layers to the same size is to add your seam allowances to the total length and then divide by the number of layers.
For example: For my 23" petticoat I added the 3" of seam allowance to the total making 26" then divided that by 4 tiers. This means that the strips would be cut to be 6 1/2" wide.
I don't know if there is a scientific way to calculate pouffiness... So I just improvised. From the bottom up the circumference of the tiers were as follows: 12 ft, 9 ft, 6.5 ft and 3 ft. Note: Make sure you separate each set of strips and label them because having to recheck the measurement on a piece that is 12ft long is not exactly preferable.
First finish off the bottom of the petticoat by stitching a folded piece of ribbon over the bottom edge. Then I used a basting stitch to gather up the tiers so I could sew them to the next layer. You take the tier and evenly gather it to the measurement of the tier you want to sew it to. The unfinished edge of the seam should go on the outside.
I found it easiest to gather it evenly by dividing my fabric strips into equal sections and gathering them all to the same measurement. And also taping a measuring tape to the table.
After that, finish off the seam by sewing a piece of ribbon over the unfinished edge. The ribbon will be on the outside of the petticoat.
It's easiest to finish each seam as you go, as you are less likely to get wrinkles. Once you gather a tier it is more difficult to go back and sew the ribbon on.
Then I sewed the skirt together. I left the top tier open and finished the edge with ribbon.
I made a fold over waistband and sewed it to the top tier, leaving an overlap so I could sew on some velcro.
The dress wasn't as pouffy as I wanted it to be. So I decided to make another, less intense, petticoat to be worn over the first one.
This second one had 2 tiers, and the bottom was made of a quilting cotton finished off with lace trim. It was made long enough so that the lace trim could be seen below the hem of the dress. Tuesday, September 4, 2012
Alice in Wonderland - Dress
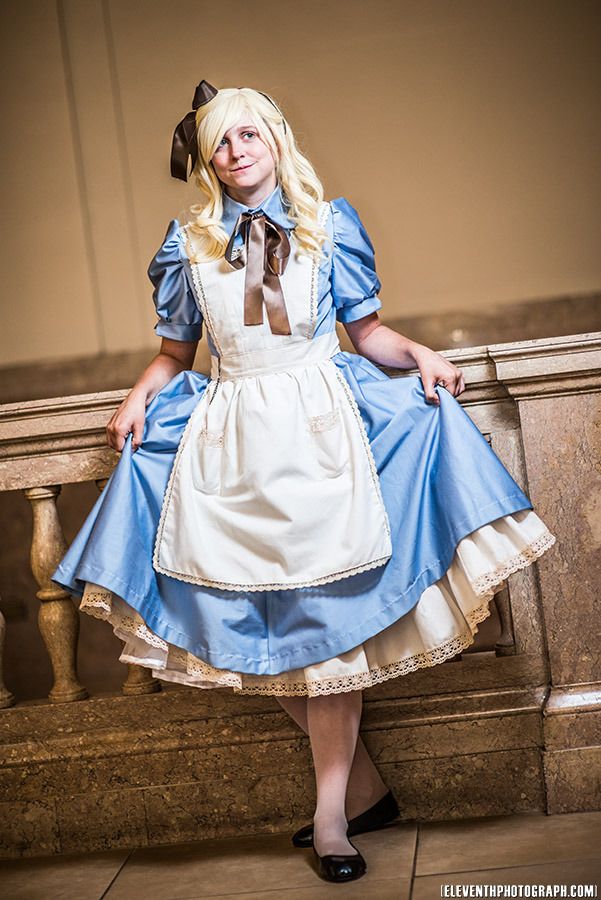
Here's a look at how I made my Alice in Wonderland dress. This costume debuted at Otakon back in July. I also wore it to Otakuthon and FanExpo this past month.
(My Alice posts will be divided into three parts: the dress, the petticoats and the apron. )
Special thanks to Mike of Eleventh Photograph for the awesome photoshoot! Go here for the pictures!
This was a costume that I had wanted to make for a long time and I am really happy with the end result. This version is loosely based off of both the '60's Disney movie, the original illustrations from the book and my own designs. I wanted to go less cartoon-y and more historical.
I had a great difficulty deciding on my blue fabric. I didn't want something excessively shiny, as I find that can look extremely tacky, but I did want a fabric that had a bit of a sheen and some nice weight to it. After much scouring I eventually found this fabric at a really reasonable price and also somehow managed to miscalculate and buy almost twice as much as I actually needed... whoops.
I started to pattern this by figuring out how wide I wanted the skirt to be at the bottom. I guesstimated the circumference and divided that number by 4. Then I calculated the length of the skirt, from where I wanted it to start to where I wanted it to fall. Keeping in mind that it would puff out in the end because of the petticoats. I drew this out on craft paper. I tapered it in at the waist, because although I wanted it to bunch and ruffle, I didn't need like 200 inches of fabric doing that at the waist...
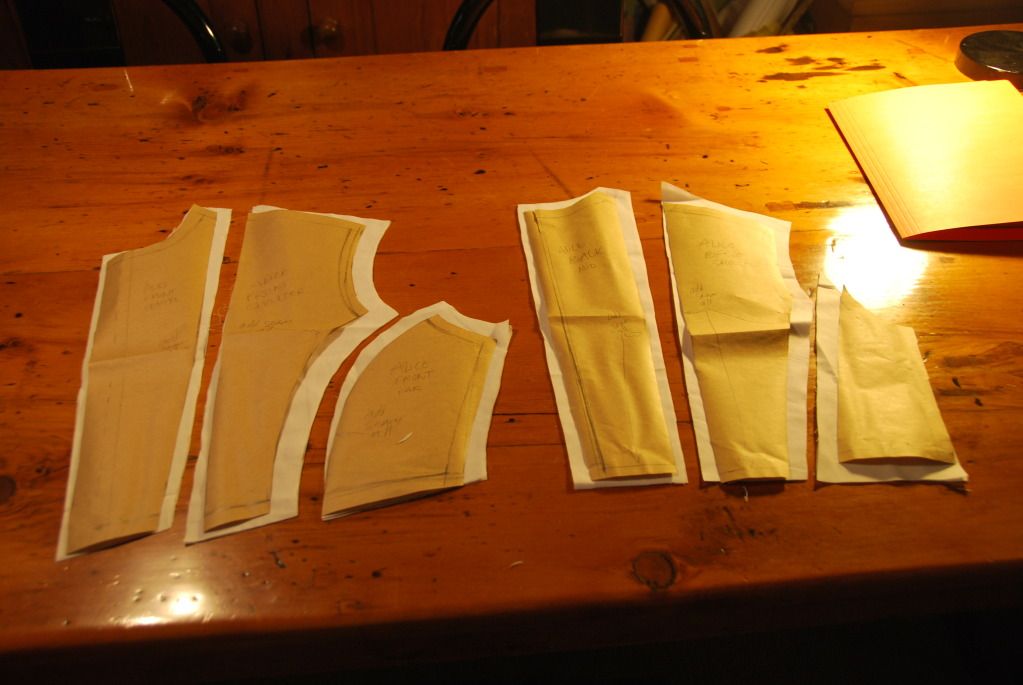
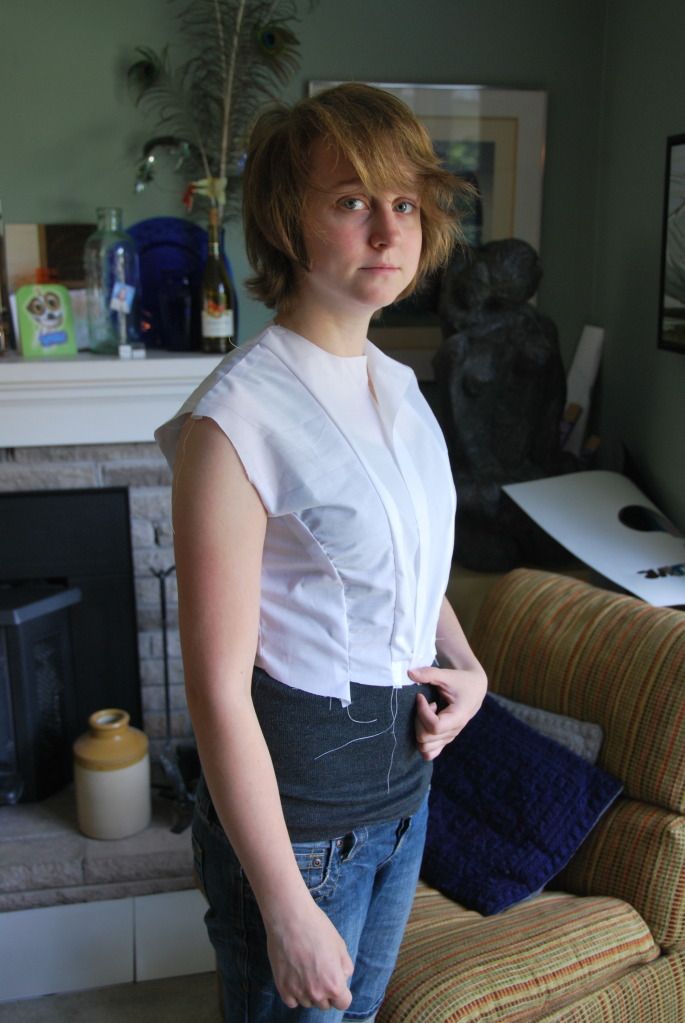
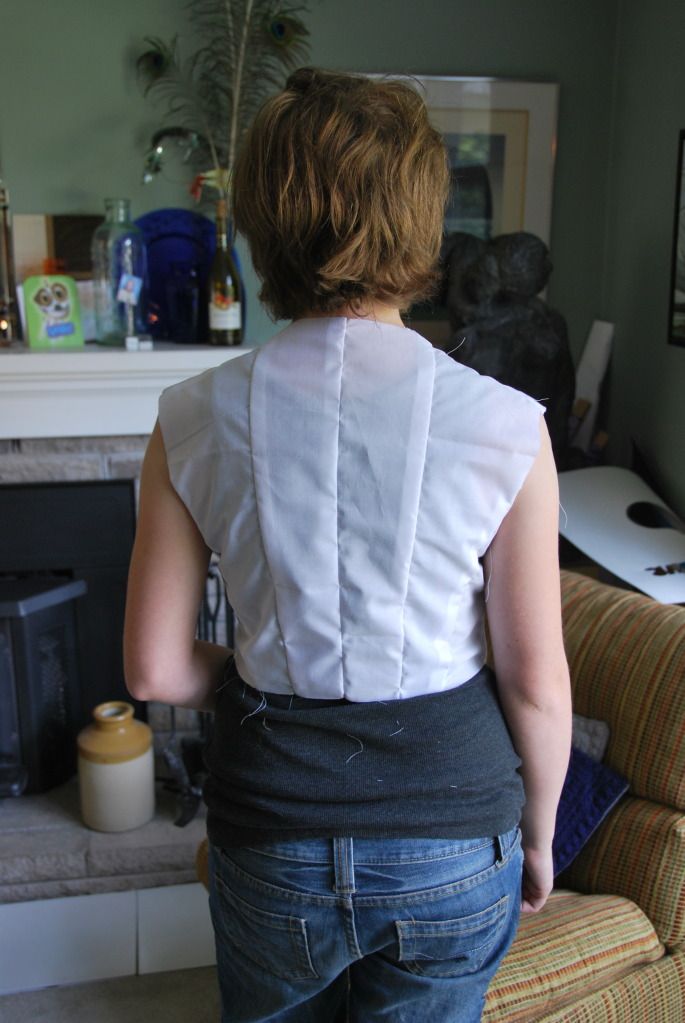
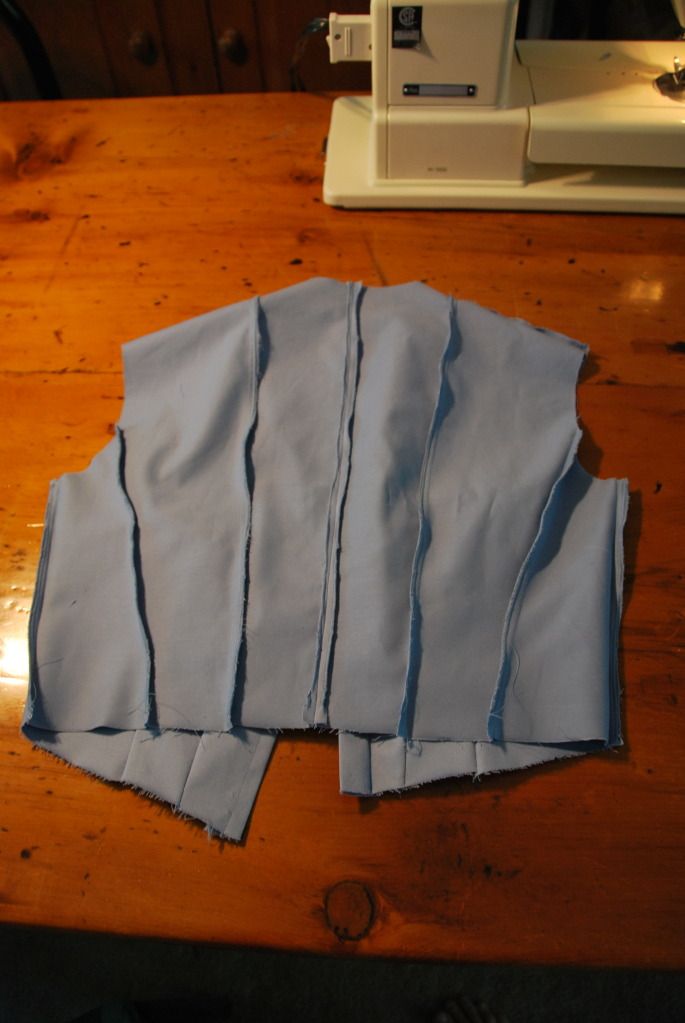
With great care and consideration, I patterned the bodice of this dress. Basing this off my measurements, a blouse pattern and my original design I created a bodice that was well fitting. I wanted to have a button up front, with 2 seams on each side making the dress taper in at the waist. The pattern I created consisted of 12 pieces that would form the bodice (+ the placket I would add later).
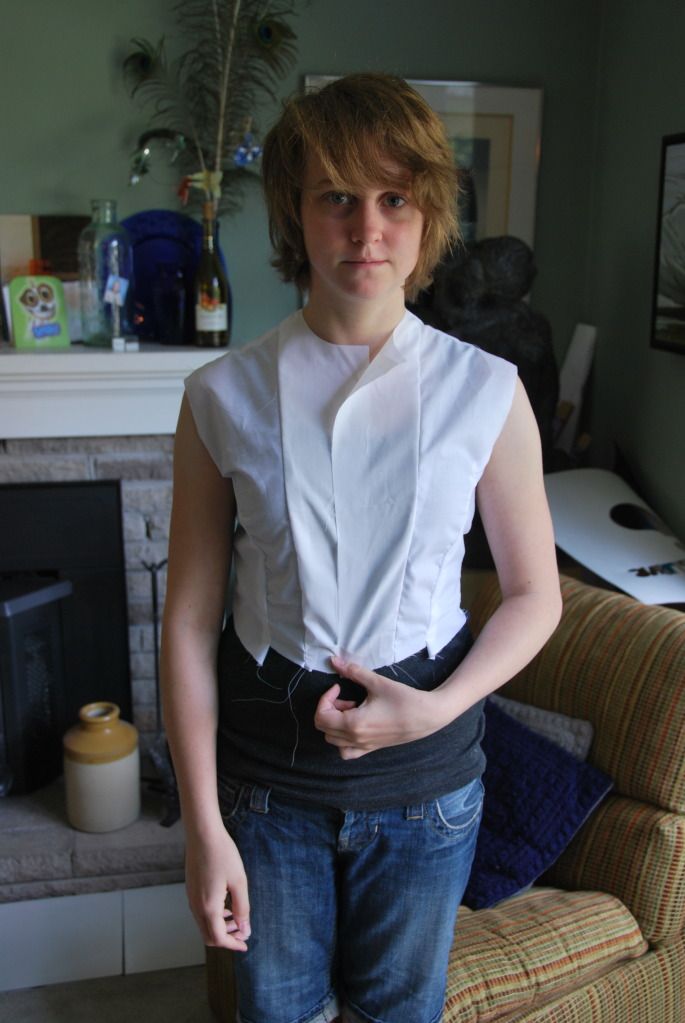
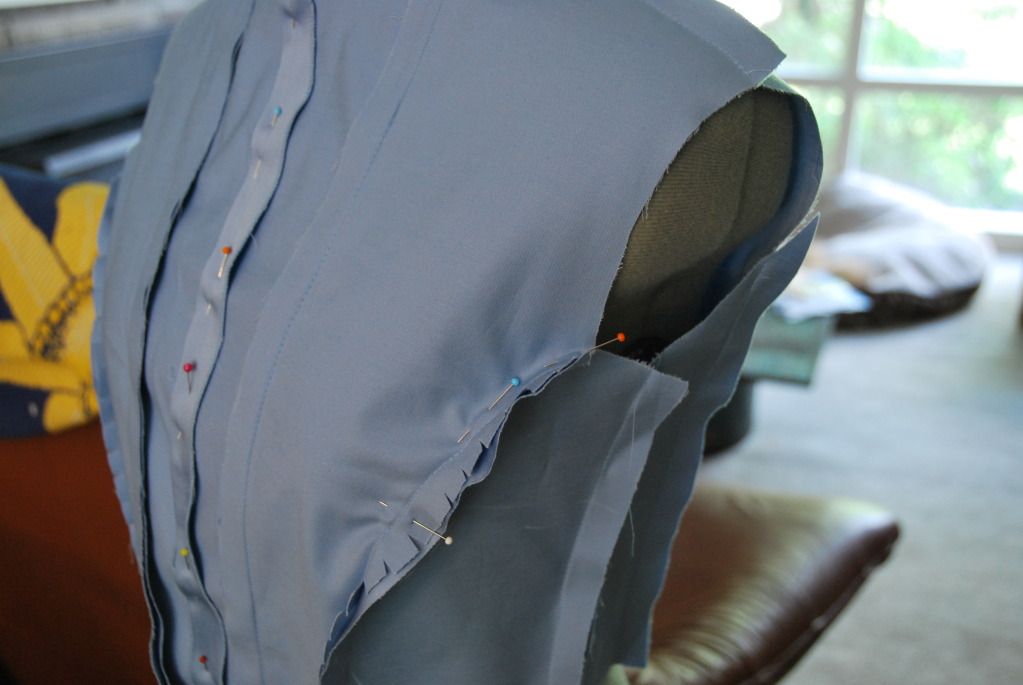
I first made a mock-up to determine if my pattern worked. Some adjustments were required--I ended up lengthening it by 1/2" and I took the shoulders in a bit--but overall the fit was good.
I sewed the front panels and back panels together. I pressed the seams flat.
I clipped and finished the tops of the seams that would be sewn in the
shoulder seam. I left the rest of the seams in the bodice unfinished so I
could make adjustments, but I had to do up the sides and shoulders
first so I could determine the fit.
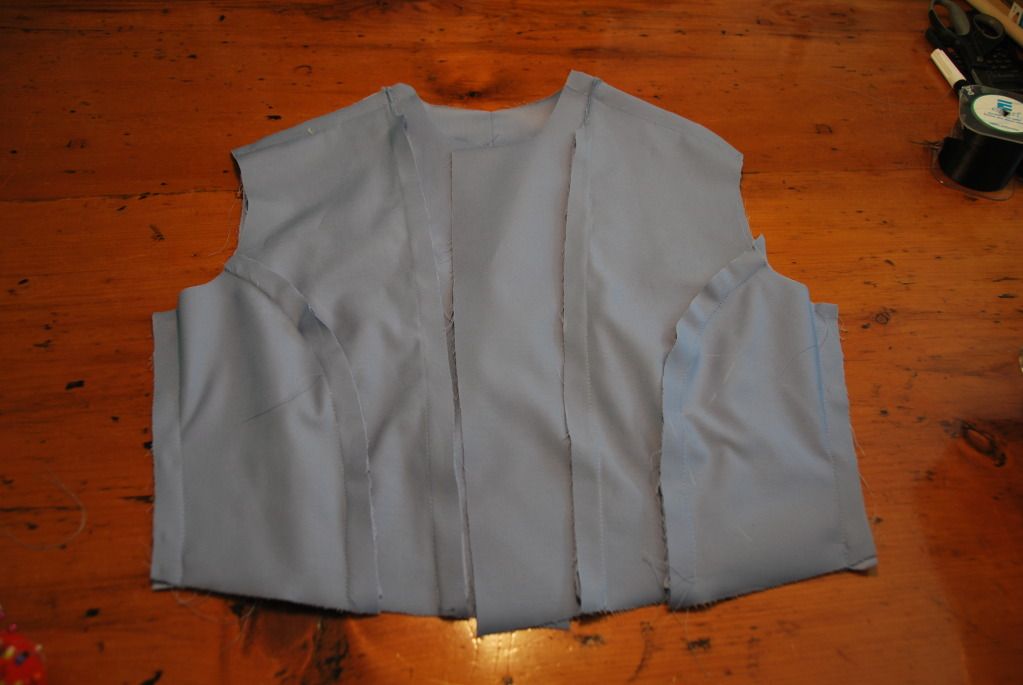
I then added the placket to the front where the button holes would go.
Once the placket was complete, I made a few more adjustments to the fit, particularly at the arms and shoulders. It is easiest to pin these adjustments when the garment is worn inside-out.
I tried it on and decided the fit was right,so I was ready to move on. (Please ignore the fact that my pants are kind of falling down even though I am totally wearing a belt...)
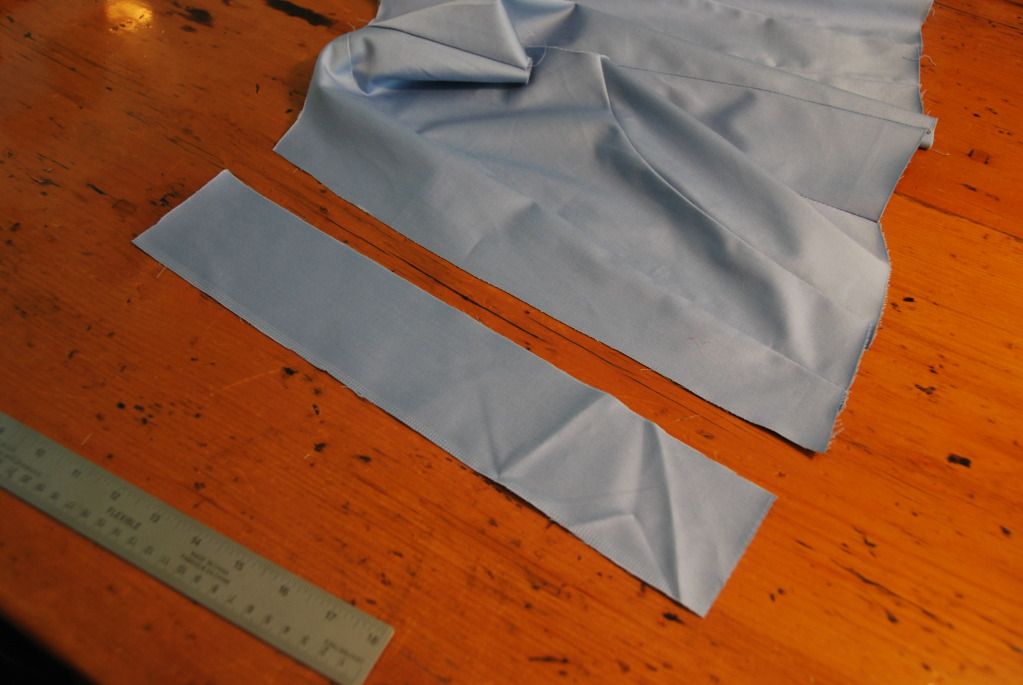
I then got to work on the collar. I based the pattern pieces off the blouse pattern I had from my Doctor Who costume, but I changed the shape of the collar at the front to be rounded as opposed to pointy.
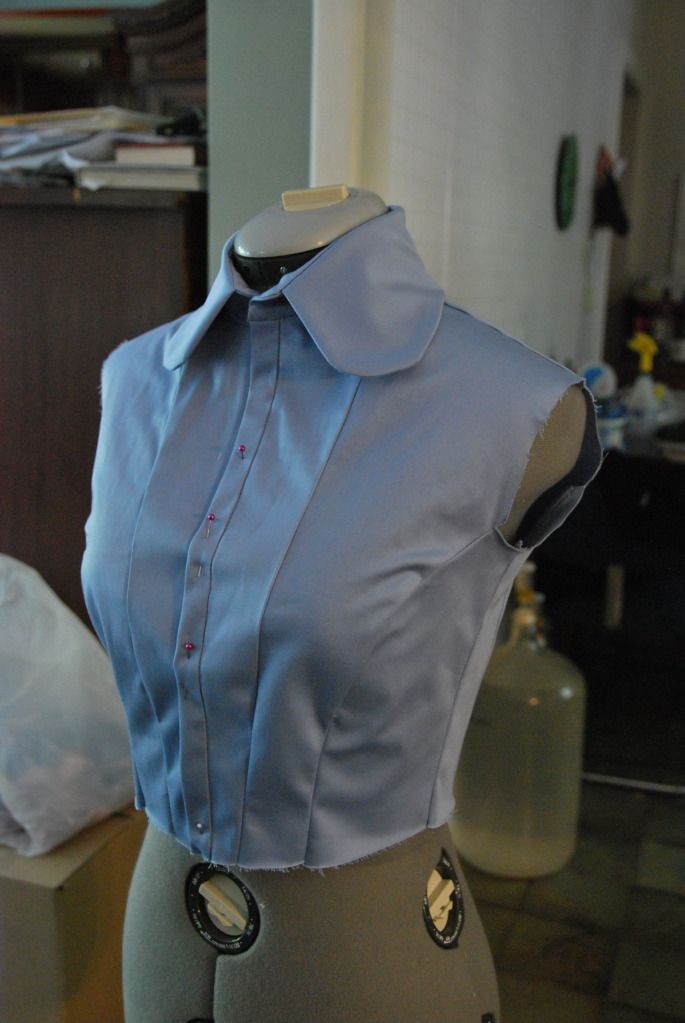
I sewed the outer part of the collar together, clipped it, turned it right way out and pressed it. Then I sewed it into the inner part of the collar. After clipping and pressing that, I was able to attach it to the bodice.
I finished the inner seams of the bodice, and then attached the collar. First on the outside and then using a ditch-stitch to finish the inside. Pretty! :D
I sewed my 4 panels for the skirt together and finished the inner seams. On on of the seams I left a 2.5" gap at the top that was un-stitched. This is where it would be attached to the front opening. By having this 'slit' I would be able to easily remove the dress when it was unbuttoned, but with the overlap it would be unnoticeable when buttoned up.
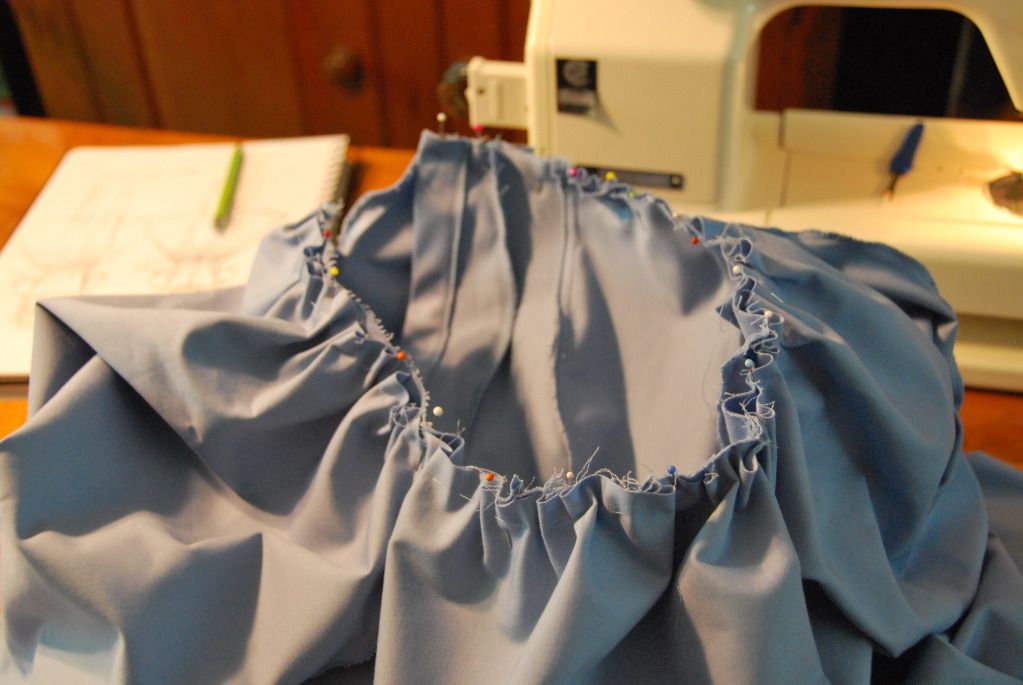
I then used a basting stitch and sinched up the skirt to the correct cicumference so it could be attached to the bodice. This was pinned in place and sewn on (right sides together).
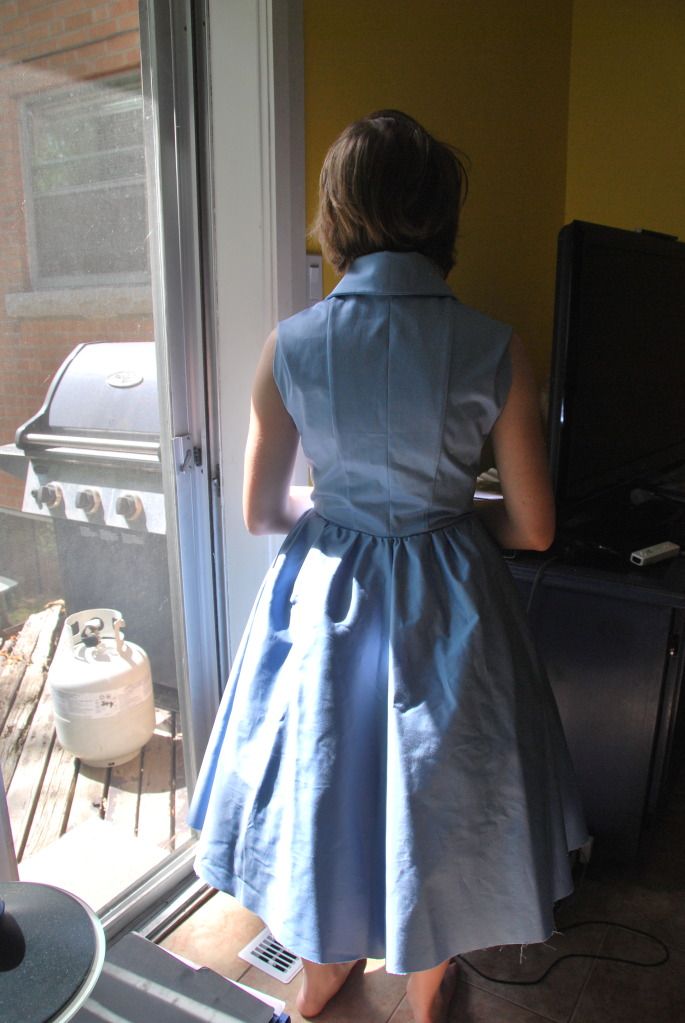
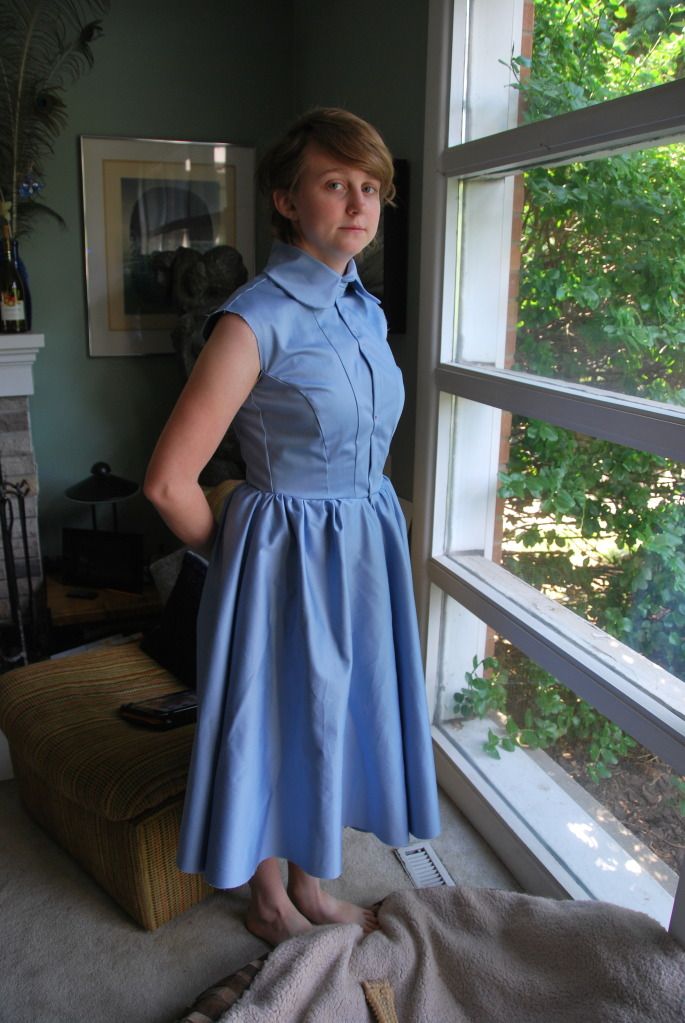
The dress so far. At this point I knew I needed to take in the shoulders even more, because even with a half inch seam allowance the sleeves would still sit too low.
I marked and pinned the dress for hemming. I had a sewing party with a friend and she hemmed the dress beautifully for me while I made gloves for another costume.
The sleeves were patterned and the sinched so that they would be pouffy. I attached them, and added a slit, which would be where the sleeve would close with a button. This slit was finished off with a bias tape made of my same fabric.
I then gathered the bottom of the sleeves and added the little cuffs. The button and loop were the finishing touches here.
The last thing I did for this costume was to add the button holes to the placket and sew on the buttons.
(My Alice posts will be divided into three parts: the dress, the petticoats and the apron. )
Special thanks to Mike of Eleventh Photograph for the awesome photoshoot! Go here for the pictures!
This was a costume that I had wanted to make for a long time and I am really happy with the end result. This version is loosely based off of both the '60's Disney movie, the original illustrations from the book and my own designs. I wanted to go less cartoon-y and more historical.
I had a great difficulty deciding on my blue fabric. I didn't want something excessively shiny, as I find that can look extremely tacky, but I did want a fabric that had a bit of a sheen and some nice weight to it. After much scouring I eventually found this fabric at a really reasonable price and also somehow managed to miscalculate and buy almost twice as much as I actually needed... whoops.
I started to pattern this by figuring out how wide I wanted the skirt to be at the bottom. I guesstimated the circumference and divided that number by 4. Then I calculated the length of the skirt, from where I wanted it to start to where I wanted it to fall. Keeping in mind that it would puff out in the end because of the petticoats. I drew this out on craft paper. I tapered it in at the waist, because although I wanted it to bunch and ruffle, I didn't need like 200 inches of fabric doing that at the waist...With great care and consideration, I patterned the bodice of this dress. Basing this off my measurements, a blouse pattern and my original design I created a bodice that was well fitting. I wanted to have a button up front, with 2 seams on each side making the dress taper in at the waist. The pattern I created consisted of 12 pieces that would form the bodice (+ the placket I would add later).
I first made a mock-up to determine if my pattern worked. Some adjustments were required--I ended up lengthening it by 1/2" and I took the shoulders in a bit--but overall the fit was good.
I sewed the front panels and back panels together. I pressed the seams flat.
I clipped and finished the tops of the seams that would be sewn in the
shoulder seam. I left the rest of the seams in the bodice unfinished so I
could make adjustments, but I had to do up the sides and shoulders
first so I could determine the fit.
Once the placket was complete, I made a few more adjustments to the fit, particularly at the arms and shoulders. It is easiest to pin these adjustments when the garment is worn inside-out.I tried it on and decided the fit was right,so I was ready to move on. (Please ignore the fact that my pants are kind of falling down even though I am totally wearing a belt...)
I then got to work on the collar. I based the pattern pieces off the blouse pattern I had from my Doctor Who costume, but I changed the shape of the collar at the front to be rounded as opposed to pointy.
I sewed the outer part of the collar together, clipped it, turned it right way out and pressed it. Then I sewed it into the inner part of the collar. After clipping and pressing that, I was able to attach it to the bodice.
I finished the inner seams of the bodice, and then attached the collar. First on the outside and then using a ditch-stitch to finish the inside. Pretty! :D
I sewed my 4 panels for the skirt together and finished the inner seams. On on of the seams I left a 2.5" gap at the top that was un-stitched. This is where it would be attached to the front opening. By having this 'slit' I would be able to easily remove the dress when it was unbuttoned, but with the overlap it would be unnoticeable when buttoned up.
I then used a basting stitch and sinched up the skirt to the correct cicumference so it could be attached to the bodice. This was pinned in place and sewn on (right sides together).The dress so far. At this point I knew I needed to take in the shoulders even more, because even with a half inch seam allowance the sleeves would still sit too low.
I marked and pinned the dress for hemming. I had a sewing party with a friend and she hemmed the dress beautifully for me while I made gloves for another costume.
The sleeves were patterned and the sinched so that they would be pouffy. I attached them, and added a slit, which would be where the sleeve would close with a button. This slit was finished off with a bias tape made of my same fabric. I then gathered the bottom of the sleeves and added the little cuffs. The button and loop were the finishing touches here.
Subscribe to:
Posts (Atom)