Monday, August 27, 2012

Echino Dress


Here's a look at how I made my Echino Dress. 'Echino' is the name of one of the lines of fabrics on Super Buzzy, which is where this fabulous print comes from. Super Buzzy is a Japanese fabric and crafts site. They have some really nice prints. Although they can be on the expensive side... This particular fabric was given to me by my sister Alex for my birthday, and I finally got around to using it!

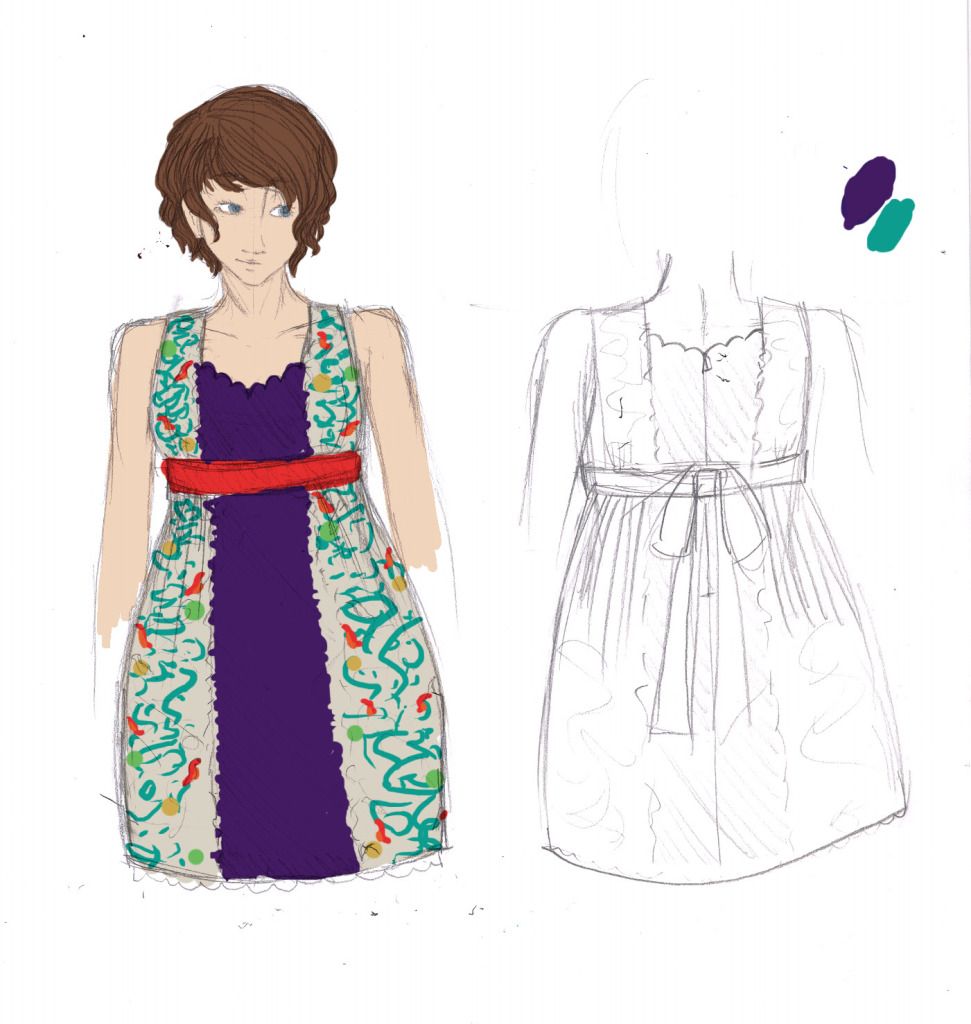
This is an original design that I made just for this fabric. Here is my design sketch, with the colour mock-up.

This dress was designed and made to wear to my cousin's wedding. Pictures of that should be up on Photo Escapes soon...

I started by taking my measurements, and then I constructed pattern pieces based on that and my design. (+ seam allowance)

I made a broadcloth mock-up of the top before I went to the good fabric.

I cut 2 pieces of the front and 4 of the back piece. Each pair was sewn to itself at the neck and armholes, then turned inside out. This finished the neck and armholes nicely.

I finished the mock-up, made note of the adjustments on the pattern pieces and went to work making the good version.

This dress was designed with the pattern in specific places, so I had to be careful when I was cutting that the patterns were in the correct places. This makes fabric conservation a tad more difficult...

I cut 1 front piece and 2 back pieces in my nice fabric and the same quantities for my lining.

I sewed the pairs to themselves. (Right sides together.)

The tricky part was the scalloped detail on the neckline. This had to be drawn out on the fabric and then traced with the stitch.

Then I carefully clipped the excess and turned it right way out.

I stitched my seams together at the shoulders and the sides. Then I tried it on Molly.

There was a bit of a gape at the armhole, so I solved it by putting in darts. Darts were put in the front and back. They had to be done carefully so I didn't decapitate any birds... Hahaha


Having then measured under my bust, I gathered the fabric to that measurement and sewed on a band.


Then I made a tube of my accent fabric, that would be flattened and later be sewn onto the band as a tie at the back.

I cut my pieces for the skirt, and sinched them up with a basting stitch, making sure the patterns would line up.

This was then sewn to the band.

Then I finished the inner seams and closed up my back seam, so I could put in the zipper.

Zipper in!

The next step was to attach the tie to the band. It was made so it would be tied over the zipper.

After hemming the dress was done!


The back is a little off, and I am not 100% satisfied with the fall of the skirt, but it was an excellent exercise in dress-making!

Here is the little photoshoot my mum and I did at the wedding. :D

Important Notice

I have reached my picture limit for blogger. Up until this point I have been foolishly posting my images at full size. I shall be going back through all my posts and subsequently downsizing the images. This will understandably take some time. I am going to fix this problem, but it may interrupt the posting for a week or two.

Sorry in advance... :(

August Update

So it's the end of the con season for me! I made a record number of costumes this year! I also attended a record number of cons! (For me anyway. 4 is a lot.)

Our Fanexpo table was a success, though I didn't make the number of sales I had hoped for. Plenty of stock still left over, so if you are interested in Owl bags, Panda bags and hair clips hop on over to my facebook page where I will be putting my leftover stock on sale! And from there hopefully I will be setting up shop on Etsy. Fingers crossed.

 Fanexpo was pretty awesome this year. I got lots of compliments on my costumes. ;D Also got to meet some cool celebs. John Barrowman and Chris Sarandon. Pretty awesome. Also got to take a picture of me as the doctor in the Delorian. Irony abound. (And for those of you who don't get either reference: It's funny because I am in the wrong time machine. Also, go watch back to the future. It is necessary.)

I also have business cards! New layout coming soon to match them!

School is starting up again in a week for me. I will try to keep updates frequent. But no guarantees. :/

Now excuse me while I go clean my room. Apparently all my costumes have exploded out of my closet.....

Wednesday, August 15, 2012

Nickel - Tube Head - Katamari


Greetings humans! ;D This post shall go into the details of how I constructed the tube head for Nickel. I started exactly the same as I did for Prince and Princess, by creating a hole in the bottom of the tube for my head to go through.


My helmet had this stupid point at the back which needed to be sawed off... :P And so I did.

I added the blocks of foam so  that the helmet, and by extension the entire head, would sit at the right height and angle. This was especially important for Nickel because the head had to clear the shoulders of my box body.

We visually determined the placement, marked it out, and then glued it all in place.

I had my friend Ian do the soldering (and re-soldering) of all my LED circuits for this project. I ran out of time to do it myself. It looks fantastic! I will go into more details of how those were constructed in a later post.

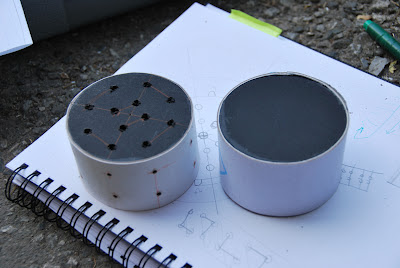
The hubs that the LED's were put into in the red cylinders were made from a disc of foam core and a cylinder of illustration board. And lots of glue. LOTS.

I drilled a hole where each LED would go, evenly spacing the array. Then I farmed them out.

These beauties were returned to me! ;D

I then taped all the exposed wires so I wouldn't get a crossed wire and end up with an electrical fire. That would be very bad.

...Particularly because it is not so easy to get this costume off quickly...

Then I cut 2 foam core discs to go in the end of the tube. These would fit snugly and be glued into place.

Then I cut a ring/disc that I glued around the bottom of each hub, so that they now resembled a top hat crossed with a jellyfish.
Then I cut a thin ring of foam core to act as an inner support for my red cylinders, and a circle of a plastic binder to act as a frosted filter. The black rings were my only gluing surface for this entire cylinder.

Meanwhile, I had Alex add an illustration board outer layer to my head. (The sonotube had obtained numerous dings in the garage.)

Then I worked on the cylinders. Using clear tape, I carefully taped together strips of red acetate  and curled them around.

I had a friend of my mum's--who has access to a laser cutter--cut me 2 perfect circles in red plexiglass. These were glued to the frosting circle and then the foam ring.

Alex then glued the 2 foam discs in the ends of the tube. The eye slot and neck hole were also nicely cut.

Back in the land of plastic, I carefully glued the acetate roll to the black ring along the top edge. The end result is a bit fragile, but looks quite clean and I am very happy with it. Because of the multiple layers to the red acetate, it did not need a frosted filter.

Alex then spackled the joins in the illustration board and sanded them out to achieve a nice, smooth and almost seamless look! ;D


With the 2 red cylinders done I was ready to assemble. The top-hat-jellyfish were carefully inserted through the neck hole. Then the foam core discs--ones on each end of the tube head and their respective jelly-hat--glued together, making sure that the electrical hub was centered in the middle of the hole. The red cylinders--which were made to fit into the hole exactly--were slotted over the hubs and then glued into place.

The border on Nickel's face was finished with a rectangle of craft foam, glued on and painted grey. A fabric piece was attached so that Nickel's face flaps up like the rest of them.

Alex says: I LOVE GLUING!!!! D:<

...Which is her way of protesting against all things sewn. :P
 The antenna was glued on and so were the decorative nuts. ;D

The final step was to solder the switch and battery into my electrical circuit to make everything work!

Beauty!

An in depth look at Nickel's circuitry--including diagrams and calculations-- will be coming up in the next month or so, but I will be taking a bit of a break from all things Katamari for the moment. I am also planning on doing a tutorial on how to put together a simple LED circuit. Those will probably be up in september or october sometime.