Part 2 of the Squids or Kids series! If you are interested in seeing how we put together the outfits and accessories, go here! Once again credit to Elemental for her fabulous job doing the group photoshoot! So many really great shots!
Let get down to business; time to talk about those crazy squid hats! Patterning and painting the tentacle hats was my big group contribution. It was a bit of a challenge for me, as I have very minimal experience working with spandex/stretch materials.
We did some google image research to see what other cosplayers had come up with. We saw quite a few who had made theirs out of fleece. We decided not to use fleece because we wanted to a) be shiny and b) be paintable for the gradient. We also saw ones who had made the tentacles and covered them in wig fibers. We all decided that was more effort than we were willing to put in. I decided to go with a hat, while the other girls were more partial to the "tentacles sticking out of the wig" idea. So for them we used the same tentacle pattern, but instead of sewing it into the hat, they stitched/pinned theirs directly to their wigs. I may go back and change mine to match the rest... I'm still on the fence about that.
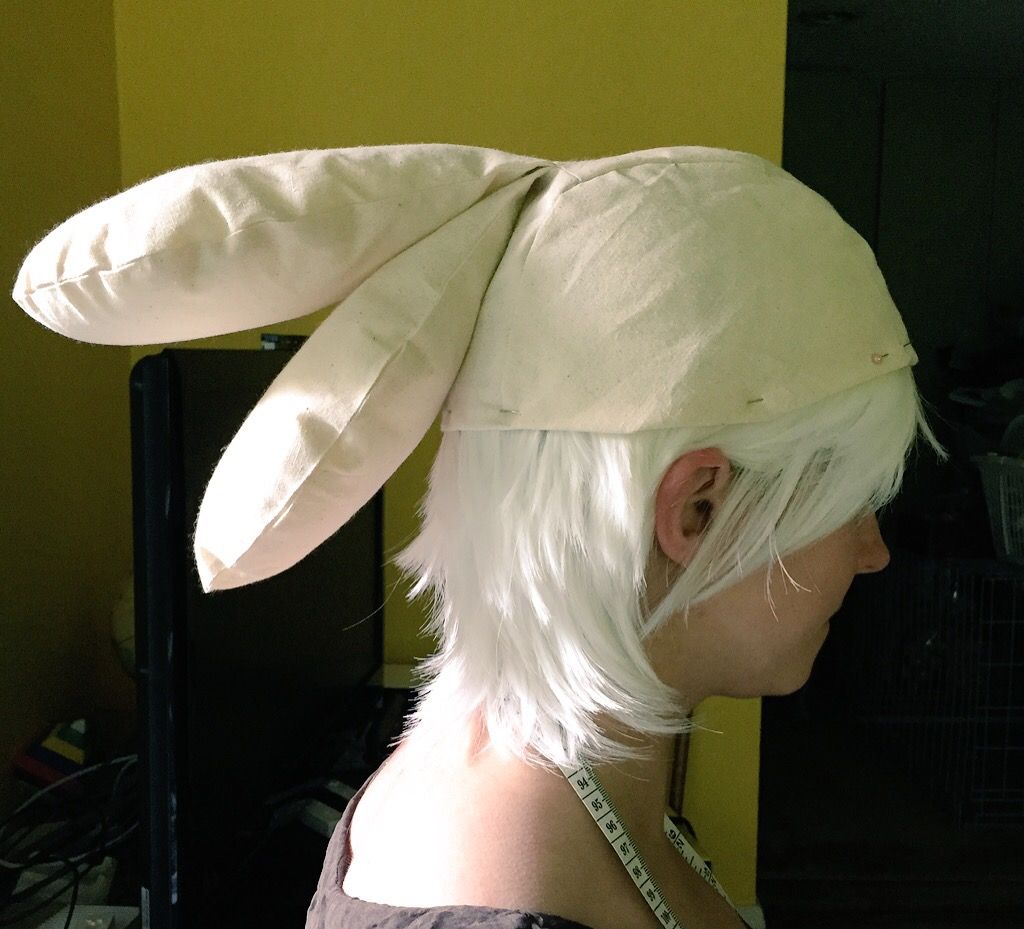
For the girl hat I started with drafting a basic pattern. The patterning process was very loosely based on how I patterned the Newboy Cap a few months ago. It consists of 5 tapered panels of various sizes that meet at the top. 1 front panel, 2 back panels, and 2 side panels that were the fronts of the tentacles.
It is important to note that since these hats were being worn over wigs, all of the measurements were taken while wearing a wig and all mockups were tested over a wig for a more accurate fit.
The one difference between the mockup and the final hat is that after doing the mockup I realized that creating "bangs" with the front flap was going to be too challenging in spandex. So I opted to instead make the bangs of the wig stick out from underneath.

For the boy hats, I knew there needed to be a seam near the top that the tentacles could be attached from. The boy hat pattern ended up looking very different than that of the girl hat. It consists of two "semi circles" as the sides, and then a rectangular shape tapered near the top seam for the center front and back. After I put together a mock up that looked alright on me, I then had to create a second mockup in a larger size that looked alright on Andy. Because my head is really small.
After creating a mockup that I was satisfied with, I went fabric shopping. Affordable Textiles on Queen St. had a good colour selection of spandex for a decent price. When you are doing a group this large, it is more affordable to share materials--in my case the 1yd of white spandex I bought was enough for 3 pairs of girl tentacles with a bit of leftover. But the 1 yd length was necessary anyway because the tentacle pieces are so long.
After cutting the pieces out I realized that if I wanted to paint on a gradient on the green side and add a sucker to the white side I would have to do it before I sewed the two halves together. In both cases I wanted to work on a flat surface.
For the paint job I originally was only in charge of doing my own and Brian's (as payment for making my tank). But since I was the only real painter of the group, I was soon asked to do the full set so they would all match.
The gradient had a different tint to it in every reference photo. In gameplay most took on an almost purple-y hue at the tip, but in still photos it was a darker shade of the team colour. I decided to go with a darker shade of the team colour so it wouldn't look weird.
I was going for a watercolour & paint splatter look. I used round brushes and fabric paint. I did all the ones that had to be painted the same colour back to back so I could be consistent in my colour mixing. I started with the greens, then orange, then turquoise and lastly purple. I typically worked with a pair at a time.
I started by mixing my darkest colour. This would be the only colour I mixed for each. All of the hues in between were created by watering down my brush before painting. Sometimes I would only paint with water, to help blend the colours. At the very tips I used almost purely fabric paint. I would make darker spots here and there. Lastly I loaded up my paintbrush with paint and ran my thumb through the bristles to flick small spatters of paint onto the fabric. This left the dark little speckles. There was no real science to this process.
Above are the original 7 I painted, labelled as to who they belonged to. Louise and Patrick will be joining us for Squids 2.0.
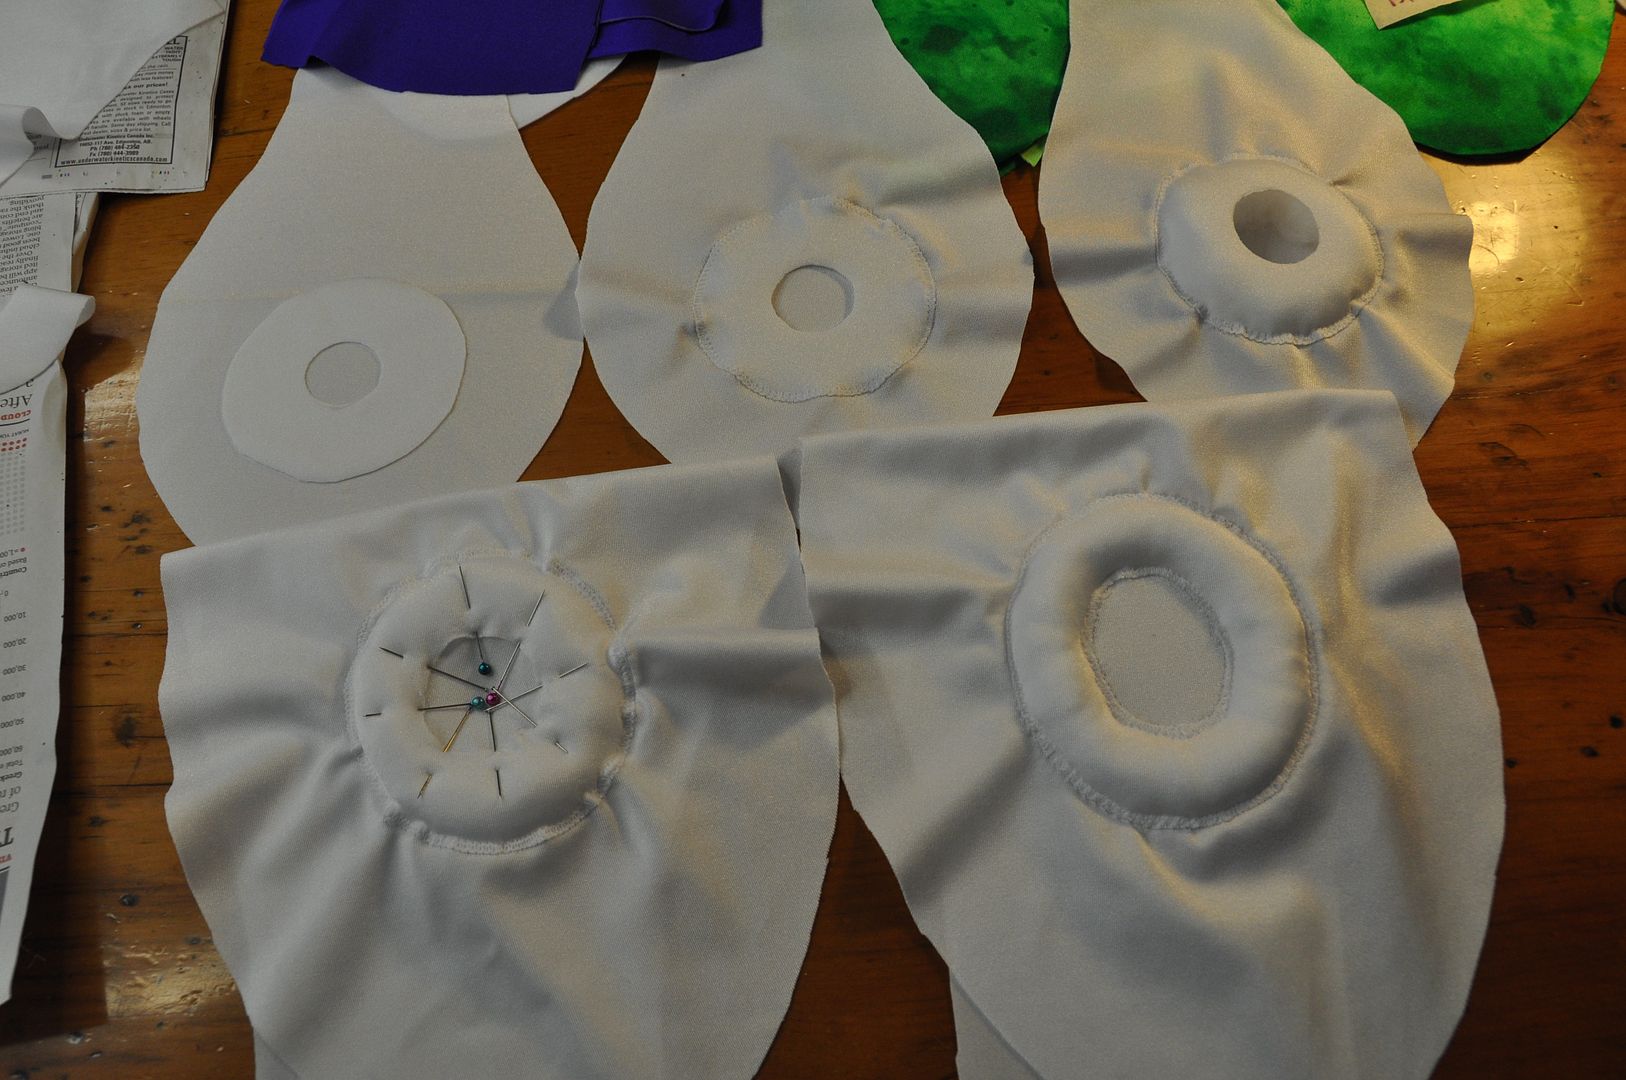
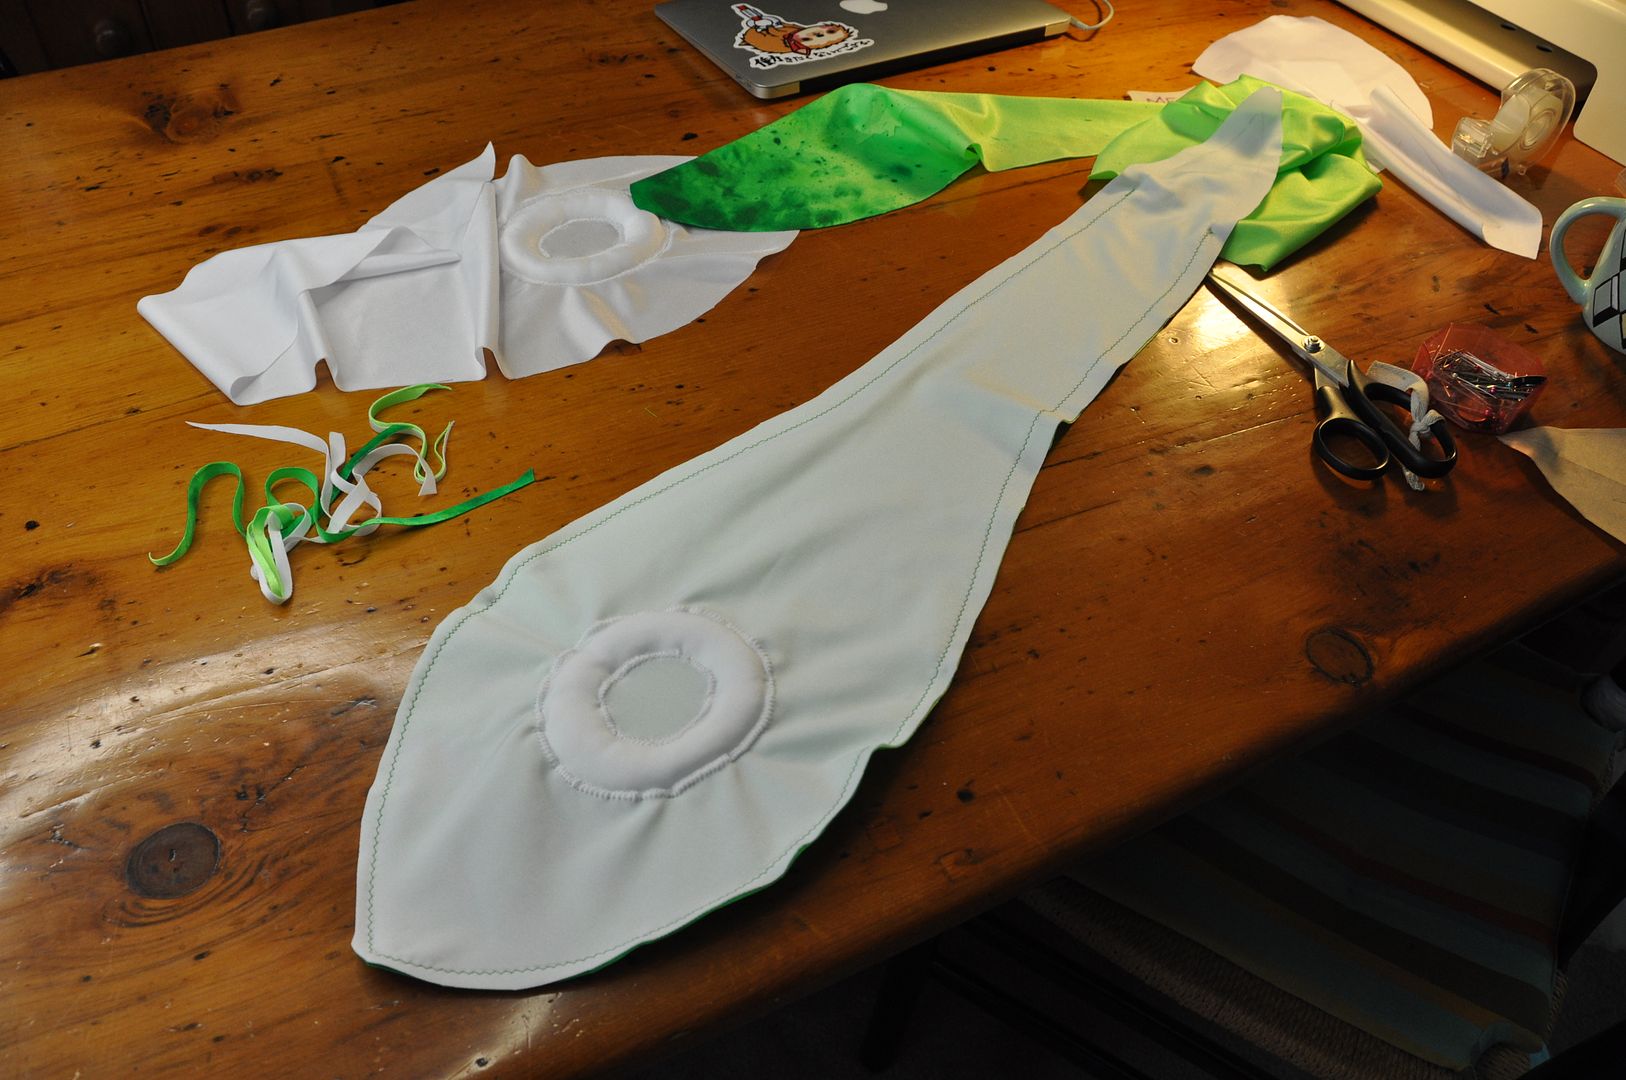
The process for the suckers was relatively simple. First I cut out a 'donut' shape in white spandex. Pinning it in place, I then used a zig-zag stitch to appliqué it to the tentacle around the outer edge. Then it would get stuffed from the center. Then the center edge was pinned down. Lastly the center hole edge would get carefully zig-zagged closed. The picture on the left shows each step of the process.
Many thanks to Michelle and Andy for coming over and assembly-lining the cutting, pinning and tentacle sewing process while I painted. They did a great job!
The next step was to sew the tentacles together. They were pinned right sides together and then sewed with a slight zig-zag stitch. We left a hole at the base so we could carefully flip them right way out and stuff them. This many tentacles required a surprisingly large amount of stuffing!
For the girls who didn't want hats the tentacles were at this point handed off to them to attach to their wigs. For myself and the guys, the next step was putting together the hats.
For the girl hat I sewed the two back panels together first along the center back seam. Then I sewed the two side (tentacles) to the center front piece. Then I sewed the sides to the back panels and trimmed the excess seam allowance from inside the hat. Then I hemmed the hat, tacking down the white fabric on the inside in the same stitch.
I picked up this green wig from EpicCosplay. The colour match is pretty darn good, especially since there are so few colours of green to choose from when it comes to buying wigs.
 Excluding my wig--which I cut myself--the rest of the group's wigs were cut and styled by the ever lovely Louise, who will be joining us for Squids 2.0! For the girls we cut blunt bangs straight across the front and trimmed the backs a bit. I wanted the back of mine to be more flippy, so I pinned it up in sections, lightly sprayed it with hairspray and then used a warm hairdryer to set the curls. Then I combed them out. They were a bit too curly, so I used a warm hairdryer again to get them to relax a bit.
For the guys Andy and Brian went with two different styles. For Andy's wig, Louise took the bangs and pulled them completely back and pinned them out of the way, under the wig. She left the sideburns, which she trimmed a bit, and then trimmed the back as well. For Brian, he wanted to keep the bangs, so she just trimmed them to be shorter and out of the eyes. The sideburns were done similarly to Andy's wig.
For both of theirs, because the weight of the tentacles made the hat back heavy and the spandex was super slippery, they had to have the hats hand stitched to the wigs. For a finishing touch they added their own hair accessories to the tentacle "topknot" hat. As far as I remember Andy used some bright coloured hair elastics. Brian added the white headband and a dollarstore bracelet as a hair tie.


do you sell these???
ReplyDeleteThank you so much for this!! I'll be doing an agent 2 cosplay so this was pretty helpful for the tentacles, even if they're a little more complicated.
ReplyDeleteWhat type of fabric did you use for the hats instead of felt? I'm fairly new to fabrics and sewing and I'm definitely not skilled enough to figure it out from a picture alone.
ReplyDeleteThese costumes are great, btw, I love the paint job on the fabrics!
-timbits
These are perfect! Did you make the tank and gun, or did you buy them?
ReplyDelete