Tuesday, January 12, 2016

Vaporeon Gijinka - Under Layers - Pokémon


Let's talk about under layers!  This includes the front drape--with its built-in bra--and the navy booty shorts I constructed. If you want to see how I made the Bolero Jacket, go here!

Once again many thanks to Elemental Photography for the great photoshoot! I love this reflection shot. :) Credit for the original costume design goes to Cowslip!

Since the design only shows how the front looked I had to design a suitable back for the costume. I decided to make a second drape at the back, since it seemed logical and would cover more skin. Also, the design itself was originally designated as one of her "male" designs. I made a slight alteration to the design of the drape at the front for the purposes of female modesty--I changed the proportion of how the drape sat across the chest so it came further back towards my armpits at the top and would therefore properly cover my bust. This is one of the few minor changes I made to make the design work for me.

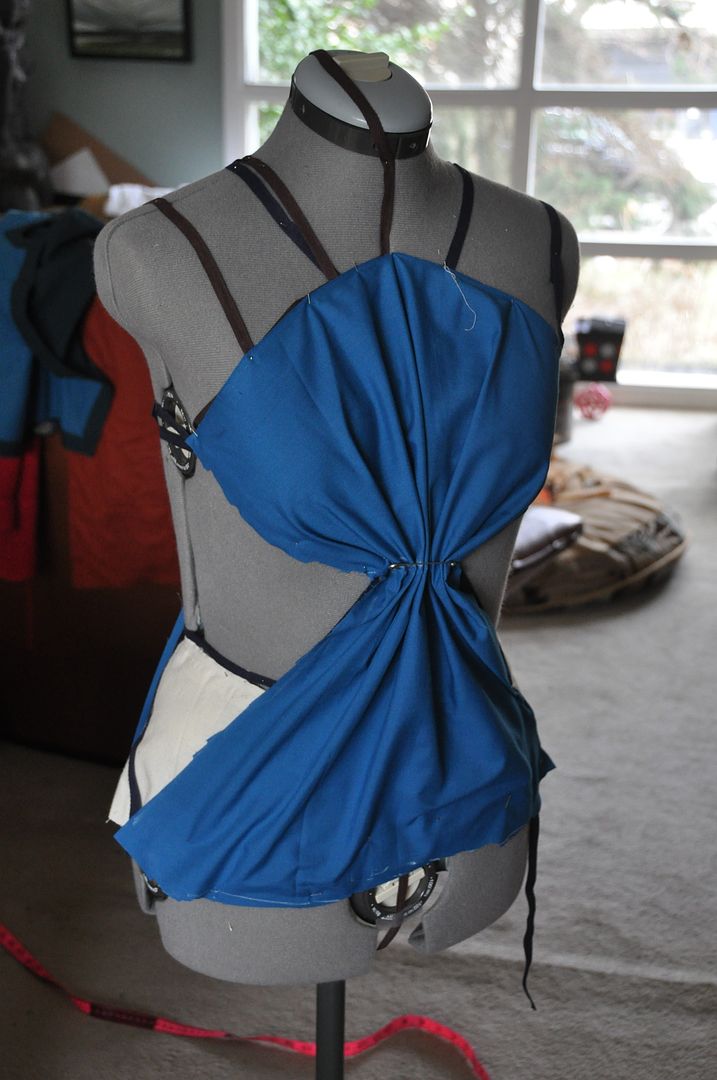
I started by using twill tape to outline on Molly where I wanted the gaps at the sides to be. I used some cheap broadcloth to drape the pieces.
I pinned and trimmed the fabric until I was satisfied with the way it gathered. I used these to create my pattern pieces.

The fabric I bought was pretty see through, so I double layered both sides. Each piece was sewn rights sides together along the side edges and turned right way out. Then I top stitched those edges to keep them from shifting about. This fabric was fairly uncooperative...


I created shoulder straps for the drape piece in the same beige cotton. The close using velcro to make them a bit more adjustable.

The bottom edge of the drape was finished with a band of beige cotton. On both sides where it overlaps it has velcro to adjust the size around the hips and allow me easy on/off.
 
I had to build a bra of sorts into this costume. I bought nude coloured bra cups in the right size. Awkward shopping moments include me trying to find the right size by holding them up to my body and comparing. Hahaha

Using beige cotton fabric and elastic I made the bra layer to fit comfortably. It opens at the back of the band with hook and eyes. I tacked the bra into the draped piece at the front so it would shift and be revealed. The band at the side peeks out a bit when I lift my arms, but it is not the end of the world.

The bra itself provides moderate support--I am not super busty, so I don't need that much support. Mostly it needed to be something that I could a) sew into the costume, and b) choose the placement of the straps so they wouldn't stick out too much and look weird. Had I used a regular bra bought in a store, the band would be clearly visible at the sides. This one I made comes up higher in the sides and back than a typical store bought bra--which is why it doesn't give maximum support. Also I didn't give it an underwire. Because I didn't think it would be super necessary.

The last detail was the cording. I bought tons and tons of navy blue cording for this costume. It wrapped around the gather at the center front and looped to the back. It's tacked in place so it doesn't move. The ends of the cord were dipped in clear nail polish so they wouldn't fray.

The other under-layer for this costume was a pair of booty shorts. Somehow I didn't clue in until the very last minute that the wrap-skirt did not actually cover all at the front and I didn't have anything suitable to wear underneath. Hence, I decided to make a very simple but unobtrusive pair of matching shorts.

They were made of some navy blue jersey I picked up at the last minute. I patterned them based off some leggings I own. I pieced them together at a friend's house so I could use a serger.

The hem was done with a zig-zag stitch on my own machine. The waistband had a roll-over where I inserted an elastic band.

I think this is one thing that convinced me I needed to get a serger of my own... I have been avoiding stretch fabrics for so long because I lacked the equipment to work with them.

Sunday, January 10, 2016

January Update

It's 2016 suddenly--and that means new projects for the new year!

...I realize I've been disappearing a lot lately. I am having trouble sticking to a regular posting schedule. I could apologize, but I won't. Blogging is a hobby, and as much as I love it, sometimes real life comes first. My plan for the new year is to post once every other week. I think that will be more manageable for me. Upcoming content includes Vaporeon, Vaporeon and more Vaporeon. With a few DIY projects I did this winter.

My first project I've started is to build myself a website for my portfolio. It will be nice to have a professional-looking site to house my costume and design work. It's taking longer than I thought though, because technology is my worst enemy. And also because I misplaced a lot of files when I transferred everything to my new computer this fall. I've spent the better part of this week reorganizing my hard drive. Uuuuuugh.

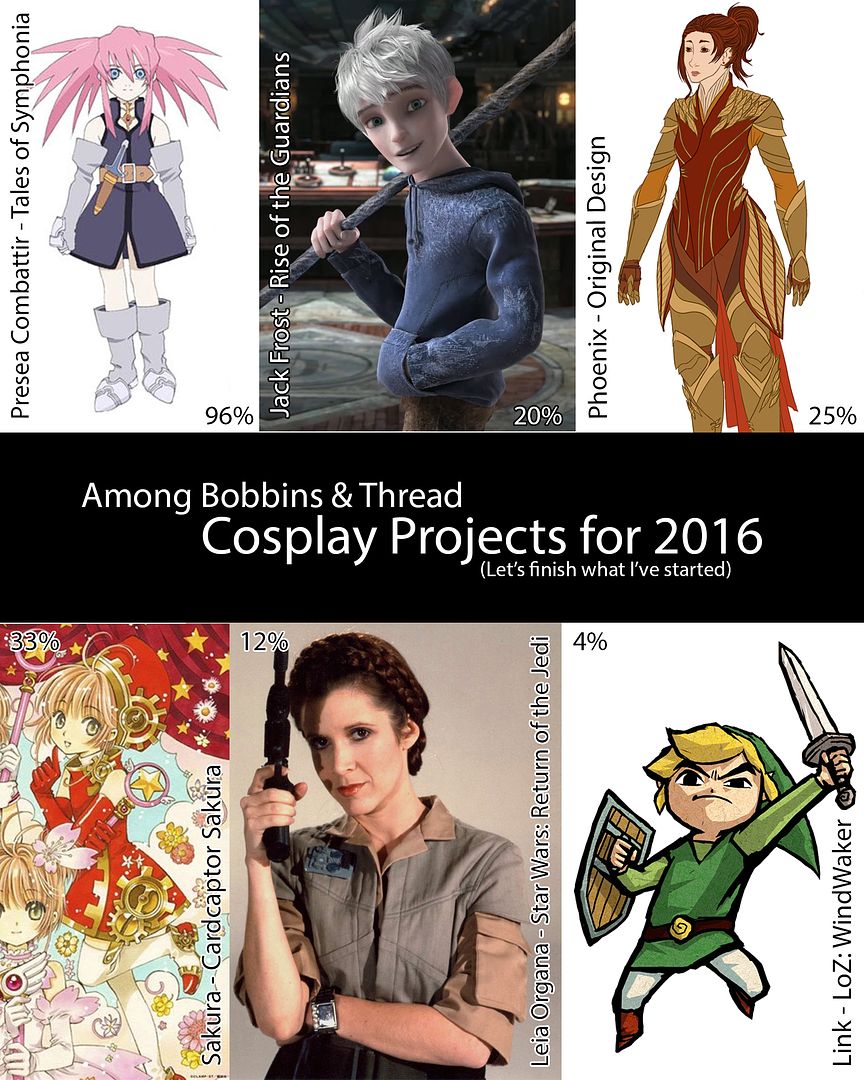
Without further ado, I present this year's cosplay projects!
6 costumes that are in varying states of completion (represented by the arbitrary percentages I have labelled them with). I make no promises on any of these, but the general goal here is to finish what I've already started before undertaking any more hugely complicated projects.

Presea: Costume started in ...2012/2013??? I wore it to Otakon the same year I did Kero & Suppi, but I have zero finished pictures. Unfortunately, the giant battle axe sustained serious paint-chipping damage in transit. I just need to sand down and re-paint the axe and this costume is finished. I would really love to do a photoshoot of this in the spring.

Jack Frost: I started this costume the same winter the film was released (2012), but I grew disinterested because it quickly became a costume that was SO overdone that con season. The costume pieces are built but need detailing. I think this will provide an interesting fabric painting challenge for me. I would love to have this done for a winter photoshoot, if I can.

Phoenix: An original design I did for my final project in university. My focus there was building the armour, but since I learned so much during the process, I want to go back and re-work some things. I don't expect to finish this costume this year, but I would like to build the tailored vest. The goal deadline is CostumeCon in 2017--which I think is a realistic deadline.

Sakura: Started this past September. It feels like I am trying to build every single Sakura costume in existence. I assure you, this is not the case. Just this one. And the other 2 I've made. And maybe some more after that.

Leia: Started this past October. Building the uniform pictured above as well as the poncho and helmet from the scenes on Endor. By far one of my favourite Leia costumes--except for perhaps her bounty hunter disguise from the same film.

Link: My excuse to bring out King of the Red Lions again. He's been sitting in our basement collecting dust. It makes me sad. The best part about making a Link costume is deciding which props to build. I think I want to make the mirror shield... But not sure what else...

Anyhoo, those are what I plan to work on this year. I may add another project to the list later on--as is always bound to happen when inspiration strikes.

In other news: I am taking a millinery course in night school starting later this month. Hat-making ahoy! Pretty stoked for that. But this may lead to some previously unplanned Downton Abbey costume. I love the heck out of that show and miss it already.

Hats off to a new year! Lets make it a good one! ;D

Thursday, December 10, 2015

Vaporeon Gijinka - Bolero Jacket - Pokémon

It's finally here, the one you've been waiting for--Vaporeon. In terms of quantity of pieces alone this is perhaps one of the most complicated costumes I have ever constructed. Hence, this one will be broken up into 5 shorter posts.

First of all I would just like to my deepest gratitude for the huge amount of support I received working on this costume. This one was a long time in the works. Special thanks go to my friend Harriet who dedicated many hours of her time and hand-stitched on 95% of the beads, hooks and clasps. Seriously, this costume wouldn't be nearly as sparkly without her help. I gave her the official title of Bead-Dazzler. Another shout out to my friend Alex who accompanied me on my initial fabric shopping scavenger hunt and helped me pick out the perfect fabrics for this costume.

Secondly, a million thank you's to Elemental Photography for the wonderful photoshoot and the wonderful pictures. I wasn't feeling so confident in a costume with so much exposed skin, but Amanda made me look and feel like a million bucks! You rock!

Credit for this amazing design goes to Cowslip. I discovered the Pokemon Gijinkadex collection of designs about 2 years ago now, and I fell in love with them. There are so many beautiful ones to choose from--I knew immediately that I wanted to cosplay one eventually. Picking between them was a challenge. I think I narrowed it down to 4, and then I let you--the fans--give your opinions on which you wanted to see me do. The votes were pretty divided--the Moltres design was also pretty popular--but eventually the decision was reached that Vaporeon would be the best one to do. Perhaps I will revisit the Gijinkadex in the future and do another one, but for now I am satisfied with Vaporeon.

I started the costume in May of 2014, originally intended to compete in the Anime North Masquerade later that month. This was at the same time I was working on completing the last 2ft of embroidery on my Forest Guardian and also building Sakura (1st opening outfit) and Isabelle--both sizeable projects. You can definitely say that I over-extended myself, particularly because I hadn't planned to still be working on the Forest Guardian at the time--I had intended to complete that for CostumeCon32 in April. By the time I hit AN prep suffice to say I was already super burnt-out.

I knew from the start that Vaporeon would be a challenging build--there was tons of detailing on every single piece. And there were so many pieces. No seriously, this costume has 22 individual pieces. It is actually kind of amazing that this costume is the one with the most pieces, and the most layers, while simultaneously being the costume with the most exposed skin I've ever done.

Ultimately, I underestimated the complexity of the project, by the time Anime North rolled around it was still not even at a point where it was wearable. I decided it was not possible to finish on the timeline I had and decided to compete in Forest Guardian instead. So I made my new goal completing it for AN2015.

...Unfortunately due to my hectic job schedule, that didn't happen either. Hahaha I didn't even try I was so busy. I finally completed it for Otakuthon later that summer--it took another month to fully complete the costume. I am pretty happy with the end result. There are only a few small things I want to adjust with the sleeves, but the rest of it worked out fabulously.


(Credit for the above shot goes to Don Dolce Photography!)

Let's talk about the first part of the build--the bolero jacket. It is the first piece I started and one of the last things I finished.

I started by draping the pattern for the bolero. I first outlined the edges and the seam where the big collar would be inserted using twill tape, then I used scrap pieces of muslin to pin in place, following the curves of the body form and trace my pattern pieces. It created 4 pieces. I then tested this pattern by making a mockup.

The next step was to pattern the big collar pieces. I made the first upper collar mockup out of paper so that it would be rigid, which would give me a better idea of what the final wired collar would look like. I ended up altering it slightly, then I made the second under collar with the offset spines.

Below you can see the pattern for the upper collar with the under collar below it.


I cut my collar pieces out of their corresponding fabrics. The upper collar was made with two layers of white cotton, sewn right sides together along the spined edge and then carefully clipped and flipped right way out. I ironed it and top stitched 1/8" from the edge to finish it nicely.

The under collar was made in the same fashion-except that it was made with the bottom side in the blue silk to match the rest of the bolero.
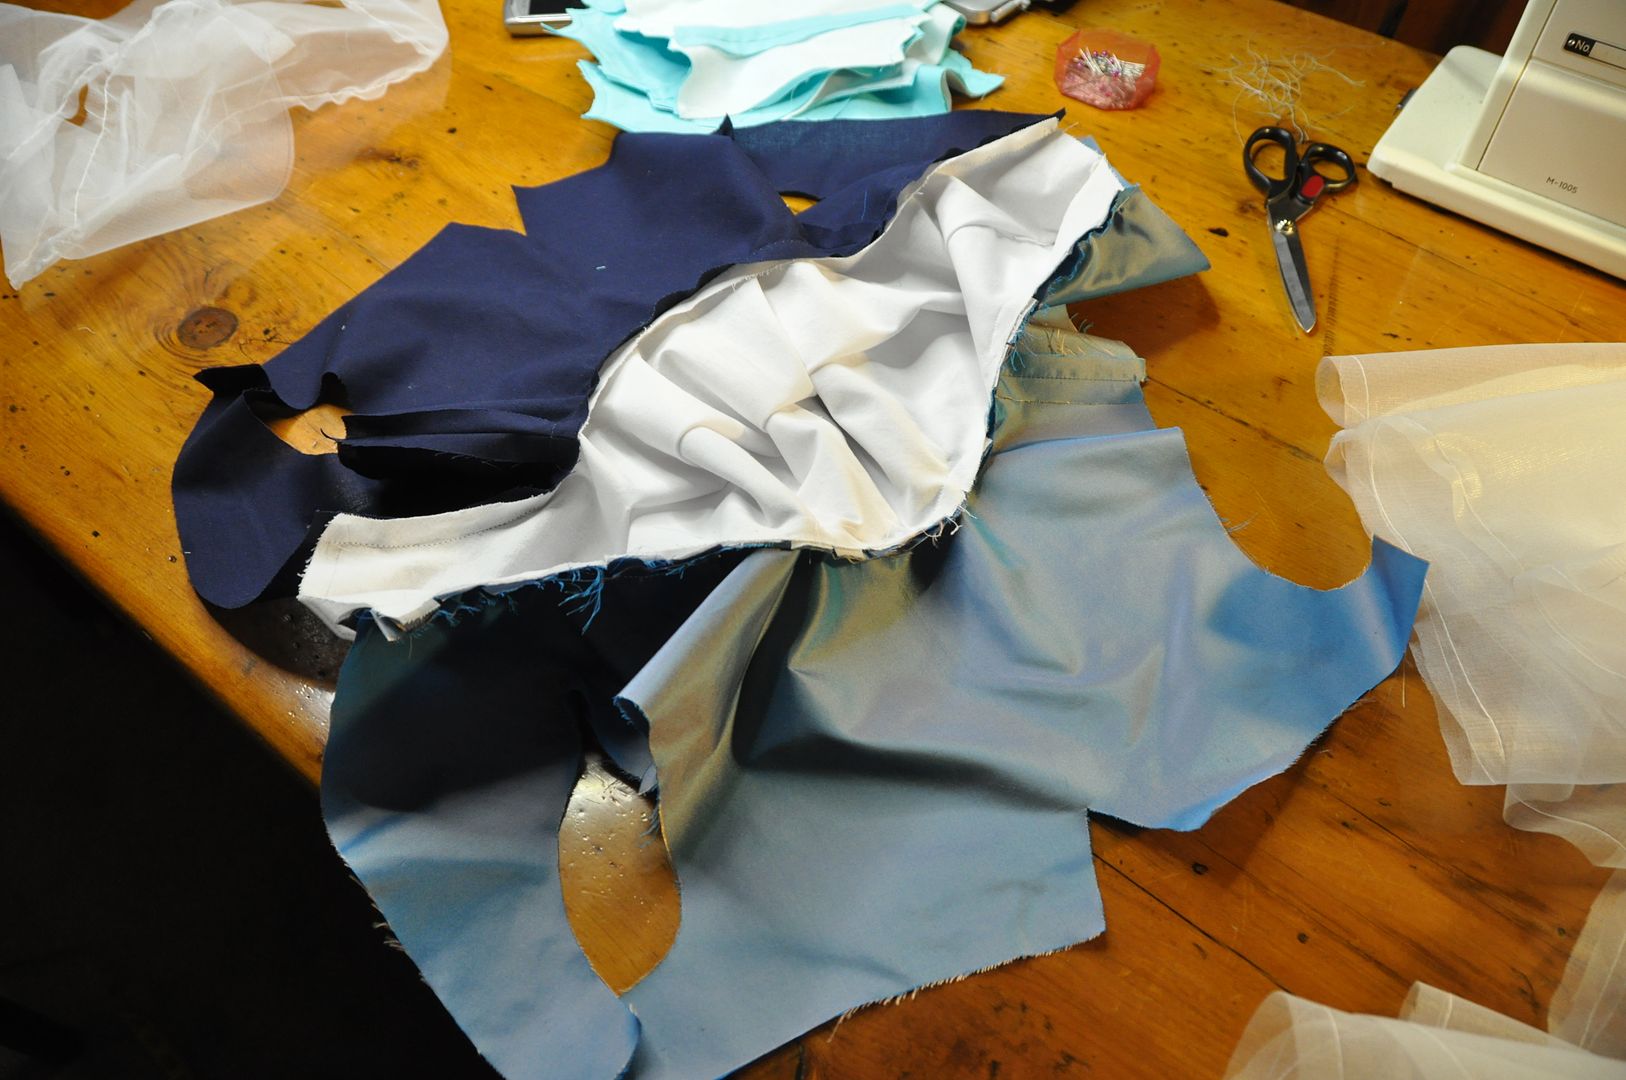
Here you can see all the pieces that made up the bolero jacket. Since the blue silk was so thin, I decided to line the body of it with a leftover navy cotton I had in stock (leftover from my bicycle skirt).

The piecing together of the collar was exceedingly complicated. I will do my best to explain, but ultimately I will have to say that I barely understood what I was doing. hahaha

There are 3 collars: the blue silk inner collar, the white wired collar, and the white and blue floppy under collar.

First I flat basted the blue inner collar to it's navy cotton lining. (The raw edge would get finished with bias tape later.)

I sewed the bottom side of the top collar to the bottom collar along the unfinished edge. This was sewn to the silk outer part of the jacket body along the collar seam. (So: jacket body, bottom collar --both edges, top collar (bottom edge).)

I sewed the top side of the top collar to the inner collar and the navy lining of the jacket body. (So: top collar (top edge), inner collar (and its lining), jacket body lining.)

Pictured left you can see how this left the top collar wide open for me to add the channels for the wires. Which was the next step.

Once the wires were in place I glued some felt to cover the ends that would sit in the jacket body. The felt helped to both keep them in place and make them less likely to wear through the fabric. The wires have an angle in them and extend past the collar seam and into the back of the jacket so that they rest against my back and therefore actually provide structural support.

Then carefully aligned it and I sewed the collar closed--this meant all 3 collars, the jacket body and lining were attached. The order from bottom to top is: jacket body, bottom collar (both edges), top collar (now both edges), inner collar (and its lining), jacket body lining.


I ironed the seam, pressing the jacket lining down, which hid all of this construction on the inside--giving it a nice, clean finish. Then I sewed channels for the bottoms of the wires to sit between the jacket layers. Then I basted the lining to the body along the raw edges--including the armholes. 
I used a basting stitch along the sleeve tops and cuffs to create puffed sleeves, which I then attached to the armholes. A year later I would return and finish the sleeve hem with a simple rectangular cuff. 

Next I finished the edges with a silver bias tape I made myself. I also used bias tape to finish the armhole seam neatly. 

Here you can see the inside of the jacket.

After this I sewed on some frogs for the closure on the top collar.
This pointy edged navy bit was top stitched to one side of the front opening of the bolero. It has dome fasteners to attach it to the other side of the opening for easy removal.

Details such as gems and beads were added later, I will go into details on those in a later post.

Thursday, December 3, 2015

Sakura - Clow Wand - Cardcaptor Sakura

I'm back from hiatus guys, so let's look at the final part of my Sakura costume series--lets talk about the Clow Wand!

The wand was the only part of the costume that I did not have time to build for the original debut of the Sakura 1st Opening costume at AN 2013. Instead it was built for the Sailor Suit version for Otakon later that summer.

Once again shout-out to EleventhPhotograph for doing both the quick pics at Otakon and the awesome shoot this fall.

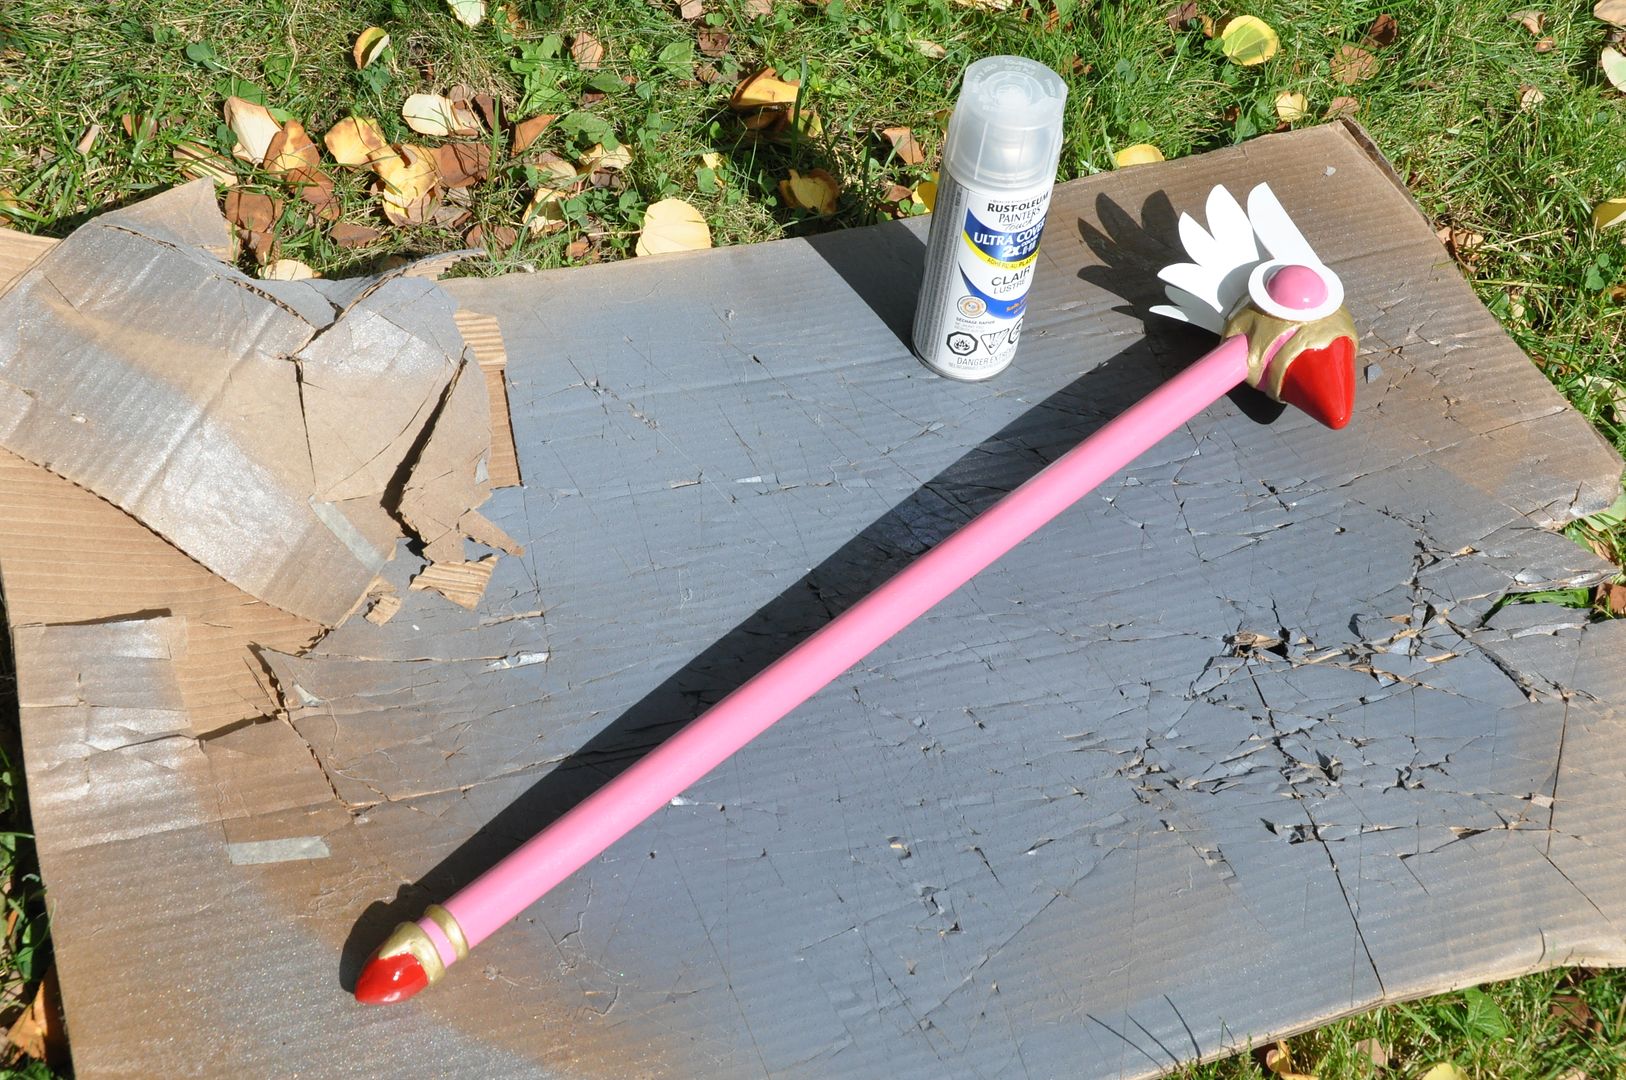
You may notice a slight difference between the photos from the school uniform shoot and the 1st opening outfit shoot I did over a year later--I redid the paint-job on the wand. Because the wand was originally painted in the hotel room the night before the con with acrylic paint and no reference picture. And I got the colours (based on the anime and not the manga illustrations) wrong! Yes, this does happen. (The eyes are pink like the handle and not red like the beak--whoops!) So, for subsequent events I had it repainted with spraypaints and finished it with a nice gloss coat to give it some extra shine. The gloss coat looks much better than the flat colours alone.

Also, at AN this past year I dropped the wand and broke it, chipping the beak. After fixing that I had to repaint it a third time.

I haven't built as many prop-heavy costumes in recent times (Splatoon doesn't count because I didn't build the props!). Props is where I started, and I would really like to get back into making more props. But I am always drawn in by more fabric construction heavy costumes I suppose?

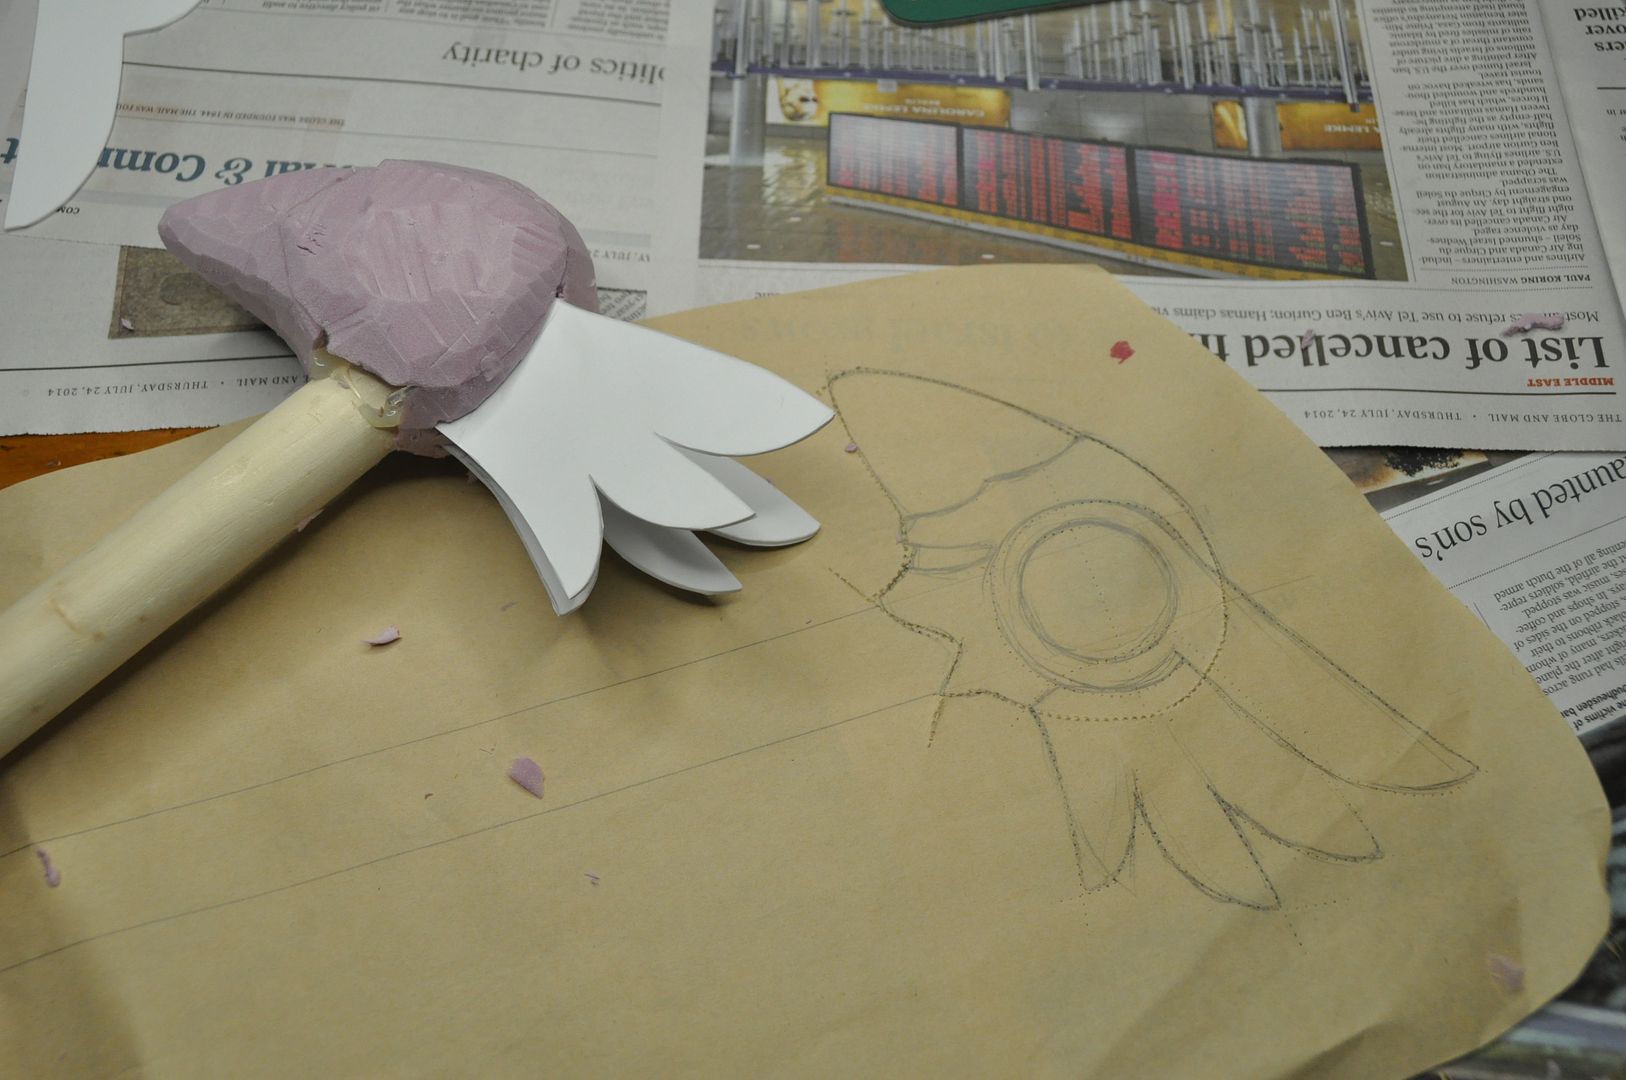
Without further ado, lets get started talking about the build. I began by sketching out the wand at full scale based on the reference photos. Once I was satisfied I used my sketch as a template to make the 4 wing pieces out of styrene. Did I mention I am still working on leftover materials from the Asuna armour? Because I am.

I also used this to cut out the basic shape of the bird head in insulation foam. I cut out a place to stick the rod up the center.
I used a dowel for the rod. I suppose the wand could have been lighter if I had used a pvc pipe instead of a dowel, but I totally didn't think about that until way later and by that point it was too late to swap it out without restarting.

I cut 2 more copies of the insulation foam bird head shape and glued these to both sides. Then I started carving.

Then I cut two angled slits in the back to stick the first two wings. These were glued in place.

Then I used apoxie sculpt to add the raised details. I also used apoxie sculpt to make the detail on the bottom end of the rod. I had to do that in 2 stages though because the sculpting material tends to not want to stick to what I want it to. So I made a base layer in the approximate shape and then built up a smooth layer over top.


Once I was satisfied with the sculpt I sanded it down a bit. Then I glued the top wing on and built up the eye detail with more apoxie sculpt.

Then I sanded down the beak and painted over a few layers of gesso.

From this point onwards Clow Wand version 1.0 was finished in poor lighting in a hotel room using acrylic paints. The picture at the top of the article was the resulting paint job. Not terrible, but I was not satisfied.
I sanded off the majority of the original paint job so I could start with a more or less smooth surface. I decided to completely redo the paint job to better match the original Sakura costume.

I carefully used some leftover Shell Shock to paint a thin coat over the unprotected foam beak surface (this is what chipped off when I dropped it a year or so later).
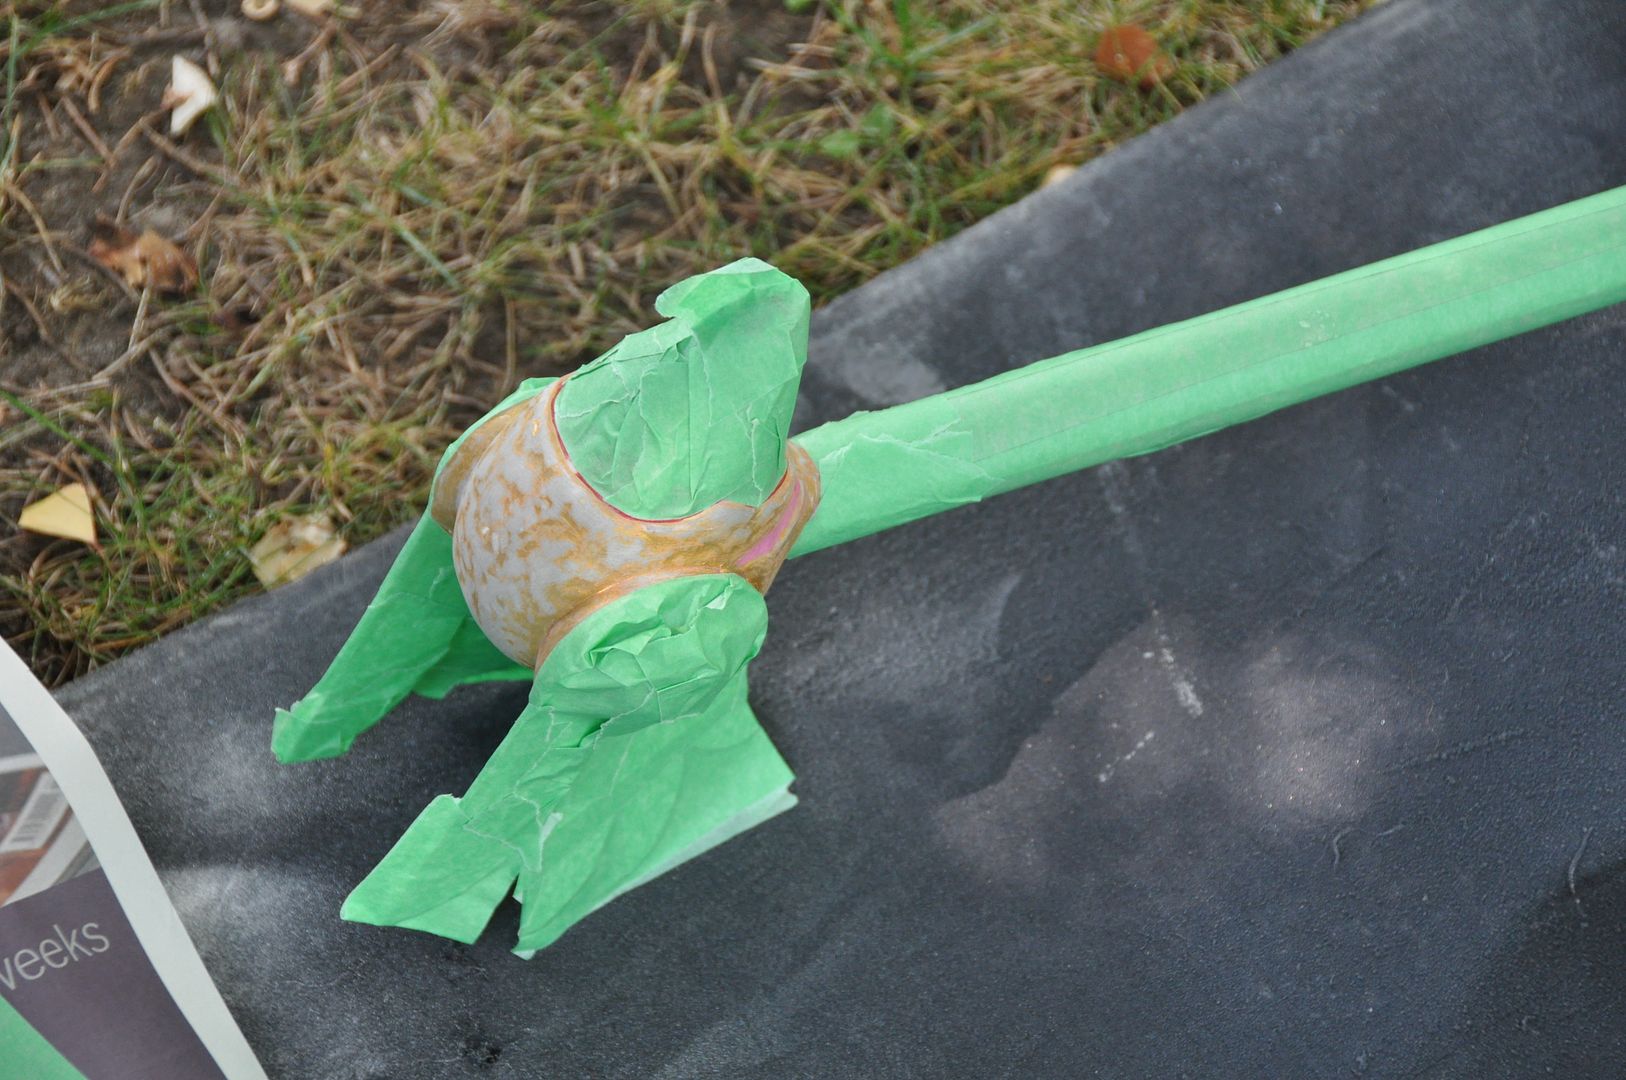
Using copious amounts of painters' tape to mask other areas, I began the paint process first with the gold. Then I hand painted the pink areas with acrylic, before re-masking and moving on the the red areas.

I finished the whole piece with nearly an entire can of gloss coat applied in many thin layers. 

This prop was pretty easy to make, it just took a bit of time with dry times, cure times, and sculpting times. 

And that's it folks! After years of waiting, I finally finished documenting my Sakura costume! Haha

Stay tuned: Vaporeon is coming up next!