Tuesday, June 12, 2012

Princess - Dress - Katamari

The Princess was picked and worn by my younger sister Elanne. She is also a blogger, so be sure to check out Sweet Boake is you want to drool all over you keyboard while you ogle her delicious desserts.

So cute! I was really excited to make this one just because of the cute factor, and also--like Miso and Nickel--I have NEVER seen anyone cosplay this cousin. ;D
I based my pattern off the Miso pattern for the a-line dress, except I had to scale it down a bit.

This cream stretch was really nice to work with. But I always have trouble when working with fabrics that have a right and wrong side which is not dead obvious. To aid myself in remembering the correct side I always put a pin in the center of the piece with the pin head on the correct side of the fabric. This saves me lots of anger later. And time spent seam ripping. :P

I start with these 3 pieces which make up the dress. the front piece and the 2 back pieces. First thing I did was sew up the back seam and then flatten and put in the zipper.

I then sewed up the shoulders and side seams and finished the insides.

I did a standard roll over/fold over collar, finished with a neat ditch stitch. Dome fasteners were sewn on later to close the flap.

I had Alex make and stuff the tube that would become the roll at the bottom.

 Meanwhile I got started on a puffed sleeve mock-up.


...I think it is a little too full Alex... O.o

We pinned it in circle form and left it that way for a few days in an attempt to convince it that it really wanted to be a circle...

The real sleeve. I added a couple extra inches under the arm in case  it didn't fit properly. Then I used a hand stitch to lightly scrunch up the fabric before I sewed the sleeve on so it would get that puff at the top.

I cut out the strips that would be used as trim for the bottom of the sleeve. 


I scrunched up the fabric for the bottom of the sleeve and as I was pinning the trim on my sister came up to me and said, "You know, if the roll and the sleeve are both the same colour, shouldn't they be stuffed to match?"And I was like: D:< "No".

...But I did it anyway. :P

I attached it in a similar way to a fold-over collar. I stitched the 1 side of the trim to the front side folded it over and ditch stitched it. The only difference is I added in stuffing before I ditch stitched it.

I used a hand stitch to finish up the edge.

Sleeves finished! And they look SO CUTE! :D

Then I had the arduous task of attaching that blasted roll. I pinned it in place and got to work pushing it through the machine. The difficult part about doing this is that in order to get a clean attachment, you have to stitch over your line of stitching that hold the tube together EXACTLY. The problem is that because it is stuffed, it doesn't want to stay under the foot of the machine and is constantly trying to push you off your line.
So pushing it through becomes a 2 person job. D:

OMG tube attached. NEVER AGAIN. D:<

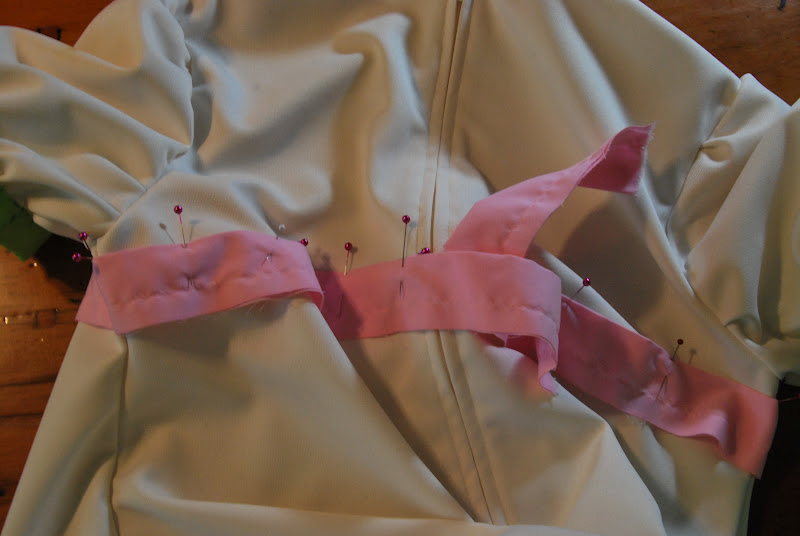
Then I set about adding the final touch: the bow. I took a strip of pink broadcloth and sewed the stripe to the garment on both sides. I hand stitched the bow in place afterwards.

At the back I made sure the stripe lined up, seam ripped the zipper at this spot to create a hole on both sides, and tucked the loose ends to the pink stripe in. Afterwards I simply finished the ends, resewed that part of the zipper and tacked the flappy bits down. :D

The roll was finished with a hand stitch, just like the sleeves.


And there you have it: one Princess dress! :D SO cute. It's really a shame she's still growing and this will totally not fit her next year... D;

Sunday, June 10, 2012

Prince - Dress & Shoes - Katamari


 Here's a quick look at how I made Prince's dress. Essentially it is exactly the same process as I made Cousin Miso's dress, except more streamlined as now I had a pattern to follow.  If you are looking for a more in-depth guide on how to make Prince's (or Miso's) dress look here!

Originally, there was no plan to make Prince until 2 weeks before Anime North, once Alex and I decided wearing the Katamari ball would be too dangerous. (Crazy fans might try a roll up and accidently injure whomever might happen to be wearing it.) We figured Prince is one of the easiest, most recognizable cousins we could do short-notice.


We even had green stretch fabric the perfect colour left over from a Link costume we had done 2 years ago. The catch? There wasn't enough left to do the whole costume, which meant we had to find another perfect green stretch short notice! Oh no! D: Finding the right green in a stretch fabric was a quest that we didn't really have time for... But the sleeves absolutely wouldn't work without a stretch.

To remedy this, we managed to find a slightly stretchy green that was almost a perfect colour match to our insufficient green. Using the 2 fabrics we were able to complete the costume.

This costume was made so the 3 different people of different sizes could wear it.

 Here it is pretty much impossible to see, but the top fabric of the sleeve is a non stretch and the bottom fabric is super stretchy.

The tube was attached last, with much swearing. ;D

 Now about those shoes... If you recall last year, for Miso we luckily had a perfect pair of purple shoes on hand. Well unfortunately we only had 1. Running short on time, our solution was to dye some canvas ballet slippers purple using ink. Certainly not perfect, but much better than running shoes.


Saturday, June 9, 2012

Nickel - Claws - Katamari


The first in-depth look at my Nickel costume: how to make moveable robot claws!

I started by drawing out my design full size, keeping in mind material thicknesses so that my hand would fit inside. 

 I cut those pieces out and traced them onto foam core. For each hand I needed 2 'hub' pieces and 4 'finger' pieces.

 Then I measured the outer curve of the fingers and made strips of illustration board that length that were wide enough to fit my hand inside.  I lightly scored the hidden side with an exacto knife so it would bend easier. 

 I began the long and painful process of gluing the fingers together. It should be noted that the illustration board really needs the curve worked into it before you attempt gluing it, because it was fighting the glue like crazy!

 After the first attempt failed, I decided to put in supports that would double as a greater surface area to glue to and just generally make everything 10 times stronger.

The most important thing here is patience. They had to be held until they were completely dry, or they broke the glue. I decided to have some people help me out here, so I didn't die of boredom. :P


 Now that the base structure for the fingers was done, I began to work on the hubs... But I realized that I couldn't finish them until I had the fingers completely done.

 Even with our best efforts, the glue still slipped a bit, and so the edges didn't all line up completely. So --after testing it on some scrap foam to make sure it was safe to use--I spackled the claw fingers.

 Spackle is awesome because it dries white, is sandable and easy to apply. :D

Sanded them off, and just touched up some areas.

 Then I measured and drilled the holes for my pivot on the fingers and the hubs, making sure they were equal distance on each side. The idea is that the bolt on each side would make it both secure and easy to move.

I gesso-ed them in preparation for spray painting. (The LAST thing I needed was to have them melt!) Unfortunately, I used a paint on gesso on the hub pieces, which not being glued to anything warped really badly, as a result I had to remake the hubs.  >: /


 The fingers were then spray painted grey. I took my bolts and worked them through the holes I'd drilled. Assembly went as so: the bolt was twisted though the hub, then the finger until tight, then I attached the nut. This was done for both fingers. Then I twisted the bolt through the opposite hub and the other side of the finger.

My friend Sarené, who aided me with some of the assembly suggested I add a thumb-strap for easier movement.

Then I added the illustration board to the outside layer of the hub to finish off the piece. Once that was spackled and sanded it got the full spray treatment. :D

Unfortunately we had some paint chipping with the tape, but we were able to do some touch-ups.

Finished! And they look fabulous! >:D

Friday, June 8, 2012

June Update

Hey guys! So I'm back and ready for action!

...Or I would be if my sewing machine weren't broken! D: Good thing this happened after Anime North!

Anime North was a huge success! Our group won a Technical Achievement Award in the MASTER DIVISION. Awesome! So now I am officially a Master level costumer! Time to crank out some really good stuff! Hahaha

Check out our Entry: Katamari Coup D'État! Timing wasn't our strong suit because none of us could see, or hear... yeah.

Tons of awesome stuff coming up these next months! So look forward to that. Inside looks at our full Katamari group including: Prince, Princess, Nickel and of course the Katamari itself! And yes... I keep saying I will put up my original Jumper up, but I haven't gotten around to taking those finished photos... It will happen... soon...

Otakon is coming up in July, and I am making 2 new costumes for that. :D I am also attending a wedding (which I am currently making my own dress for).

In other news: I got a dress form! Introducing Molly Bobbin the first! >:D

That's all for now! Cheerio! ;D