Showing posts with label pouffe. Show all posts

Tuesday, June 24, 2014

Isabelle - Outfit - Animal Crossing


Hey all! This is the second (and last) post on my Isabelle costume I made for my sister Alex! Isn't she adorable!? :D The outfit itself is pretty simple, but presented its own challenge: making checkered fabric!

Go here to look at how I made the Wig, Ears & Tail!

Thanks again to EleventhPhotograph for the cute pics! :D Be sure to check out his con gallery!


Let's talk about the easy stuff first: namely the purchased items. The blue skirt we got at H&M on sale for $7! Not bad! We both agreed it wasn't necessary to spend the money on fabric and/or the time on making something that could be easily purchased and worn as is. (Especially when it is perfect.)

The tights are from American Apparel, who have a decent selection of colours, but are on the pricier side. Sadly my favourite tights/socks store at Queen&Spadina seems to have gone out of business. (This was the place we got all of our insanely purple tights for the Katamari costumes...) I'm a bit sad about this, because I would rather not pay the iron American Apparel price for wacky coloured tights... So if anyone knows another good local GTA store to buy coloured tights, let me know!

The shoes are from her wardrobe (though technically the character doesn't wear shoes, we were both in agreement that shoes were necessary for wandering around a convention). The red ribbon was from Sussman's Bridal Supplies!

For the blouse I used the same pattern I created for her Suppi costume, but modified it: I made the collar rounded, and the sleeves pouffy. The pouffe sleeves were really just trial and error, I took the original pattern piece, made it a bit wider and taller and then gathered it along the top and bottom edge. Then I just added a rectangle to make the cuff. If you want to see how I put the original blouse together, go here!
To make the checkered fabric I started off with 3 different colours of green: light, mid and darker. I had a heck of a time finding 3 colours of green that looked good in combination that were close to the reference image. I eventually ended up with this combo, which is not 100% accurate, but I like it. :)

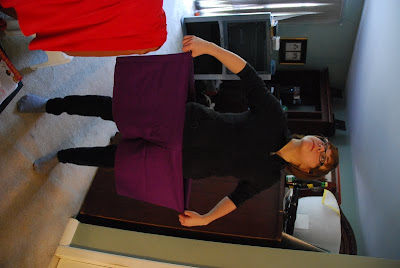
I started by cutting strips of fabric 3" wide. This included a 1/4" seam allowance on each side--meaning my finished squares would be 2 1/2" wide. I cut twice as many of the mid green fabric. Then I sewed my strips together lengthwise. The goal was to make 2 separate striped fabrics: one in light and mid green, one in mid and darker green. Make sure when you hold them up to each other the mid green stripes are offset, like in the picture above. This is important for the next step.

(You can also use this technique to make regular checked fabric--like a chessboard--you will just only need to make 1 striped fabric with an even number of each colour stripes.)
You then press your seams flat on your striped fabrics. Then you can begin cutting again. Cut 3" strips of your striped fabric perpendicularly to your stripes. You should end up with strips like pictured above.

Then you sew those strips together alternating the light stripe fabric with the darker stripe fabric. Press seams flat again. The result should look like the picture on the left.

It's difficult to gauge exactly how much fabric you are making, but as a rule of thumb I think it is better to have too much than too little.
I laid my pattern pieces down on my fabric and cut out the shapes. (I had already done a mockup at this point) I had to be mindful of the checker pattern, to ensure it lined up at the center front.) I sewed the vest together at the side seams, shoulders and closed the darts at the armholes. I opted to leave this garment less fitted because a) the character's body is essentially a sausage shape and b) too many darts really mess with the checker pattern particularly when the squares are this big.
I made an identical vest in the darkest green fabric to line the vest with, otherwise all the seams from the checked fabric will be exposed and fraying on the inside. I made the front placket and collar facing in this fabric also. I finished the bottom edge with a stripe of my darker green (the one I used in the checker fabric).  This finished those raw edges. The darkest green accent fabric is actually leftover from the Prince costume!

 I added 2 strips of velcro to close the jacket. The 2 large buttons added on top were just decoration.
Using the darkest green I made 4 rectangles. 2 were top stitched onto the front as fake pockets the other two had velcro to cinch in the waist at the back. This was instead of putting darts, which would have looked weird on the checkered fabric.

Lastly I attached a bias tape to the inside to finish off the armholes.

Wednesday, September 4, 2013

Kero & Suppi - Shirts & Shorts - Cardcaptor Sakura

This is the first part of my documentation for our Kero and Suppi gijinka costumes! (Or Keroberos and Spinel Sun if you want to get technical...) These are characters from my one of my favourite animes CardCaptor Sakura! This was the first anime I watched in Japanese with subtitles, and one of the first boxsets we bought. :D

This is my second time wearing a gijinka costume, but my first one making one myself! I had a lot of fun making these, particularly working with such bright contrasting colours. I got to try some new things on this project--namely tails and ears.

I got some nice photos thanks to Mike from EleventhPhotograph. We took a couple pics in the big candy store on the harbour!

For those of you unfamiliar with the term, a "gijinka" costume is essentially a humanization of an animal character.

This project is a collaboration with my sister Alex, of Alex Boake Illustration who did the very cute design. It's sort of inspired by the outfits in the 3rd ending song "Fruits Candy". Lots of fun working on these!

These gijinka costumes were based on the characters' "little" forms. FYI I love this gif... It reminds me of how I felt stuffing the foam into those wings...

But without further ado, let's get started!

I started first by washing all the fabrics, these costumes would be worn in a very hot place, so I thought it best that all clothing be washable. And since fabrics tend to shrink when you wash them (particularly cotton), it is always a good idea to pre-shrink your fabric before you cut anything. We opted to go a little more expensive with the fabric and bought quilting cotton, because it breathes really nicely. (Also it came in all the right colours, so that kind of sealed the deal.) The yellow and purple fabric were picked to match the wigs.
So I started by patterning the shirts and shorts. For the shirts I modified a basic block with a princess seam, widened the armholes a bit.

First I sewed up the back darts. Then I sewed the side seams, shoulders and front darts together.
At this time I also sewed a placket to one side of the front overlap (this is where the button holes would go). It was a long strip with a fold ironed down the center. On one side of the fold it was attached right sides together with the left side of the shirt opening. Then I ironed the seam flat, and pinned the the other half of the strip to the inside, tucking the raw edge under (making sure it overlapped the seam). This was ditch-stitched in place from the front.

Then I patterned the collar. First the outer collar was sewn right sides together then clipped and flipped right way out. Then this piece was placed in between the 2 layers of the inner collar and it too was stitched together and flipped right way out.

One side of the open edge was sewn to the shirt, then the other edge was folded inside the collar and ditch-stitched in place. This left a clean finished collar.

Next I patterned the sleeves, I started with a normal sleeve pattern, which I then sliced up the middle and added a few inches of flair. To the edge of the sleeves I added a cute trim with a split near the front. This detail made the shirts a little more interesting.

The last thing was putting on the buttons and adding in the button holes.

----------------------------------------------------------

Now let's talk about the shorts. I decided that I should start making a habit of putting pockets in my costumes, because it seems like a logical thing to do! So Suppi and Kero both have pockets in their shorts. When making pockets just make sure that they are big enough to hold your average size cell phone (not those monster ones) and that the opening is large enough to slip your hand in. (Otherwise your pockets will be a tad useless...)

Since I don't really know how to properly pattern pants from scratch yet, I traced each of my pants patterns from existing pairs. I picked a pair of pants that fit me well at the butt and waist. This pattern I then modified to give the flair necessary to form the little bit of pouffe at the cuffs. I mocked these up in muslin first before I cut the good fabric.

The process is essentially the same as the pockets on my Simple Gathered Skirt. I started by stitching each of the pocket pieces to the side seams. Making sure these were done to the correct sides so I would end up with a right and left pant leg, instead of 2 rights or 2 lefts. (If confused lay it out like I have in the picture above.) Then I pressed the pockets to the outside. (Before continuing it is best to finished the seam where you sewed the pocket to the pant panel, otherwise it will be difficult to do later.)


The next step is to stitch each side seam and pocket together. Go around the edge of the pocket, then turn and follow the side seam down. Then stitch together the inner leg seams. When you flip the pant leg right way out, the pockets will now be on the inside (like the picture below).
Then I sewed up the crotch seam, leaving the fly open. Then I made any adjustments necessary and finished off all the inside seams.
Then I made 2 pieces for the fly overlap. These were sewn to the outside. One would be flipped completely inside and tacked down, the other would be pressed flat so it would underlap the fly seam (if you are confused by this description, look at the fly on your nearest pair of jeans).

Then I made a slightly curved waistband. This was sewn right sides together along the top edge, then flipped right way out. Then it was sewn to the pants, the raw edge finished with a zigzag stitch then tacked down. I folded and finished the ends of the waistband.

For the pouffe I did a long basting stitch around the bottom edge of the pants (without backtack). Leaving the ends of the threads long I was able to grab hold of the bobbin thread and gently slide the ruffles on. I did my best to make the gathers even. The cuffs were simply rectangles made about 2" larger than the circumference of my thigh (so they wouldn't be constricting), folded over and sewn into a loop. I adjusted the size of the pouffy pant leg to fit the loop and sewed them together. This was don on the outside, then flipped down so the seam allowance would be on the inside of the pant leg. This was finished with a zigzag stitch.
The fly was finished with Then I added belt loops. When spacing them, I had to make sure the back two were far enough apart for the base of the tail (about 6").
These clothes were very simple, and very comfortable to wear. I liked this costume a great deal for that. :D

Though this is more yellow than I ever wear in real life, because I don't look very healthy in the colour yellow unless I have a tan, which is only at the end of summer. Hahaha

Saturday, June 11, 2011

Cousin Miso - Dress & Shorts

Hey all! I'm back with another detailed progress gallery! This time it's the outfit for Cousin Miso! :D I made this for my sister about a week before the con, after finishing the feathers on my mask, and before I started the cursed foam coat. I was able to finish this completely in a few days, without too much trouble (which was a nice change).

Cousin Miso is just SO cute! I love Katamari, what a great game!


Somehow I managed to forget to take any progress pictures of the beginning of this project, but I basically just traced a pattern from a t-shirt that fit her comfortably, morphing that into a short A-line dress and working from there. I put a seam in the back to make it easy to put a zipper in. It ended up being too long, so I shortened it.

Alex made the roll that goes around the bottom of the dress/shirt. A simple tube stuffed with leftover bits of cotton batting.


 The collar was simply a rectangle that I folded over. I pinned it securely and the ditch-stitched it on.

 Oh look at my fingers. They are so beautiful. I just love how my ring-finger sticks out at a bizarre angle... -_- Yeah, that's all natural.

Anyway, the collar was finished off at the back with a few dome fasteners. (Because I just love them so much.) I decided to put it in after the zipper for the simple reason that I've had too many problems putting in zippers where there are a lot of layers and am now purposefully trying to avoid doing that to myself again (see: Floral Pouffe Dress.)


 I realized that in order to have a the mittens be part of the sleeve, I would nee to have 2 seams in the sleeve, but I realized that if the 2 seams were top and bottom of the sleeve the fabric would have to twist and put a lot of wrinkles into the sleeve. So I decided to put a seam on either side of the sleeve, which worked out quite well. To make this part of the pattern, I traced the armhole, and then measured the circumference of my sister's arm every 2 or 3 inches down her arm to get a form fitting sleeve. I decided to add an extra 1/2" to ensure movement, because I wasn't sure how well the fabric would stretch. As it was, the 1/2" was unnecessary, and if I get a similar type of fabric for my cousin, I will not add as much.

 Some progress shots. Alex was working away on her bloomers. They were patterned of a pair of her shorts which she then added about 20 extra inches of fabric to make them nice and pouffy. She left extra fabric at the top and bottom to do a roll in which she could put some elastic.

 These are all the pieces of one sleeve laid out. The top of the sleeve is one piece, while the bottom is 2 pieces. (So I could have a slight overlap where there is a hole to slide her hands out. You know, so she doesn't have to take the costume off if she needs to use her fingers.) I finished the seams at the place where the 2 bottom pieces meet. Then I pinned it with front sides together and sewed the sleeve.

 The finished bloomers. Looking good. You may also notice her shoes, which match her tights rather nicely. Recognize them? Yeah, those are mine. From my Kiki costume.

 2 finished sleeves. I ended up having to modify them at this point, because the gap was too far up her wrist and she couldn't easily get her hands out.

Also I don't know why, but this picture just reminds me of Thing 1 and Thing 2 from 'Cat in the Hat'.

 All sewn together! I ended up taking in the sleeve at the shoulder seam a bit because the fabric was loose there.

I pinned the edge of the dress to the roll. Not easy. Or fun.

 I sewed it all together. Less easy and even less fun. My finger got grazed by the sewing machine several times creating a nice bruise under the nail.

The roll was then measured and hand stitched together at the back, and then the rest was machine stitched to the garment.
I'm really pleased with how this on turned out! I definitely want to make companion costume for this one. Miso needs more friends~! XD