Showing posts with label asymmetrical. Show all posts

Thursday, September 25, 2014

Kimono Style Sleeveless Shirt

 This is an original design I made using fabric I got from my sister for Christmas. Woo! I decided this fabric would make a good kimono top, but I didn't have enough of it to do a full kimono top. Since I wanted something I could wear with normal clothes I decided to make it into a cool tank top with a kimono style closure instead. :)
I started off with a mockup. The pattern I drafted myself, modified from a basic block. It was a bit of a challenge to get the princess seams to work.

Once I was happy with my pattern I cut it out of my cool fabric. It's asymmetrical so I only cut 1 of each different front piece, making sure that I was cutting a right and left side (not 2 rights or two lefts by mistake!).
Above you can see the different pieces all laid out together!

First I sewed the collar pieces together at the shoulder seams. Then I sewed the inner collar to the outer collar along the outer edge, right sides together--this way the outer edge was finished nicely. I clipped the curves and flipped it right way out, then ironed it flat.

I sewed my front pieces together along the princess seam and sewed the darts in the back. Then I attached my front and back pieces at the side seams and shoulders. I then finished all inner seams.
I made my inner collar accent piece the same way as the outer collar. The inner collar is about 3/8" wider so it is visible in behind. The inner collar is made out of leftover fabric from my Suppi costume!


I attached the collar along the front edge and back up around the neck. The outer collar is layered underneath. This was then flipped right way out, the seam was finished, ironed to one side and then topstitched neatly in place.

Then I hemmed the bottom edge. I finished the sleeve holes which was flipped to the inside and top stitched in place.

Lastly I stitched on the ties. The inner ties were made of a twill tape to hold the under flap closed, the eternal tie was stitched between the two collar layers, and into the side seam (I had to unpick it to do this). This was done with leftover fabric from my Forest Guardian costume!

This shirt is nice and comfortable. The cotton breathes well in summer!

Tuesday, October 8, 2013

Asymmetrical Marimekko Jacket

Taking a short break from costumes to show off an original design of mine using a Marimekko fabric I got from my sister as a gift. :) It was a really interesting experiment for me in making a fitted garment with a large print fabric. I really love the warm and cool grey tones in this fabric.

A summer project for me, though the only reason it took me all summer is that I kept stopping work on this in favour of more pressing cosplay projects! Hahaha

You will most likely notice that I used a black fabric  on the sides and under arms: this is completely intentional from the very beginning. (Meaning I did not run out of fabric.) I felt such a large print would be overpowering if it were used on the whole jacket, and I actually had designed it this way from the beginning. The black panels on the side make the jacket far more slimming. ;D
For patterning this I started with a modified basic block. I added in a seam down the back and the asymmetrical front overlap. I made a muslin mockup first before cutting my good fabric. Because this was a jacket, I had to make it a bit larger to ensure it would fit over other clothes (as a jacket should).

I also cut two pieces (inner and outer) for the collar. You will notice that the patterned outer piece is much wider; this is because of the folded fabric detail. Same with the sleeve.
My folded ruffle detail was pretty easy to make I simply pinched 1" sections of fabric together and sewed them, these were each 1/2" apart. They were then all ironed to the same side.

I also cut the 2 pocket pieces, and added the same detail there.
I added a black facing piece to each of my front overlapping panels. I sewed these right sides together (only along the finished edge, not on the seam edge where they attached to other pieces), clipped the excess, turned them right way out and ironed them.
Then I sewed the black side pieces to my sleeve.
The outer collar was stitched to the inner collar along the top and side edges, right sides together, then clipped, flipped and ironed.
I sewed my side seams together, then attached my pocket pieces to the sides along the bottom hem.

I also faced the bottom portions of the two back panels where the slit was in the back so they would have a nice finished edge on the hem.
I sewed the two back panels together up until the slit. When cutting these pieces I took great care to ensure that the pattern lined up along the back seam. It was difficult, but it turned out beautifully!

At this point I began to put it all together. I sewed the front, side and back panels together, and then the shoulders. I then ironed and finished all the seams. I also top stitched down the seams from the outside with black thread.

Then I added on the collar and the sleeves. After trying it on I then marked and hemmed the sleeves.

I marked (first on myself) where the jacket should sit when closed, then marked where the zipper should go. Funny story: normally I buy zippers for bags, skirts and dresses, not jackets. So the first time I bought a zipper for this jacket I bought one that didn't separate at the bottom! D: I had to go back and buy one that actually worked for jackets.

The zipper I separated into its two pieces, pinning them to the jacket separately. These were sewed down securely.

The last thing I did was add the black fasteners at the top with the velcro and metal d-rings/buckles.
I really need to buy a pair of black shoes so I can wear this in public...

Thursday, April 25, 2013

Greyscale Checked Jumper

So it's my mum's birthday today! This post is in honour of the incredible woman who took the time to teach me how to sew, puts up with my crazy cosplay antics, supporting me in my hobbies and through life in general! An incredible lady! And also very stylish! :D

People say we look the same, I am inclined to agree?

This post is of a jumper I made 2 years ago. 2 years late, but better late than never! ;D

(And back to regular posting hopefully!)
This is a Christmas present I made for my mum. An original design of a jumper. I patterned it myself from scratch. :D

Using a fabric that had a pattern on one side and a solid on the other, I decided which parts I wanted to be checked, and which ones I wanted to be grey.


I cut out my fabrics, accounting for seam allowance.

The checked shoulder piece I cut 2 of, so I could sew it inside out and then reverse it to get clean edges. This made sewing it onto the garment much easier.

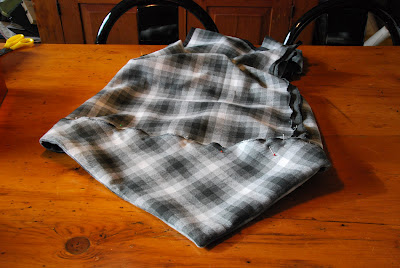
That's the before and after of when I reversed it. You can see below how it looks on the garment where it drapes over the shoulder.

I sewed up the side seams, knowing I would have to take the left one out later to put in the zipper. That seam I basted.


After ironing my shoulder piece, I pinned it in place to see how it would look.
I tried to zig-zag the edges of the fabric, which was really thick and would not cooperate for a double rollover seam, but that didn't work very well, and neither did the single rollover seam...

So I scrapped that idea and applied a black bias tape to the edge.

Then I pinned and sewed my shoulder piece into place.


I also folded over a piece of bias tape and sewed that together to create my button loops.

I measured where my buttons would go and marked those spots with a pin.

And now the neckline is finished! :D


The next bit was the bottom piece that would incorporate a pocket into the design. I cut the large triangle twice so I could turn it inside out to finish the edge in the same way as the shoulder piece.

I made it large enough so it would wrap around to the back of the garment.

Sewing it on was terrible. With this many layers, the sewing machine just barely made it through!

I added the topstitching on the pocket opening so it would match where I stitched the other side to the garment. Then I added buttons and loops.

Lastly was the zipper, which I affixed in my usual fashion.