Showing posts with label masquerade. Show all posts

Thursday, August 14, 2014

Forest Guardian - Wig, Mask, Bow & Arrows

[Sometimes life gets in the way of fun, most notably when writing a final essay for school takes several days longer than expected... Finally posting last Thursday's blog post. :P I will be carrying on as normal from here on out!]
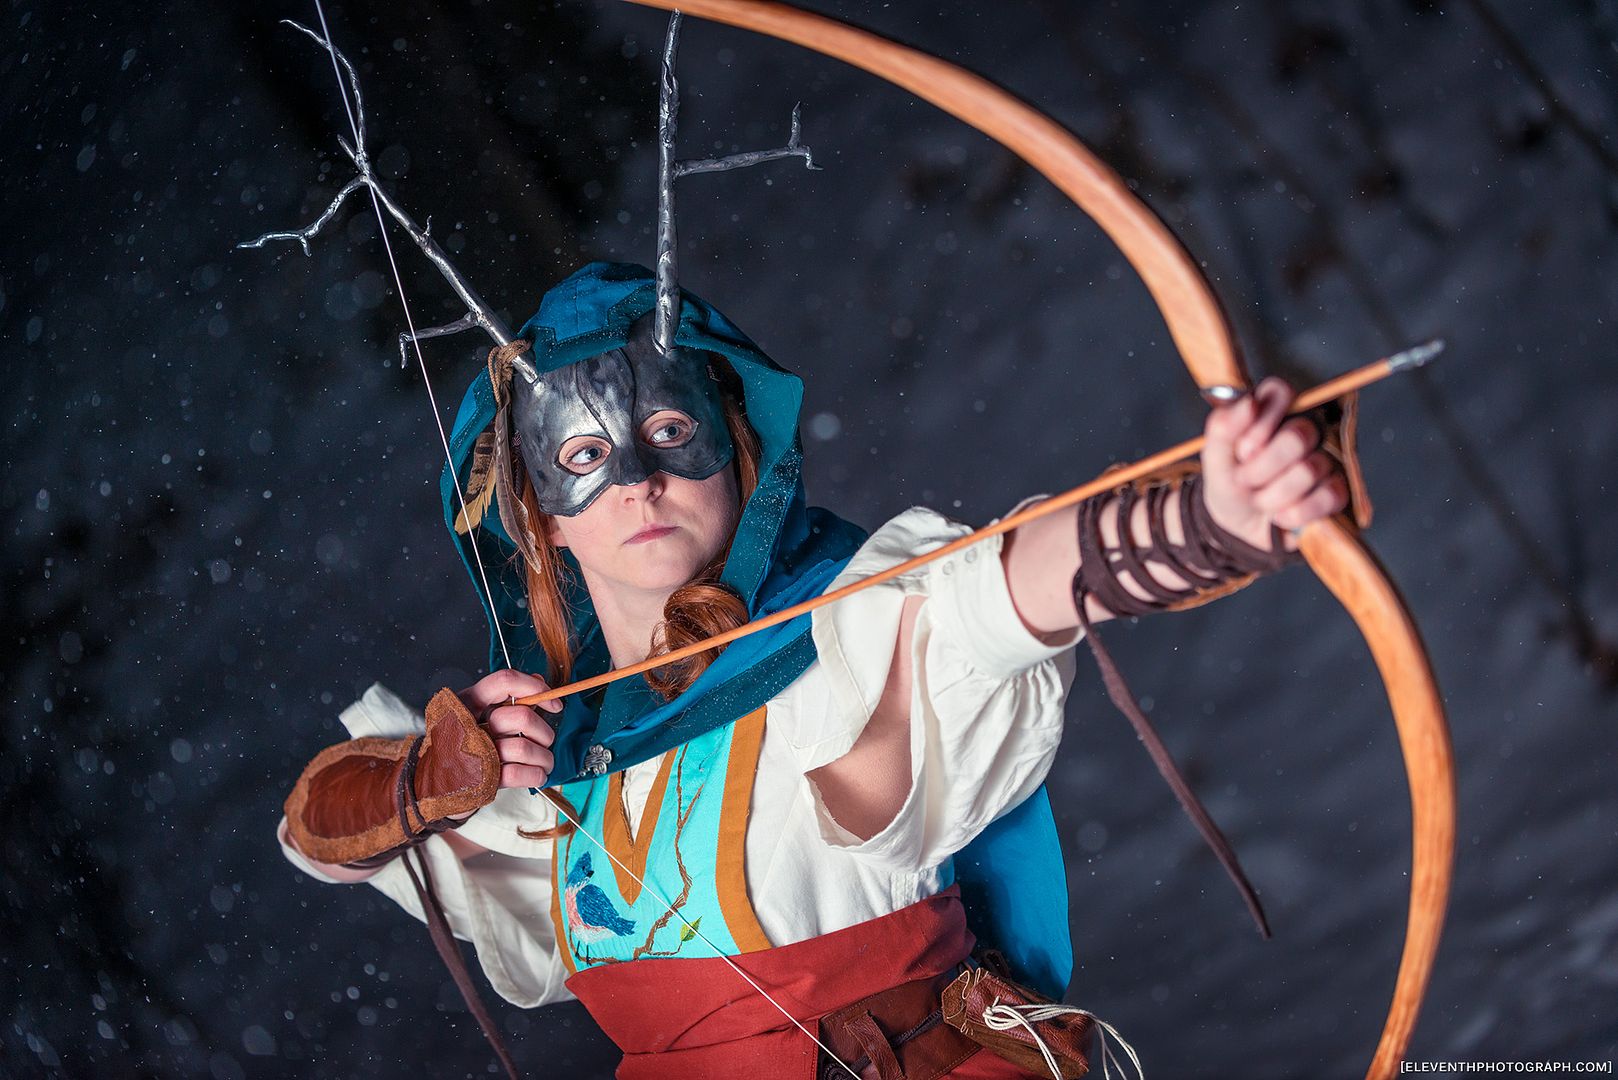
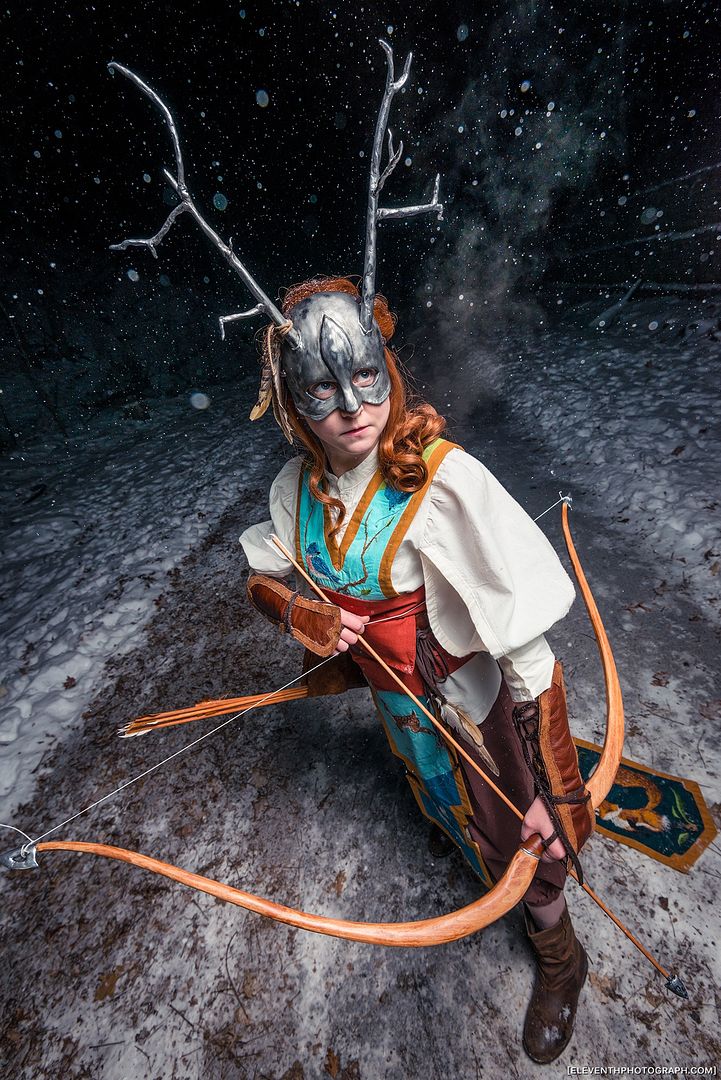
Now, on to the fourth and final part of my Forest Guardian costume: Wig, Mask, Bow & Arrows. (Not necessarily in that order.) If you are interested in the other sections, including my design process, accessories, and embroidery, check out parts one, two and three respectively!

The mask was actually the first piece I started on. I began this part of the project almost a year ago now (after I returned from Otakon 2013!). I knew I wanted to make it close fitting to the face, like I had designed it, meaning I knew I wanted to cast the piece from the very beginning.

I started by getting a friend of mine to do a life cast of my face. (Ian, who has helped me out on many other projects before, most notably: Nickel and Asuna's cast armour pieces). I didn't do this myself because a) it is impossible to cast your own face, and b) I didn't know how to do it last year. (But now I am wiser!) I will not go into explaining the details of life casting in this post, and will simply skip ahead to when I actually began on the mask itself.

After I was handed a concrete replica of my head, I began sculpting my mask piece. I started by marking out the outline of the mask itself in pencil, ensuring I had the eyeholes and bottom edge looking more or less symmetrical. Then I laid down a layer of clay about 1/4" thick over the marked area. Note: If you are casting, always make sure you are using a sulfur-free clay!!!
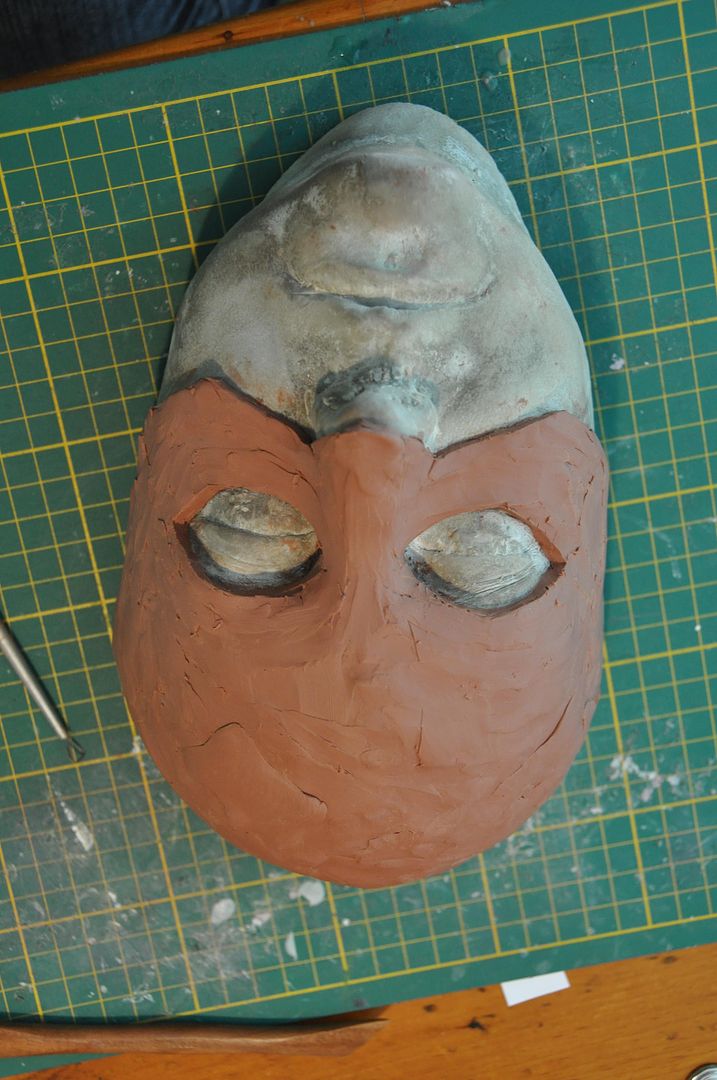
Then I began to smooth out the clay and add in the raised details. The smoothing was aided by 99% alcohol, which worked pretty well.

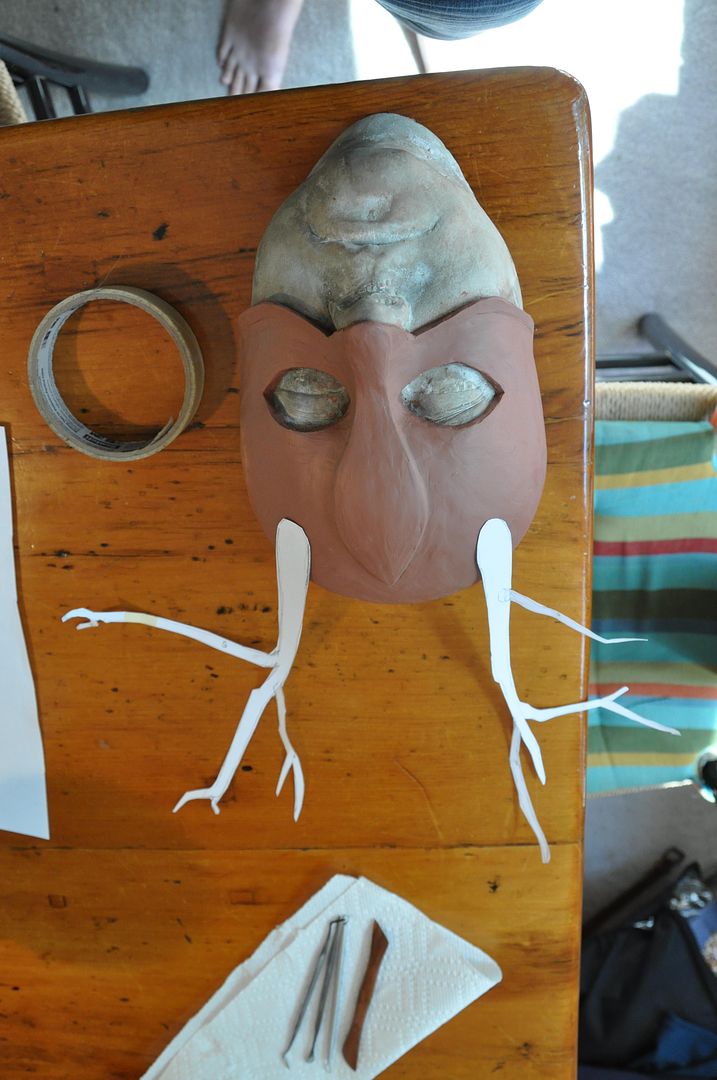
Then I drew an approximation of what I wanted for the antlers. Using these as a guide I sculpted my antlers out of a hardening clay (called apoxie sculpt) over a wire frame for stability.

The antlers were sculpted separately from the mask piece because casting the mask and antlers as a singular entity would be next to impossible.

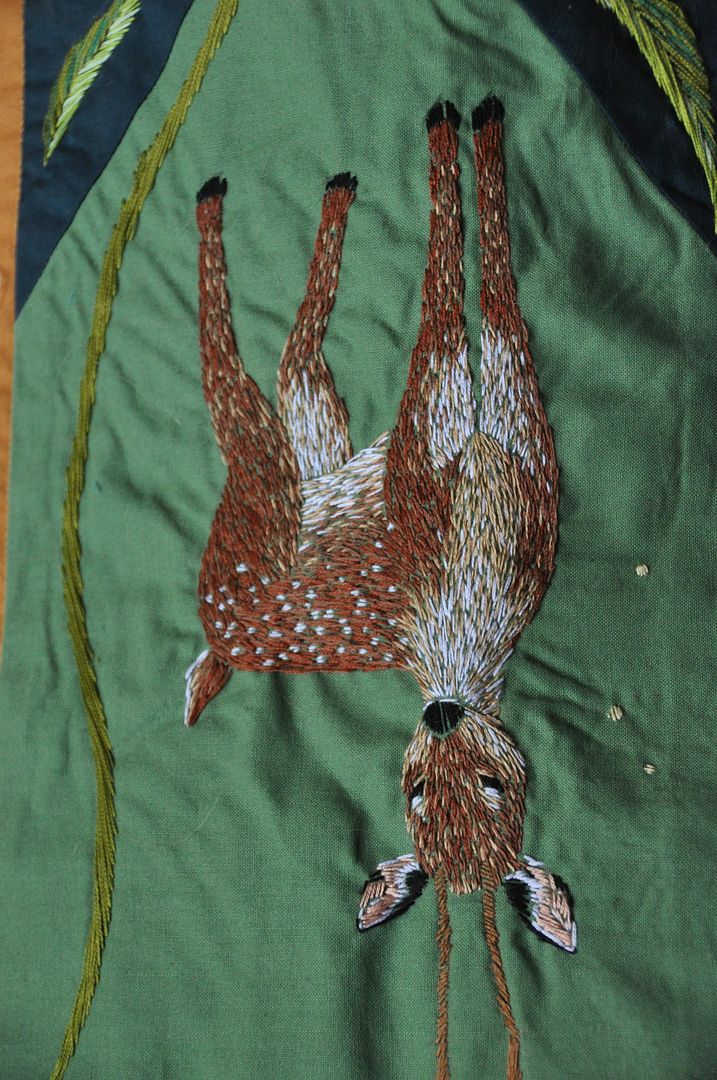
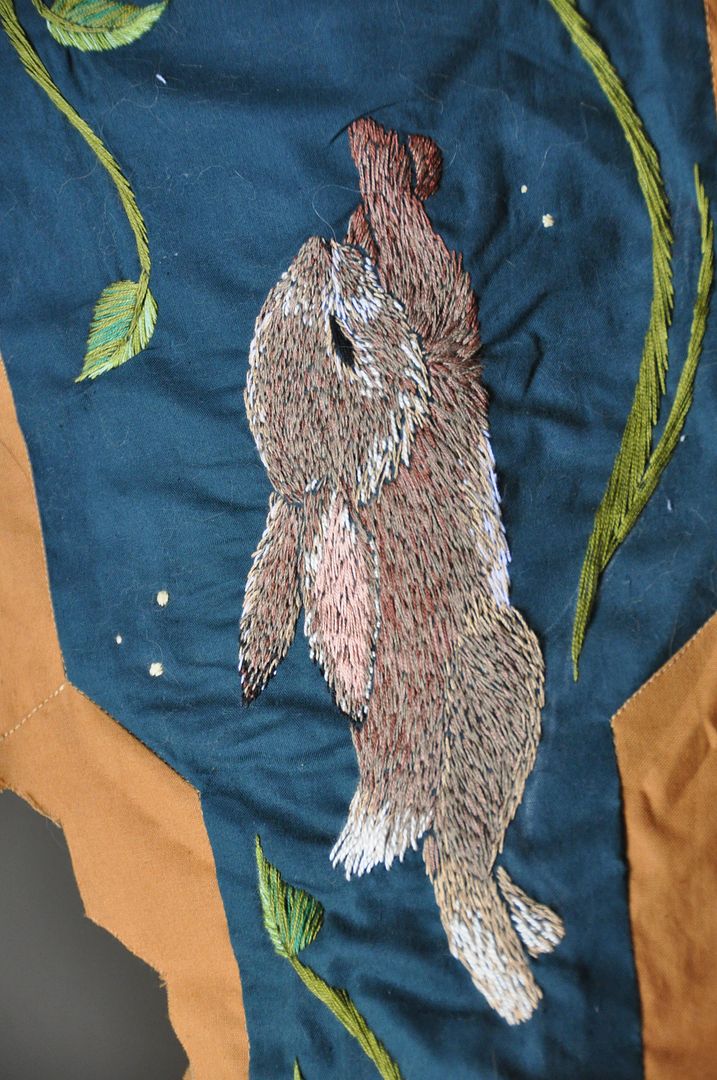
Most of the materials used here were left over from my Asuna costume, which I had purchased with this project also in mind.
Once the antlers had cured completely, I sculpted 2 sockets which they would slot into on the mask itself. This would ensure they would bond well with the mask and not be at risk of falling off later under their own weight.

Then I created the negative mold for my mask. I used a product called "Rebound 25" which is a silicone rubber. I mixed the 2 parts together according to the box instructions and slathered it over my mask piece. It took about 2 layers. Once that cured, I made a plaster bandage 'mother shell' for support. Then I de-molded it.

Next, I made the final pull of my cast out of a product called "Shell Shock", which is a plastic. Instead of using the life cast of my face as the 2nd part of the mold, I chose to instead 'slosh cast' the piece. Since my product had a short work/cure time, this was acceptable choice. I painted in my splash coat (first layer) carefully, making sure it went into all the nooks and crannies, and making double sure there were no air bubbles. Then I added a second and third layer as necessary.

I used paperclips to hold the mold and shell together at the edges. Admittedly, I made a bit of an undercut when I made the mother shell and had to break the edges to get it off the initial sculpt. It still worked for this cast, but in future I will try not to do that...

Pictured below are the three parts: the sculpt, the negative mold with mother shell and the positive cast.


Then I cleaned up the cast using a dremmel. I had to round out all the edges, making sure there were no sharp points against my face--particularly in the eyeholes. I also had to thin down the forehead area in the back of the mask, as it was a bit thicker than the rest of the mask, making it not sit snugly on my face.
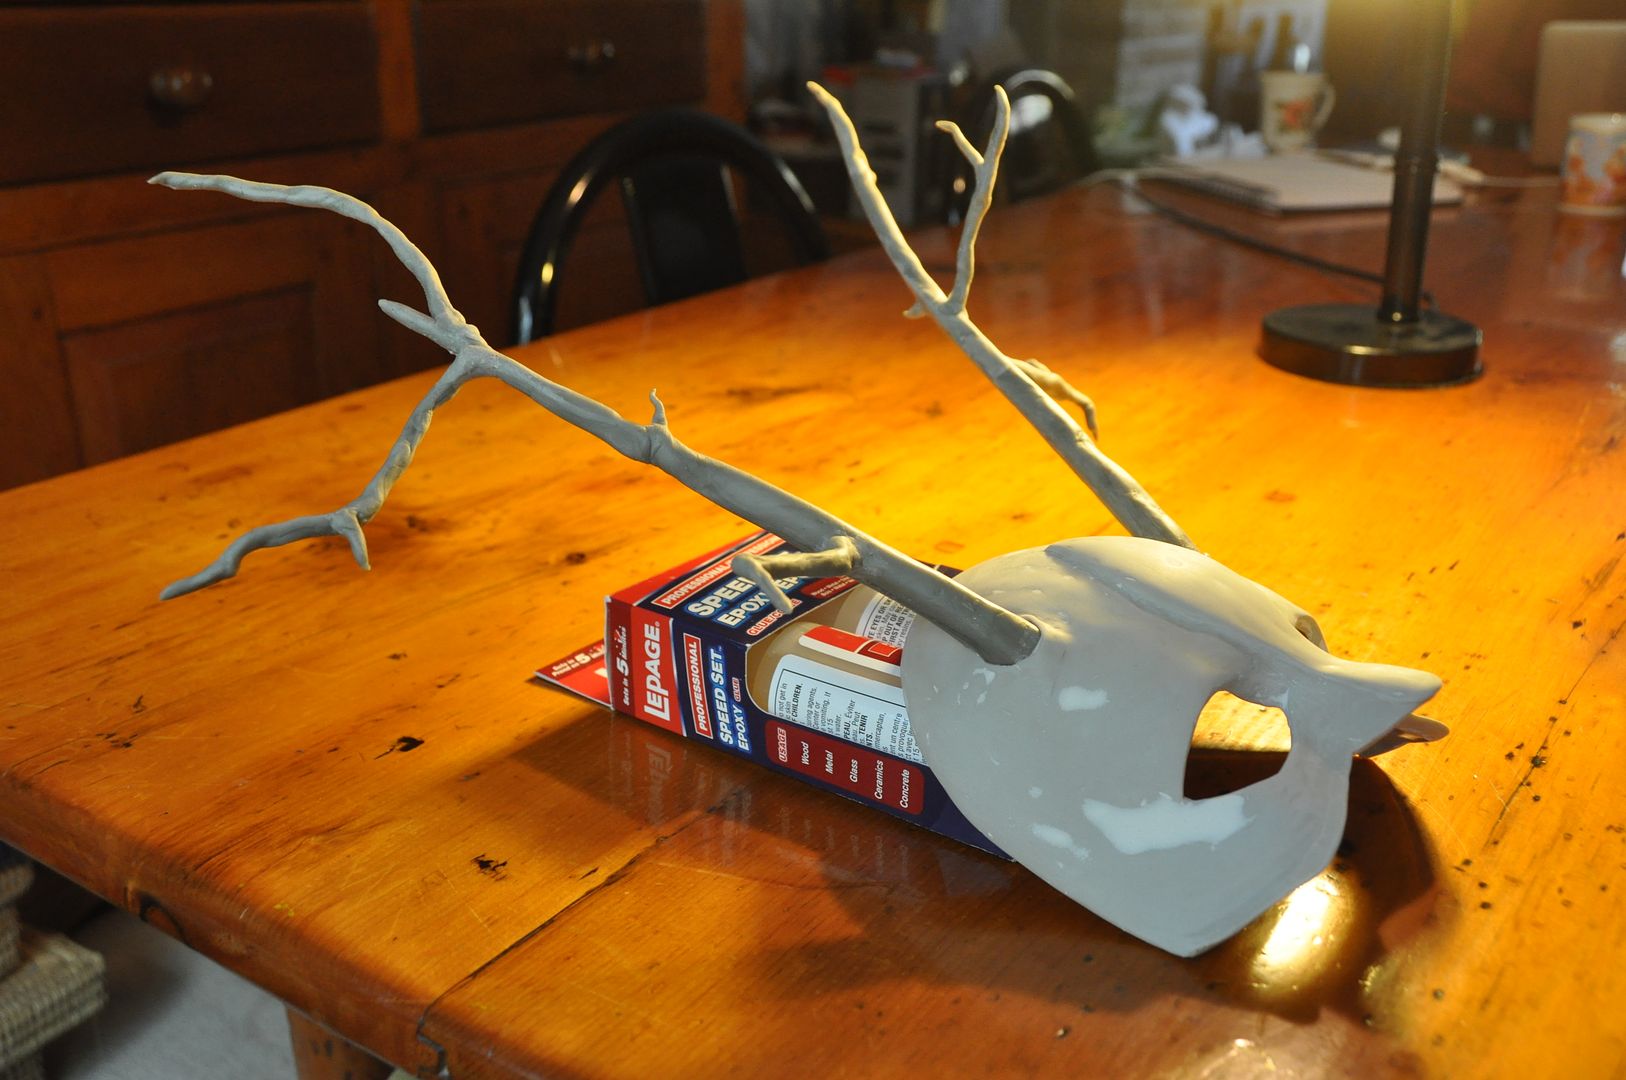
I filled any air bubbles and sanded the whole piece to be even smoother. Using a really strong epoxy I glued the antlers into the sockets. I later drilled 4 holes in the mask to add on the ties.

Fast forward several months to the next piece of this project, the bow and arrows.  When I started this part of the project this past March I knew there was going to be a slight problem: I knew approximately how I wanted to make this piece, but I didn't have the proper tools to do it at home. 

I was taking a scenic carpentry course at the time and brought the draft of my bow to my prof, asking his opinion on how best to make it, while also requesting to use the shop outside of class for this personal project. Since a) I was well ahead of the class on my furniture project, and b) we are such bros, he let me use both the tools I needed and found me a piece of hardwood to make it out of! :D

The bow itself is constructed from 3 pieces: 2 arcs made of poplar and a dowel for the center hand grip. t was important that I make the pieces out of hardwood, because although the bow itself would not be under tension, a softwood would splinter when being cut/sanded or would break very easily later. I didn't want this piece to be too fragile!
Using my full scale draft, I traced the 2 arcs onto the wood. These were carefully cut out using the bandsaw. Then using a spin sander I rounded out the corners and tapered the bow into the final shape. This took quite a bit of time, but I am very happy with the result! To get it extra smooth, I used a fine grit sandpaper and finished the job by hand.

To attach these pieces at the center, I drilled a pair of holes into each of the joining surfaces and placed dowels into them. Using epoxy, I glued the whole thing together. The dowels in the joint would strengthen it much more than gluing 2 flat surfaces together would. Also by having 2 dowels in each join this meant I wouldn't have the pieces rotating in place.


Next I used apoxie sculpt to make the detailed bits on the end of the bow.
For the arrowheads I was initially going to sculpt them out of apoxie sculpt too, but it wasn't achieving the desired look so I switched to clay. Then I molded the arrowhead and cast 7 arrows. (I was too lazy to make more.) I feel I need to improve my arrowhead casting method, as they didn't turn out as clean as desired. (For those who know casting: it was a 1 part box mold with a slit in it.)


Next I started the paint job. The mask, arrows and bow were done all at the same time. Any areas I didn't want silver were covered in painters' tape. I primered black, then sprayed silver in several coats, then sanded the pieces to age them.

The wooden part of the bow and arrows was then stained with a "cherry" colour and finished with a clear coat. I sanded and coated it a second time to make it extra smooth.

Then I hand stitched a piece of leather over the hand grip to match the rest of the costume.


The last detail was to add feathers to match the rest of the costume. The ones on the mask were tied on, the ones on the arrows were glued into slits that I had carefully cut with an exacto knife.

I measured and added the ties to the mask, finishing off the ends with clear nail polish so they wouldn't fray.

Now lets talk wigs! The wig was actually an "Amy Pond" wig I ordered off of Five Wits. (As a side note, I love the names these guys give their wigs!) I picked it because it didn't have bangs, which would get in the way of the mask. It had arrived before Costume Con, but I had no time to style it, so I didn't end up wearing it to that event.


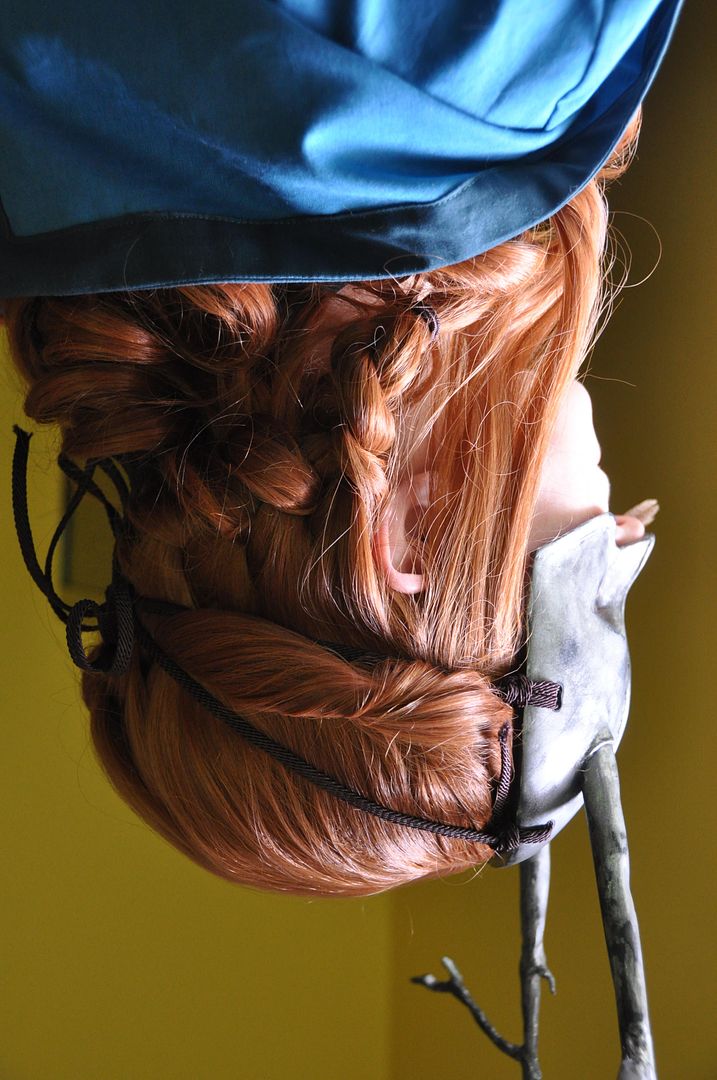
The style I eventually decided upon was relatively simple. I french braided horizontally across the back of the wig, only taking hair from the top. I left the 'sideburn' sections to hang freely at the front, but the rest of the hair was pulled away from the face to reduce bulk under the mask. From the opposite side of where I started my braid I created a twist with the front bunch of hair, which was pinned and threaded through the braid at the center back. I stuck a feather in the end of the braid for good measure.

This style worked well because it helped both keep the hair away from the face and also provided an 'anchor to tie the mask to at the back. Having the 4 ties meet at the center back under the braid kept the mask from sliding down my face as much as it did without the wig.

Overall I really love the finished look with the wig.

I hope to do a full photoshoot of this costume in the forest sometime soon, just need to find time (that also coincides with good weather and a photographer)... Also my bow will be making the trip to Otakuthon without me! I am lending it to a friend for his costume, which is some kind of mouse archer from a game I am not familiar with.

[Edit: The new snowy photos are from my winter photoshoot I did with EleventhPhotograph! Many thanks!]

Wednesday, July 30, 2014

Forest Guardian - Embroidered Panel

Everyone I apologize this post is late, I had a small accident yesterday and was unable to finish typing up this post. I will explain in more detail at the end of this post! Meanwhile, without further ado I present Forest Guardian, Part 3! Let's take a look at the embroidered panel, since I know that's what everyone has been dying to see! XD

For part 1 go here! For Part 2 go here!

[New snowy photos were taken by EleventhPhotograph in Feb 2015! Thanks Mike! They look fab!]
Let me just preface this by saying this was my first time embroidering ever. I learned a lot doing this project. I have a new-found mad respect for the woman who does the embroidery on the Game of Thrones costumes. I highly suggest you take a look at that! It's crazy awesome!

So now let's talk embroidery! The project (just the embroidery, not even the rest of the costume) took me about a month and a half--give or take. Some of those days were 14 hours, some I only worked on it for 2. I constructed the panel itself on my Christmas holidays, but didn't start embroidering until April. I knew this piece would be time consuming, but I didn't quite realized how time consuming. This piece is the reason I didn't compete this costume at CostumeCon 32 as intended: this was just not done. There were still 2' left of embroidery to complete on the back side, this included the rabbit and most of the vines between the deer and fox. Knowing my pace, 2 days was simply not going to work for the amount I had left, so I wore the otherwise completed costume to the convention, without the main piece.

First I had to make the panel. I drafted it out in paper, putting it over my shoulders so I could decide the finished length. Then I finalized my design and drew it out full scale on the paper. I cut out the different sections and cut those pieces out of the corresponding fabrics.

I sewed those together so it was all in one long piece.
Then I used the rest of my pattern pieces to construct the gold/yellow border around the edges.

I pressed all the seams flat, and top stitched down the corners.


Then I attached a white interfacing backing to the entire piece. This would make it easier to embroider as the cottons I used for the coloured panel were nice and light.

Above is what it looked like pre-embroidery. In the lead-up to actually starting this project I streamlined my embroidery design, re-drew some of the animals and cleaned up some of the messier areas. Some people have asked me where I got my embroidery pattern: there wasn't one. I designed it myself to suit the piece and to suit the character. When I was completely satisfied with the design I transferred the main shapes to the fabric. This was done using a combination of a spiky tracing wheel, pencil and grey pencil crayon.

I had to look at a lot of reference pictures to ensure my animals had the colours in the right place, and the most importantly the limbs bending in the right directions! I can't stress enough the importance of actually looking at animals when undertaking a project like this. You may think you know what a fox looks like. Your memory may not be so reliable! Mine wasn't! If you are trying to maintain some degree of realism, reference is key.

I didn't attack this in any particularly logical order, I mostly embroidered whatever I felt like doing next. I actually started with the fish on the front, then moved to the fox, then the birds, deer and lastly the rabbit. In between the major pieces I tackled the various branches and greenery.
 Mostly I created the different looks through experimentation: since I wanted to maintain some realism, even if the animals were stylized. The challenge was to create the different textures. Long haired animals had to be obviously different than short haired animals, while feathers again had to appear different than fur or scales. I would describe the process as a combination of painting and pointillism with thread.

In terms of process I don't think there is any real right or wrong way of doing this. On any given animal I typically started with the detail bits first (eyes, nose, beak, hooves, spots, fins, etc), these usually had stark contrast and so placement was important. The more stitches you get in there the harder it is to see the lines, so I would like to get those done first.

Next I would start in one of my main colours and go around the outside of a section, to ensure that I didn't go outside my lines. I typically started at the head and would work my way towards the tail. On the fox for example I started by doing the eyes, nose and black parts on the ears. Then I outlined and began to fill the white section in my main colour. Next I outlined and filled the light orange sections of the face, then did the same with the dark orange. Lastly I speckled in my secondary colours to breakup the transitions and give variation and texture. To continue with my fox example I speckled cream and light brown into the white sections, light brown into the orange sections, and orange and brown into the dark orange sections. This is because fur isn't just all one colour. 

For the birds I modeled them after blue-birds. I went with a slightly pinker colour for the breast than they actually do because I preferred that with my colour scheme. I started with the details, then simultaneously worked on the head and breast leaving the wings to last. For the head and tail I used a medium blue as my main with a blue-grey and warm grey as secondary, while for the breast I used a salmon-y pink as my main, with a peach and white as my secondary.

The deer were done much in the same way as the fox; details, light/dark main sections, then colour breakup. It was a bit different because I had to work around the spots, and also because I had to make my stitches smaller and more controlled to denote short fur.

For the branches they were just done haphazardly. On the original design I drew out exactly how the branches would look, but when I transferred the pattern I just drew out a single meandering line to follow for each branch, that way the path was the same, but the width and stitch direction was freer.

Jelly was not impressed that I took over his favourite spot for a month.

The rabbit was very similar to the rest, but a little more troublesome because rabbits don't have as much colour variation as other animals do. That actually made it more of a challenge than some of the others.

The greenery I had down to a science. It was very controlled and directional, with specific colours for all the parts. Every leaf was divided in half--it would have a dark half and a lighter half. I would go in with my 2 main greens and then add in a couple highlights with my secondary greens. All leaves were done with the strokes extending outward from the stem diagonally toward the tip.
Here is what it looked like with the finished embroidery! You can see that it doesn't stop at the places that are hidden under the belt.

Once that was done all that was left was to add the backing to the panel so you couldn't see all the threads. This was done in 2 pieces, which were bagged out, then carefully pinned and hand-stitched at the neck and shoulders.
Here are some close-ups of the finished embroidery.

In regards to the fish, I did the scales each stitching in a tiny radial pattern extending from a central point. My colour variation was don so that the lighter colours were concentrated on top, while the darker colours covered the bottom.

I had a lot of trouble trying to figure out how to do the extended wing on this bird, but it turned out alright in the end!
The fox is still perhaps my favourite, but I am most certainly proud of the piece as a whole. I will probably do another embroidery piece in the future, as I really enjoyed this project, but I think it is safe to say I am pretty burnt out on embroidery for a while.

More to come on this costume set!


In terms of why this post is late, I injured myself at work yesterday and had to go to the hospital. An embroidery machine needle pierced through the top of my finger nail, went all the way through and broke off inside. I am fine, bandages come off tomorrow, but my hand was frozen last night, making it difficult to operate a keyboard and finish typing this post. For the record, it was entirely my own damn fault. :P
 

Saturday, July 5, 2014

Forest Guardian - Pants, Shirt & Cape

[Edit: New photos added from Feb 2015 shoot with EleventhPhotograph!]

Welcome to my first look at the Forest Guardian! I thought we should start with the pants, shirt and cape because in terms of the actual build of the costume that's where I started. I think at this point it has been a full year since I started the concept sketches for this costume, wow! This is my first real original design costume and I'm pretty proud of it. 
I wore most of the costume to CostumeCon 32, excluding the embroidered panel, which I was sadly unable to finish in time. The costume was completed for Anime North, and I competed it in the Masquerade. I won an award for my embroidery in the Master Division, which I am super proud of! This was my entry.

I still need to do a photoshoot of this costume, hopefully that will happen sometime in the near future. I have been location scouting in the forest behind my house. :P 

I started the design concept of this last summer. I had bought my badge for CostumeCon 32 at Anime North last year, so I knew I wanted to make something original. There were several different designs leading up to this one, several different versions before I arrived at this one. I developed the design over the course of the summer and got started on the project after returning from Otakon. 

 The hardest part once I had the shapes down was colourizing everything. I knew I wanted the character to have auburn hair and that the shirt was going to be off-white but other than that I wasn't sure. I didn't even know if I wanted to make the mask look like metal or clay & bone. There were several different coloured versions before I settled on this one (there was even one where the animals on the embroidered panel were to be done as silver silhouettes). It ended up being quite colourful in the end, I was sort of going for ceremonial garb when I first started drawing it and ultimately I think the colour suits the design. Even then there have been several changes that developed over the course of the build since I did this "final" sketch. I purposefully designed the under clothing for this costume to be quite simple, as I wanted the focus to be on the embroidered panel and accessories. 

 I started by patterning and mocking up the shirt. The shirt was designed to be a looser fit, with flowy sleeves that would allow easy/unrestricted movement. The shirt itself only has 2 darts at the armhole to the bust, the waist get cinched in by the belt. The sleeve pattern had required some adjustments initially because unlike a regular sleeve this had a slit in the front. So I had to move the seam from the bottom to the front.
 
After doing a mockup, I cut and sewed the pieces. I closed the darts and then sewed the front and back pieces together, leaving a little slit open at the bottom of each side seam. I cut the slit open at the front and finished off the edges with a strip I made out of the same fabric. This would reinforce the fabric when I added the laces later.
I then sewed on the collar and gathered the sleeves. Then I finished/reinforced the edges of the sleeve opening. Originally I had intended for the sleeves to be laced shut, but I decided I really liked the look of them open and left them that way.

 I hemmed the bottom of the shirt.
Then I gathered the edge of the sleeve and added the cuffs to the sleeve. Later I put 3 buttons & buttonholes on each to close them.I also added in the holes on the front closure for the laces. These were done in the same way as the button holes rather than with grommets.
 Once the shirt was done I began work on the cape.


The cape itself had originally been designed to be longer, but after much consideration I felt it would detract from the embroidered panel so I made it a short cape, but still kept the large hood. I am pretty inexperienced patterning hoods, and this was my first cape. It took a few tries to get it to look how I wanted it. The only advice I can give is make a mockup!
The pattern pieces for this look pretty odd!

My main design feature on the hood was the two slots for the antlers to stick through. It was one of the design elements from the initial concept sketch that came all the way through to the end. I had to make a reinforced edge piece that went all the way around the edge of the hood and the hem of the cape. It had to conform to all the odd angles and contours. It is made of the same fabric as the hood lining.

I started by sewing the sides and center seams on the hood, hood-lining and cape pieces. For the hood I attached the trim piece to the lining and bagged it out. Then I slotted the outer fabric under the trim and pinned it in place. I carefully measured and folded under the raw edges then top stitched the trim in place.


For the main part of the cape I bagged out the trim, having stitched it directly to the inside of the outer fabric. I folded it to the outside and finished the raw edges in the same way, top stitching it all in place. This way the raw edges are all hidden inside the trim, leaving for a clean look on the inside and outside!

You can see how the hood collapses in on itself. Which was frustrating as even when worn over the mask the edges of the antler slots just drooped. I later re-opened the seam and added in a wire to the hood, which kept it rigid and held the desired shape perfectly!

The red wrap around the stomach is simply a long strip of fabric that is wider at the ends (narrower in the middle) bagged out to finish the edges. It has velcro to close it, which is hidden by the belt. (The belt pictured here is actually from my Presea costume, which I was using when trying things on until I made the actual one.)

The pants are actually based on a pattern I had modified for a costume I started but never finished. (Jack Frost) I modified my modified pattern to get the pants I made for this costume. Haha

To make the leg wider I opened up the front of each pant leg and added in a pleat on each. I flared each pant leg out more as well. This way, it still fit nicely at the butt, but the legs would pouffe out a bit.

When I was satisfied with the changes to the pattern I cut and sewed the pieces.  I started with the pleats on the front, then the side seams. Then I partially closed the crotch seam and finished the inner seams.
Next I added my waistband. The pants front closure was a bit tricky. I decided I wanted laces rather than doing a fly-front... even though it isn't even visible, I wanted authenticity. hahaha I had to reinforce the edges where I put the holes, and add a modestly panel so you can't see my underwear through the gaps in the lacing. But in the end it worked well.

Lastly I finished the cuffs by cinching them and then adding on a strip of fabric that I had closed to be a circle.
I can definitely say that the base outfit for this costume is very comfortable.