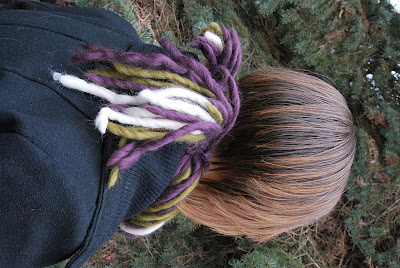
Hello all, my new photography blog has finally been created: Photo Escapes! All of my new photography will be posted there, all old photography shall be linked to here. I will still continue my whimsical travel log style, just without my sewing work interjected here and there. And for those of you who preferred my sewing work, I am sure you will be glad for less photographic interruptions. :D
Wednesday, January 25, 2012
Sunday, January 15, 2012
Panda Bag

So here's a look at how I made this adorable panda bag. It is based on a doodle I drew in class. :)
I redrew the pattern at full size, and cut the pattern pieces out. Keeping in mind that the pieces that will get applied to the front don't need seam allowance.
I cut out the ears next, and made sure to cut out a layer of interfacing too.
Next I cut out 2 pieces for the top panel (same length as the zipper), sewing them together in preparation for adding in the zipper.
I also cut out some fabric for the lining, and interfacing.
I pinned it in place, then basted the zipper in place. And then I sewed the zipper in for real.
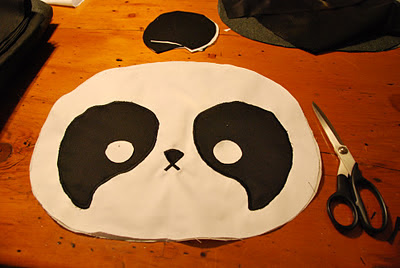
I appliqued the face on to the front of the back.
I added in the nose details.
Then I sewed the ears together, clipped, and turned them inside out.
Next I measured for the inner pocket.
I finished off the edge for the pocket.
I measured the rest of the perimeter of the bag and cut out the remaining bottom piece in my black fabric, interfacing, and lining.
Then I sewed the bottom piece to the top on one end, forming a long strip of fabric.
I also sewed the inner pocket to the back piece.
I clipped the ears to allow them to stretch and be sewn in on a curve.
I also stitched the lining to the front piece, keeping the ears out of the way while I did so.
I finished off the first inner seam with bias tape.
I then sewed the side strip to the front piece. Then I closed the strip into a loop.
Then I pinned and stitched it to the back piece.
Beautiful! And then I had trouble getting the zipper open from the inside... XD
I then finished all the inner seams with bias tape.
Gorgeous! Then I made the strap.

 Next time I would use more interfacing in the ears, and main pieces so that it doesn't fold in on itself as much when there is nothing inside.
Next up: Mum's jumper! ;D
Thursday, January 12, 2012
Nikon Applique Sweater
Here's a quick look at how I did the applique on this sweater.
I actually made this on boxing day. Yes, it is completely acceptable to make Christmas presents after Christmas... yes. I mostly just ran out of time between work and other projects.
This is an homage to Nikon for my photographer friend: Mike. :) He has done quite a few photoshoots of our costumes, so, many thanks! I couldn't possibly afford camera equipment as a present, so I made the next best thing! XD
It's not extremely difficult to do applique, but it requires a certain amount of patience to do well, and cannot be rushed. It also requires a lot of thread. So be prepared for that. The last thing you need in the middle of a applique is to run out of thread. Hahaha
I started by printing the letters I wanted at the size I wanted them. I carefully cut them out. And then cut them out of my fabric.
I picked a yellow fabric and thread that matched well. And I bought this black sweater from Bluenotes. I through the sweater in the washer and dryer to shrink it up a bit. it is important to do this before you start the applique otherwise the letters may look weird after you wash it.
I marked the height I wanted them at and the center of the garment.
I placed the letters and then traced them with a white pencil crayon. I pinned the N into position and set my machine to a really tight zig-zag stitch.
By following the outline of the letters, you can get a clean crisp edge. The important thing is to go slowly and to not stretch the fabric underneath, otherwise the letters go wonky. I messed up a bit on the I, but it looked alright, so I continued.
And there you have it. This process is neither quick nor easy, but it looks fantastic! :D
Comments, feedback, & questions are always appreciated! :D
I actually made this on boxing day. Yes, it is completely acceptable to make Christmas presents after Christmas... yes. I mostly just ran out of time between work and other projects.
This is an homage to Nikon for my photographer friend: Mike. :) He has done quite a few photoshoots of our costumes, so, many thanks! I couldn't possibly afford camera equipment as a present, so I made the next best thing! XD
It's not extremely difficult to do applique, but it requires a certain amount of patience to do well, and cannot be rushed. It also requires a lot of thread. So be prepared for that. The last thing you need in the middle of a applique is to run out of thread. Hahaha

I started by printing the letters I wanted at the size I wanted them. I carefully cut them out. And then cut them out of my fabric.
I picked a yellow fabric and thread that matched well. And I bought this black sweater from Bluenotes. I through the sweater in the washer and dryer to shrink it up a bit. it is important to do this before you start the applique otherwise the letters may look weird after you wash it.
I marked the height I wanted them at and the center of the garment.
I placed the letters and then traced them with a white pencil crayon. I pinned the N into position and set my machine to a really tight zig-zag stitch.
By following the outline of the letters, you can get a clean crisp edge. The important thing is to go slowly and to not stretch the fabric underneath, otherwise the letters go wonky. I messed up a bit on the I, but it looked alright, so I continued.
And there you have it. This process is neither quick nor easy, but it looks fantastic! :D
Comments, feedback, & questions are always appreciated! :D
Wednesday, January 11, 2012
Dread Knot - Yarn Necklace
 Greetings! Here is an in depth look at how I made what I am now referring to as the 'Dread Knot'. Why such an awesome name? Because I decreed it. >:D
This was an experiment that I am rather pleased with. Very classy, but cozy and awesome. I wanted to make a chunky scarf/necklace thing without knitting for weeks on end. This is the result. :D
I chose 3 colours of yarn that I thought had both good contrast and went well together. The yarn I chose was a thick soft yarn that reminded me a bit of dreadlocks.
I looped the yarn around in circles alternating the colours until I found the right combination, length and thickness. I made the main colour purple, with green as secondary and white/cream as the accent. I made sure there was enough left at the ends to knot it and finish it off, while still hanging where I wanted it to.
I separated the colours and then cut the loops into strands all approximately the same length.
I divided the yarn into 3 equal groups with varying amounts of each colour. The knots on the end is a bad idea. I tied them too tight and it was a bit of an effort to get them undone, damaging the ends of the yarn more quickly.
I tied an elastic band around the 3 groups and twisted them around until I found the look I was going for. I then tied the other end with an elastic band.
I flattened it out and used bias tape to sew the ends together so it wouldn't fall apart. The bias tape acted as a barrier to prevent the yarn from getting sucked into the sewing machine.
I then hand stitched the ends into circles, so they were more compact and easier to work with.
I found a large wooden bead and braided it into a sort of rope to wrap around and cover the bias tape. The bead would act as a fastener, as I made a loop for the other end of the scarf. These 'ropes' hide the bias tape and finish the piece.
And there you have it. I don't think the knots for the fasteners are quite as firm as I would like, but as I said: it's an experiment.
This project used only about 1/3 to 1/2 of the yarn I bought, so with the 3 skeins, you can make more than one scarf. I'm thinking about making one for myself... :D
It can be worn in a few different ways: you can put the knot at the front, or the back, and twisting it to different degrees gives it a different look.
Subscribe to:
Comments (Atom)


